Clothing

Bulky Diagonal Hat

5 February 2014

bulkydiagonal

This is a beanie hat for bulky yarn with a diagonal purl texture. Directions are given for seven sizes.

Sizes:

SizeCircumference (Inches)Height (Inches)Ounces of yarnYards of yarn
12 month15.56.52.4174.77
Toddler16.572.7785.83
Child17.57.53.1597.66
Teen18.7583.55110.25
Small Adult19.758.53.99123.6
Medium Adult2194.44137.71
Large Adult229.254.92152.59

Gauge:
14 stitches and 18 rows = 4 inches in stockinette

Materials:
Bulky weight yarn
Size 10-1/2 (6.5 mm) 47″ circular needle (for magic loop) or set of size 10-1/2 (6.5 mm) double pointed needles
Yarn needle

Abbreviations:
k = knit
p = purl
p2tog = purl two together

Pattern:
Cast on this number of stitches and join to knit in the round. Divide stitches in multiples of 4 between double pointed needles or needles for a magic loop.

12 month = 56
Toddler = 60
Child = 64
Teen = 68
Small Adult = 72
Medium Adult = 76
Large Adult = 80

Ribbing: k2, p2 repeated across round for 4 rounds

Repeat each instruction across the round.
Rnd 1: k2, p2
Rnd 2: k1, p2, k1
Rnd 3: p2, k2
Rnd 4: p1, k2, p1

Repeat these four rounds until the hat measures the desired height for size including the ribbing. Begin the crown after a round 4 :
12 month – 4.5″ high
Toddler – 5″ high
Child – 5.5″ high
Teen – 6″ high
Small Adult – 6.5″ high
Medium Adult – 7″ high
Large Adult – 7.25” high

Crown:
Repeat across the round
Rnd 1: k1, p2tog, p1
Rnd 2: p2, k1
Rnd 3: k1, p2tog
Rnd 4: p1, k1
Rnd 5: p2tog
Rnd 6: p
Rnd 7: p2tog

Cut the yarn with several inches to work with. With a yarn needle, pull the yarn through all the remaining loops, secure and weave in end.

Edits:
12/17/2015 – replaced a broken link for Magic Loop method

Basic Bulky Beanie Hat

4 February 2014

bulkybasic

This is a very basic beanie hat for bulky yarn in four sizes.

Sizes:

SizeCircumference (Inches)Height (Inches)Ounces of yarnYards of yarn
18 month16.2571.6856.2
Small Child17.57.51.9364.52
Small Adult20.58.752.6387.82
Large Adult23.25103.44114.7

Gauge:
14 stitches and 18 rows = 4 inches in stockinette

Materials:
Bulky weight yarn
Size 10-1/2 (6.5 mm) 47″ circular needle (for magic loop) or set of size 10-1/2 (6.5 mm) double pointed needles
Yarn needle

Abbreviations:
k = knit
p = purl
k2tog = knit two together
ssk = slip one knitwise, slip one knitwise, insert left needle into front of both slipped stitches and knit.

Pattern:
Cast on this number of stitches and join to knit in the round. Divide stitches between double pointed needles or needles for a magic loop.

18 month = 56, Divide with multiples of 8 on each needle.
Small Child = 60, Divide with multiples of 10 on each needle.
Small Adult = 72, Divide with multiples of 12 on each needle.
Large Adult = 80, Divide with multiples of 16 on each needle.

Ribbing: k2, p2 repeated across round for 6 rounds

Knit until the hat measures the desired height for size including the ribbing:
18 month – 5″ high
Small Child – 5.5″ high
Small Adult – 6.75″ high
Large Adult – 7″ high

Crown for 56 stitch cast on:
Repeat across the round
Rnd 1: k2, k2tog, ssk, k2
Rnd 2: k
Rnd 3: k1, k2tog, ssk, k1
Rnd 4: k
Rnd 5: k2tog, ssk
Rnd 6: k2tog

Crown for 60 stitch cast on:
Repeat across the round
Rnd 1: k3, k2tog, ssk, k3
Rnd 2: k
Rnd 3: k2, k2tog, ssk, k2
Rnd 4: k
Rnd 5: k1, k2tog, ssk, k1
Rnd 6: k
Rnd 7: k2tog, ssk
Rnd 8: k2tog

Crown for 72 stitch cast on:
Repeat across the round

Rnd 1: k4, k2tog, ssk, k4
Rnd 2: k
Rnd 3: k3, k2tog, ssk, k3
Rnd 4: k
Rnd 5: k2, k2tog, ssk, k2
Rnd 6: k
Rnd 7: k1, k2tog, ssk, k1
Rnd 8: k
Rnd 9: k2tog, ssk
Rnd 10: k2tog

Crown for 80 stitch cast on:
Repeat across the round
Rnd 1: k6, k2tog, ssk, k6
Rnd 2: k
Rnd 3: k5, k2tog, ssk, k5
Rnd 4: k
Rnd 5: k4, k2tog, ssk, k4
Rnd 6: k
Rnd 7: k3, k2tog, ssk, k3
Rnd 8: k
Rnd 9: k2, k2tog, ssk, k2
Rnd 10: k
Rnd 11: k1, k2tog, ssk, k1
Rnd 12: k
Rnd 13: k2tog, ssk
Rnd 14: k2tog

Cut the yarn with several inches to work with. With a yarn needle, pull the yarn through all the remaining loops, secure and weave in end.

Edits:
11/19/2014 – corrected division of stitches multiples. Changed Young Adult cast on to 72 and changed Crown for Young Adult.
12/17/2015 – replaced a broken link for Magic Loop method.

Climbing Frame Hat for Straight Needles

2 February 2014

This hat has an interesting texture with a little cabling that can be done without a cable needle. Directions are given for several sizes. This version is for straight needles. Go to this page for the in-the-round version.

Sizes:

SizeCircumference (Inches)Height (Inches)Ounces of yarnYards of yarn
Toddler155.51.1457.09
Child16.7561.4170.49
Small Adult18.256.751.7185.29
Medium Adult207.252.03101.5
Large Adult21.757.752.38119.12
Extra-Large Adult23.258.52.76138.15

Gauge: 17 stitches and 23 rows = 4 inches in stockinette

Materials:
worsted weight yarn (see chart above for amount)
Size 8 (5 mm) needles
Yarn needle

Abbreviations:
k = knit
p = purl
c2f = cable 2 front – Slip the next stitch onto cable needle and hold in front of work. Knit the next stitch from left-hand needle, knit the stitch from the cable needle.
c2b = cable 2 back – Slip the next stitch onto cable needle and hold in back of work. Knit the next stitch from left-hand needle, knit the stitch from the cable needle.
k2tog = knit two together
ssk = slip one knitwise, slip one knitwise, insert left needle into front of both slipped stitches and knit.

The c2f and c2b can be made without a cable needle. There are several methods for doing that. I have a video of my method.

Pattern:
Amount to cast on for the different sizes:
Toddler = 73
Child = 81
Small Adult = 89
Medium Adult = 97
Large Adult = 105
Extra-Large Adult = 113

Repeat instructions between * across the round:

Row 1: k1, p2, * k2, p2 *, k2
Row 2: p2, * k2, p2 *, k2, p1
Rows 3 to 8: repeat the first two rows three times to complete 8 rows of ribbing.
Row 9: k
Row 10: k4, * p2, k6 *, p2, k3
Row 11: k2, c2b, c2f, * k4, c2b, c2f *, k3
Row 12: p

Repeat these four rows until the hat measures the desired height for size (ending with a row 4):
Toddler – 3.5″ high
Child – 4″ high
Small Adult – 4.75″ high
Medium Adult – 5.25″ high
Large Adult – 5.75″ high
Extra-Large Adult – 6.5″ high

Crown: Repeat between * across the row
Row 1: * k2, k2tog, ssk, k2 * k1
Row 2: k3, * p2, k4 *, p2, k2
Row 3: k1, c2b, c2f, * k2, c2b, c2f *, k2
Row 4: p
Row 5: * k1, k2tog, ssk, k1 * k1
Row 6: k2, * p2, k2 *, p2, k1
Row 7: * c2b, c2f * k1
Row 8: p
Row 9: * k2tog, ssk * k1
Row 10: p
Row 11: * k2tog * k1

Cut the yarn with several inches to work with.  With a yarn needle, pull the yarn through all the remaining loops, secure, stitch seam and weave in end.

Afghans for Afghans 2013

2 February 2014

Afghan2013

Afghans for Afghans provides hand knitted wool socks and hand knitted or crocheted wool mittens, hats and sweaters to children in Afghanistan. In January 2013, I donated two sets of mittens and two hats.

The blue mittens are made from handspun wool made by the friend of a friend. The green mittens are made from Patons North America Classic Wool Worsted. Both are made from the pattern Basic Pattern for Children’s Mittens.

I didn’t have the label from the orange yarn, but know it is 100% wool worsted weight. The brown yarn is Cascade Yarns Cascade 220. The had with the brown band is from the pattern Basic Ribbed Hat and the solid orange hat is from the pattern Simple Lines Baby Hats.

Warm Hands, Warm Hearts 2012

2 February 2014

 
During December 2012 the office in which my husband works had a drive to collect gloves, hats and scarves for Warm Hands, Warm Hearts.

climbing200-CopyThis yarn is Caron Simply Soft Heather. The pattern is Climbing Frame Hat.
grannyscarf200-CopyThis was made from a single skein of Red Heart Light & Lofty Multi that I had in my stash. The pattern is Quick Granny Check Scarf.
lacyscarf200-CopyI made this scarf and hat from some Red Heart Plush Solid in my stash. The scarf pattern is Quick Lacy Shell Scarf. The hat is just a simple roll brim knitted hat I made to use up the rest of the yarn.
quickshellscarf200This scarf is made from some Yarn Bee Topkapi I had in my stash. The pattern is Quick Shell Scarf.
stripescarf200I had these two skeins of Lion Brand Chenille Sensations in my stash and made this simple scarf. It is just double crochet and I used any last yarn for fringe.
twisted200This hat is made with Lion Brand Wool-Ease. The pattern is Cable With a Twist Hat.

crazyblockscarves - Copy

The scarf on the left is made of Bernat Boucle remnants I had in my stash. The one on the right is made of Jo-Ann Sensations Marvel. Both are with the pattern Quick Crazy Block Scarf.

scarves

These are all scarves I had made some time ago.

quickv

These are both made from single skeins of Lion Brand Jiffy. The pattern is Quick V-stitch Scarf.

telltale

This one is made from Lion Brand Jiffy Thick & Quick. The pattern is Tall Tale Scarf by Lion Brand Yarn.

Textured Baby Hats for Straight Needles

8 November 2013

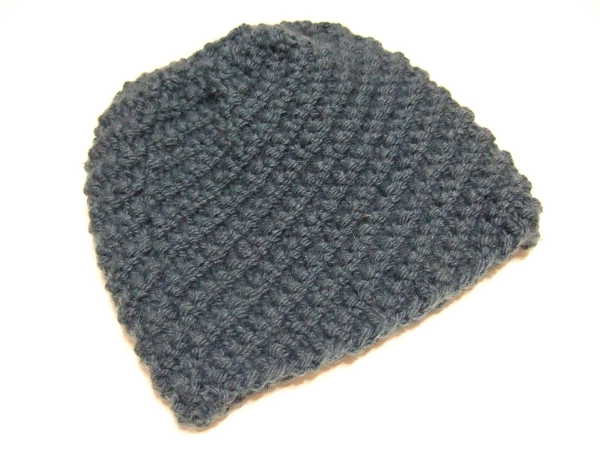
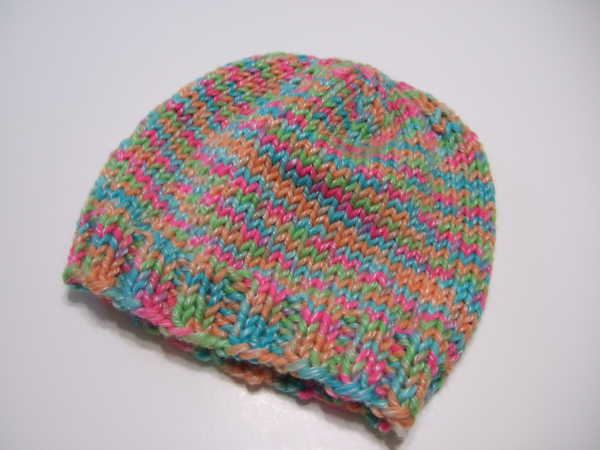
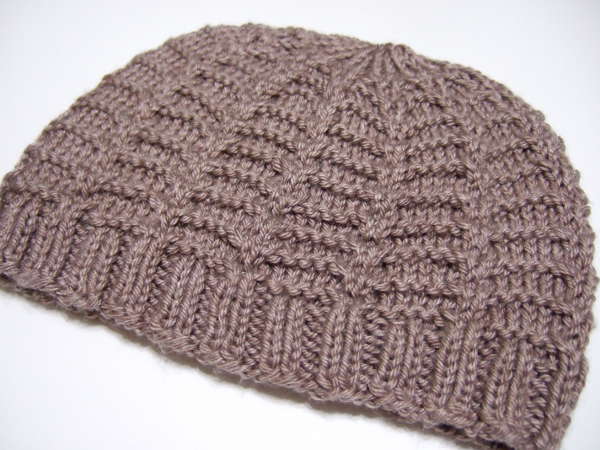
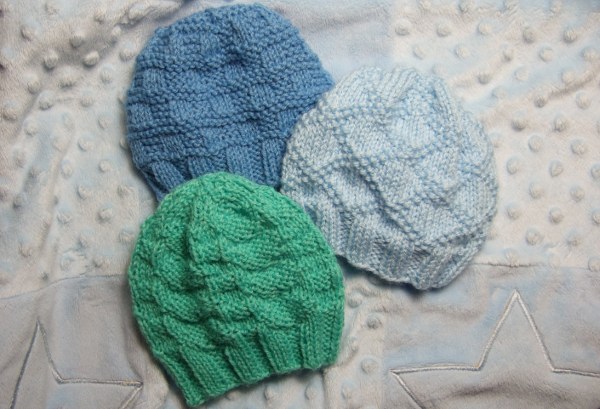
These three hats all begin with the same ribbing and can be completed with the Little Check pattern (darker blue), King Charles Brocade (light blue) or the English Diamond Block pattern (green). Instructions are given for preemie and newborn sizes.

These instructions are for straight needles. See this alternate pattern for in-the-round instructions.

There are patterns available for coordinating blankets for the King Charles Brocade and the Little Check.

Sizes:
Preemie – 10″ circumference
Newborn – 12″ circumference

Gauge:
22 stitches and 30 rows = 4 inches in stockinette

Materials:
0.5 to 0.6 oz (40 to 50 yards) of DK weight baby yarn
Size 6 (4 mm) needles
Yarn needle

Abbreviations:
k = knit
p = purl
k2tog = knit two together
k3tog = knit three together
p3tog = purl three together
ssk = slip one knitwise, slip one knitwise, insert left needle into front of both slipped stitches and knit.
s2kp2sso = slip2 (together, knitwise), k1, pass 2 slipped stitches over

Cast on and Ribbing (same for all three hats):
Cast on 61 for preemie size or 73 for newborn.

Repeat instructions between * across row.

Ribbing (6 rows for preemie size, 8 rows for newborn size):
Row 1: * k3, p3 * k1
Row 2: p1 * k3, p3 *

Body and Crown:
Little Checks

Repeat instructions between * across row.
Row 1 (right side): * k *
Row 2: * k *
Row 3: * k *
Row 4: k1 * p3, k3 *
Row 5: * k *
Row 6: k1 * p3, k3 *
Row 7: * k *
Row 8: * k *
Row 9: * k *
Row 10: * k *
Row 11: * k *
Row 12: k1 * p3, k3 *
Row 13: * k *
Row 14: k1 * p3, k3 *
Row 15: * k *
Row 16: * k *
Rows 17-30: repeat rows 1-14
Row 31: * s2kp2sso, k9 * k1
Row 32: * k *
Row 33: * k4, s2kp2sso, k3 * k1
Row 34: * k *
Row 35: * k1, s2kp2sso, k4 * k1
Row 36: k1 * p3, k1, p1, k1 *
Row 37: * k3, s2kp2sso * k1
Row 38: k1 * p1, k1 *
Row 39: * s2kp2sso, k1 * k1
Cut the yarn with several inches to work with. With a yarn needle, pull the yarn through all the remaining loops, secure, seam edges together, secure and weave in end.

King Charles Brocade

Repeat instructions between * across row.
Row 1: * k9, p1, k1, p1 * k1
Row 2: k1 * p1, k1, p1, k1, p7, k1 *
Row 3: * k1, p1, k5, p1, k1, p1, k1, p1 * k1
Row 4: k1 * p3, k1, p1, k1, p3, k1, p1, k1 *
Row 5: * k1, p1, k1, p1, k1, p1, k1, p1, k4 * k1
Row 6: p1 * p5, k1, p1, k1, p1, k1, p2 *
Row 7: * k3, p1, k1, p1, k6 * k1
Row 8: as row 6
Row 9: as row 5
Row 10: as row 4
Row 11: as row 3
Row 12: as row 2
Rows 13-24: repeat rows 1-12
Rows 25-30: repeat rows 1-6
Row 31: * k2, p2tog, k1, p2tog, k5 * k1
Row 32: p1 * p4, k1, p1, k1, p1, k1, p1 *
Row 33: * k1, p2tog, k1, p2tog, k4 * k1
Row 34: k1 * p3, k1, p1, k1, p1, k1 *
Row 35: * p2tog, k1, p2tog, k3 * p1
Row 36: p1 * p4, k1, p1 *
Row 37: * p1, k1, p1, k3tog * p1
Row 38: p1 * k1, p1 *
Row 39: * p3tog, k1 * p1
Cut the yarn with several inches to work with. With a yarn needle, pull the yarn through all the remaining loops, secure, seam edges together, secure and weave in end.

English Diamond Block Pattern

Repeat instructions between * across row.
Row 1 (right side): * k4, p1, k4, p3 * k1
Row 2: p1 * k3, p3, k3, p3 *
Row 3: * k2, p5, k5 * k1
Row 4: p1 * p4, k7, p1 *
Row 5: * p9, k3 * p1
Row 6: as row 4
Row 7: as row 3
Row 8: as row 2
Rows 9-24: repeat rows 1-8 twice
Rows 25-30: repeat rows 1-6
Row 31: * k2, p5, k2, k3tog * k1
Row 32: p1 * k1, p3, k3, p3 *
Row 33: * k3, p3tog, k3, p1 * k1
Row 34: p1 * k1, p2, k3, p2 *
Row 35: * k2, p3tog, k3 * k1
Row 36: p1 * p2, k3, p1 *
Row 37: * p1, p3tog, p1, k1 * p1
Row 38: p1 * p2, k1, p1 *
Row 39: * k3tog, k1 * k1
Cut the yarn with several inches to work with. With a yarn needle, pull the yarn through all the remaining loops, secure, seam edges together, secure and weave in end.

Edits:

1/14/2014 – corrected row 6 of King Charles Brocade

Quick Asymmetric Shell Scarf

6 October 2013

asymmetricshellscarf

One skein of  homespun or bouclé or other knobby style yarn can easily be transformed into this quick scarf. This scarf does not require finding chain stitches, even for the first row. The lacy shells keep the scarf light even with a heavier yarn.

This pattern was designed to be easy for homespun or bouclé style yarns, but it can be made with just about any yarn. Make it in a solid color or with as many color changes as you like.

The example is made in Patons Divine.

Size:
The example is 7″ by 40″, but can be easily adjusted to make other sizes.

Materials:

The example was made with 142 yards/100 grams of bulky yarn. If another weight of yarn is used, use a hook size appropriate for the yarn.
Size J (6mm) crochet hook

Abbreviations:
ch = chain
ch sp = chain space
dc = double crochet
tr = triple crochet

Instructions:
Instead of a beginning chain, the scarf is begun with a first row of chain and tr spaces.

There is also a tutorial video available.

The example was begun with 7 tr/ch spaces.

Row 1: Ch 3, tr in first ch, (ch 3, tr in last ch sp) until you have made desired number of tr/ch spaces, making an odd number of them.

Do not turn.

Row 2: Ch 3. Without turning the work, make a dc over tr just made. Working across the tr stitches, (4 dc, ch 2, 1 dc) over next tr, ** skip 1 tr, (4 dc, ch 2, 1 dc) over next tr . Repeat from ** across to the last tr stitch. Work (1 dc, ch 1, 1 dc) over last tr.

Row 3: Ch 3 and turn. Dc in ch-1 sp. In each ch-2 sp across the row, make 4 dc, ch 2, 1 dc. (Dc, ch 1, dc) in ch-3 space at end of row.

Repeat row 3 until scarf is desired length. Complete with this last row:

Last Row: Ch 3 and turn. Dc in ch-1 sp, ch 2, sc in ch-2 of shell, ** ch 3, dc in sp between shells, ch 3, sc in ch-2 of next shell. Repeat from ** across all the shells. Ch 2, (dc, ch 1, dc) in ch-3 space at end of row.Finish off and weave in end.

The scarf can be made in a solid color or can be made with any number of color changes. The best way to make a color change is to finish all but the very last pull through of the two loops of the last stitch of a row. Cut yarn with a few inches of tail and join with new color next to stitch. Pull new color through last two loops. Weave in ends.

Quick Crazy Block Scarf

29 September 2013

crazyblockscarf

Make good use of those single skeins of homespun or bouclé or other knobby style yarns that have been just sitting in your stash. This scarf does not require finding chain stitches, even for the first row. Every side has a fun and pretty zig-zag shape.

This pattern was designed to be easy for homespun or bouclé style yarns, but it can be made with just about any yarn. Make it in a solid color or with as many color changes as you like.

The scarf on the left is made from Bernat Soft Bouclé, a bulky weight acrylic yarn. The scarf on the right is made from Jo-Ann Sensations Marvel, a super bulky wool yarn.

Size: The scarf on the left is 6″ by 45″. The scarf on the right is 8″ by 48″.

Materials:
Yarn – The scarf on the left was made with 148 yards/80 grams of Bernat Soft Bouclé. The scarf on the right was made with 196 yards/200 grams of Jo-Ann Sensations Marvel.
The scarf on the left was made with Size I (5.5mm) crochet hook. The scarf on the right was made with Size N (10mm) crochet hook. Use the appropriate sized hook for the yarn you choose to use.

Abbreviations:
ch = chain
ch sp = chain space
dc = double crochet
sc = single crochet
sl st = slip stitch

Instructions:

Instead of a beginning chain, the scarf is begun with a first row of blocks.

The scarf on the left was begun with 4 blocks. The scarf on the right was begun with 5 blocks. Start with the number of blocks to make the scarf whatever width you desire.

There is a photo tutorial, chart and a video demonstrating the technique of this pattern.

Row 1 Block: Chain 6. Join with a sl st in first chain. Chain 3. 2 dc in ch 6 sp.
Make these blocks until desired width.

Do not turn.

Row 2: Ch3. Without turning the work, rotate so that the following is worked across the chain loops created in the first row. In each of the chain spaces, (sc, ch3, 3dc) in ch sp.

Row 3: Ch 3 and turn. In each of the chain spaces, (sc, ch3, 3dc) in ch sp.

Repeat row 3 until afghan is desired length. Finish off and weave in end.

The scarf can be made in a solid color or can be made with any number of color changes. The best way to make a color change is to finish all but the very last pull through of the two loops of the last stitch of a row. Cut yarn with a few inches of tail and join with new color next to stitch. Pull new color through last two loops. Weave in ends.

Quick Lacy Shell Scarf

29 September 2013

lacyshellscarf

This is a great use of those single skeins of homespun or bouclé or other knobby style yarn you have in your stash. This scarf does not require finding chain stitches, even for the first row. The lacy shells keep the scarf light even with a heavier yarn.

This pattern was designed to be easy for homespun or bouclé style yarns, but it can be made with just about any yarn. Make it in a solid color or with as many color changes as you like.

The example is made in Red Heart Plush, an Aran weight plush textured yarn.

Size: The example is 10.5″ by 49″, but can be easily adjusted to make any size.

Materials:
The example was made with 230.7 yards/141 grams of Red Heart Plush.
Size I (5.5mm) crochet hook, but use hook size appropriate to yarn if other yarn is used.

Abbreviations:
ch = chain
ch sp = chain space
dc = double crochet
sc = single crochet
tr = triple crochet

Special stitch:
Shell – work the following in the ch sp or over stitch indicated: (1 dc, ch 1) three times, 1 dc

Instructions:

Instead of a beginning chain, the scarf is begun with a first row of chain and tr spaces.

The example was made with 9 tr/ch spaces. You can make the scarf narrower or wider by decreasing or increasing the number of tr/ch spaces.

Row 1: Ch 5, sc in first ch, (ch 3, tr in last ch sp) odd number of times, ch 3, dc in last ch sp.

Do not turn.

Row 2: Ch 1. Without turning the work, sc over dc just made. Working across the tr stitches, ch 1, shell over first tr, ch 1, ** sc over next tr, ch 1, shell over next tr, ch 1. Repeat from ** across all the tr stitches. Sc in ch 5 sp at end of row.

Row 3: Ch 4 and turn. Sc in first ch-1 sp of first shell, ch 3, sc in third ch-1 sp of same shell, ** ch 3, sc in first ch-1 sp of next shell, ch 3, sc in third ch-1 sp of same shell. Repeat from ** across all the shells. Ch 2, dc in ch space from row before shell row.

Row 4: Ch 1 and turn. Sc in ch-2 sp. Ch 1, shell in first ch-3 sp, ch 1, ** sc in next ch-3 sp, ch 1, shell in next ch-3 sp, ch 1. Repeat from ** across all the ch-3 spaces. Sc in ch 4 sp at end of row.

Repeat row 3 and 4 until scarf is desired length.

For straight sides – End with a row 3. Finish off and weave in end.

For scalloped sides – You will need to have an odd number of shell rows. End with a row 4. In same ch sp, ch 1, shell, ch 1, sc. Working across the ch-4 spaces on the side, (ch 1, shell in next ch-4 sp, ch 1, sc in next ch-4 sp). At the last ch-4, after the sc, also work, ch 1, shell, ch 1, sc. Working across bottom of afghan in the ch-3 spaces, (ch 1, shell in next ch-3 sp, ch 1, sc in next ch-3 sp). After the last sc, in same sp also work, ch 1, shell, ch 1, sc. Working across last side of dc stitches,  (ch 1, over next dc, ch 1, sc over next dc). At last corner also work, ch 1, shell, ch 1. Join with sc from the beginning of the last row 4. Finish off and weave in end.

The scarf can be made in a solid color or can be made with any number of color changes. The best way to make a color change is to finish all but the very last pull through of the two loops of the last stitch of a row. Cut yarn with a few inches of tail and join with new color next to stitch. Pull new color through last two loops. Weave in ends.

Edits:
1/23/2017 – changed “over” to “in” on row 4.

Quick Shell Scarf

29 September 2013

quickshellscarf

Do you have some single skeins of homespun, bouclé or ribbon yarn and you haven’t found a purpose for it? Crocheting with textured and specialty yarns can be frustrating because sometimes it is hard to find stitches. This scarf does not require finding chain stitches, even for the first row.

This pattern was designed to be easy for homespun or bouclé style yarns, but it can be made with just about any yarn. Make it in a solid color or with as many color changes as you like.

The example is made with Yarn Bee Topkapi, a fuzzy ribbon yarn (DK weight).

Size: The example is 6″ wide and 60″ long but can be adjusted to any size you like.

Materials:
Yarn – example was made using 262 yards/200 grams of Yarn Bee Topkapi.
Size I (5.5mm) crochet hook or size appropriate to yarn used.

Abbreviations:
ch = chain
ch sp = chain space
dc = double crochet
sc = single crochet
tr = treble/triple crochet

Instructions:

There is a tutorial video available for the similar blanket.

Instead of a beginning chain, the scarf is begun with a first row of chain and tr spaces.

The example was made using 7 beginning chain and tr spaces. Make the scarf wider by adding more beginning chain and tr spaces. You need to begin with an odd number.

Row 1: Ch 3, tr in first ch, (ch 3, tr in last ch sp) even number of times.

Do not turn.

Row 2: Ch 4. Without turning the work, 2 dc over tr just made. Working across the tr stitches, (sc, ch 3, sc) over next tr, ** (2 dc, ch 2, 2 dc) over next tr, (sc, ch 3, sc) over next tr. Repeat from ** across all but last tr stitch. Over last tr, 2 dc, 1 tr.

Row 3: Ch 3 and turn. Sc in space between tr and dc. ** (2 Dc, ch 2, 2 dc) in ch-3 sp, (sc, ch3, sc) in ch-2 sp. Repeat from ** across to last 2 dc and turning chain. (Sc, ch 1, dc) in space between 2nd dc and turning chain.

Row 4: Ch 4 and turn. 2 dc in ch-1 sp. (Sc, ch 3, sc) in ch-2 sp, ** (2 dc, ch 2, 2 dc) in ch-3 sp, (sc, ch 3, sc) in ch-2 sp. Repeat from ** across to last ch-3 sp. (2 Dc, 1 tr) in last ch-3 sp.

Repeat row 3 and 4 until scarf is desired length. Finish off and weave in end.

The scarf can be made in a solid color or can be made with any number of color changes. The best way to make a color change is to finish all but the very last pull through of the two loops of the last stitch of a row. Cut yarn with a few inches of tail and join with new color next to stitch. Pull new color through last two loops. Weave in ends.

« Previous PageNext Page »