
Embossed Leaves Hat for Straight Needles

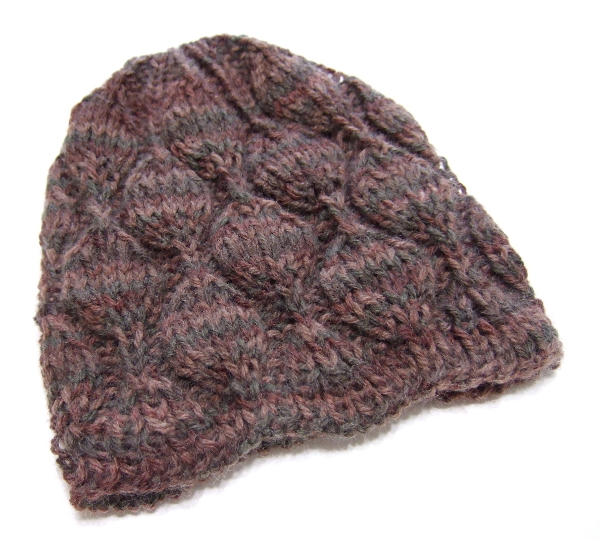
The knit stitch leaves stand out against a purl background, which makes this hat very stretchy. The poles the leaves climb meet very neatly at the crown. The bottom edge has a very slight scallop.
This is a straight needle version of the pattern. See the in-the-round version here.
Sizes: The circumference measurements given are unstretched. This is a very stretchy hat.
| Size | Circumference (Inches) | Height (Inches) | Ounces of yarn | Yards of yarn |
| Baby | 10.75 | 5.5 | 0.62 | 41.13 |
| Toddler | 13.25 | 6.5 | 0.93 | 61.44 |
| Child | 16 | 7.5 | 1.3 | 85.77 |
| Medium Adult | 18.75 | 8.75 | 1.73 | 114.11 |
| Large Adult | 21.25 | 9.75 | 2.22 | 146.46 |
| Extra-Large Adult | 24 | 10.75 | 2.78 | 182.83 |
Gauge: 17 stitches and 23 rows = 4 inches in stockinette
Materials:
worsted weight yarn (see chart above for amount)
Size 8 (5 mm) needles
Yarn needle
Abbreviations:
k = knit
p = purl
m1 = make one: With left needle pick up thread between last and next stitch inserting front to back. With right needle knit back loop.
k2tog = knit two together
ssk = slip one knitwise, slip one knitwise, insert left needle into front of both slipped stitches and knit.
s1k-k2tog-psso = slip1 knitwise, k2tog, pass slipped stitch over
s2kp2 = slip2 (together, knitwise), k1, pass 2 slipped stitches over
Pattern:
Amount to cast on for the different sizes:
Baby = 57
Toddler = 71
Child = 85
Medium Adult = 99
Large Adult = 113
Extra-Large Adult = 127
Repeat instructions between * across the row:
Row 1: k1, * p1, k1 *
Row 2: p1, * k1, p1 *
Row 3: k1, * p1, k1 *
Row 4: p1, * k1, p1 *
Row 5: p1 * p1, m1, k1, m1, p3, k1, p1, s1k-k2tog-psso, p1, k1, p2 *
Row 6: * k2, p1, k1, p1, k1, p1, k3, p3, k1 * k1
Row 7: p1 * p1, k1, m1, k1, m1, k1, p3, ssk, k1, k2tog, p2 *
Row 8: * k2, p3, k3, p5, k1 * k1
Row 9: p1 * p1, k2, m1, k1, m1, k2, p3, s2kp2, p2 *
Row 10: * k2, p1, k3, p7, k1 * k1
Row 11: p1 * p1, k7, p3, k1, p2 *
Row 12: * k2, p1, k3, p7, k1 * k1
Row 13: p1 * p1, ssk , k3, k2tog, p3, m1, k1, m1, p2 *
Row 14: * k2, p3, k3, p5, k1 * k1
Row 15: p1 * p1, ssk, k1, k2tog, p3, k1, m1, k1, m1, k1, p2 *
Row 16: * k2, p5, k3, p3, k1 * k1
Row 17: p1 * p1, s2kp2, p3, k2, m1, k1, m1, k2, p2 *
Row 18: * k2, p7, k3, p1, k1 * k1
Row 19: p1 * p1, k1, p3, k7, p2 *
Row 20: * k2, p7, k3, p1, k1 * k1
Row 21: p1 * p1, m1, k1, m1, p3, ssk, k3, k2tog, p2 *
Row 22: * k2, p5, k3, p3, k1 * k1
Row 23: p1 * p1, k1, m1, k1, m1, k1, p3, ssk, k1, k2tog, p2 *
Row 24: * k2, p3, k3, p5, k1 * k1
Row 25: p1 * p1, k2, m1, k1, m1, k2, p3, s2kp2, p2 *
Repeat rows 10 – 25 until the hat measures 1.75 inches less than desired finished length. Begin crown after a row 12 or a row 20.
Measurements from edge before beginning crown:
Baby – 3.75″ high
Toddler – 4.75″ high
Child – 5.75″ high
Medium Adult – 7″ high
Large Adult – 8″ high
Extra-Large Adult – 9″ high
Crown after a row 12 (repeat between * across the row):
Row 1: p1 * p1, ssk, k3, k2tog, p3, k1, p2 *
Row 2: * k2, p1, k3, p5, k1 * k1
Row 3: p1 * p1, ssk, k1, k2tog, p3, k1, p2 *
Row 4: * k2, p1, k3, p3, k1 * k1
Row 5: p1 * p1, s2kp2, p3, k1, p2 *
Row 6: * k2, p1, k3, p1, k1 * k1
Row 7: p1 * s2kp2, p2, k1, p2 *
Row 8: * k2, p1, k2, p1 * k1
Row 9: p1 * k1, p1, s2kp2, p1 *
Row 10: * k1, p1 * k1
Row 11: k1 *k1, s2kp2 *
Crown after a row 20 (repeat between * across the row):
Row 1: p1 * p1, k1, p3, ssk, k3, k2tog, p2 *
Row 2: * k2, p5, k3, p1, k1 * k1
Row 3: p1 * p1, k1, p3, ssk, k1, k2tog, p2 *
Row 4: * k2, p3, k3, p1, k1 * k1
Row 5: p1 * p1, k1, p3, s2kp2, p2 *
Row 6: * k2, p1, k3, p1, k1 * k1
Row 7: p1 * p1, k1, p2, s2kp2, p1 *
Row 8: * k1, p1, k2, p1, k1 * k1
Row 9: p1 * p1, k1, p1, s2kp2 *
Row 10: * p1, k1 * p1
Row 11: k1 * s2kp2, k1 *
Cut the yarn with several inches to work with. With a yarn needle, pull the yarn through all the remaining loops, secure, seam side, secure and weave in end.
Edits:
12/8/14 – removed references to needles needed for in-the-round knitting


Hi
I know its maybe at bit much to ask but do you do any free hat patterns in Aran or chunky using two needles as are used in a cardigan. I cannot use a round needle or double ended needles as my hands find them hard to manage. I have enough trouble using “normal” needles! I can alter some patterns to do this but not always and I am always getting asked to knit hats and gloves and I like to vary what I do. Cheers Gill
I only have two bulky yarn hat patterns. I would be glad to convert either of these to flat knit patterns if you are interested.
http://stitcheryprojects.com/2014/02/04/basic-bulky-beanie-hat/
http://stitcheryprojects.com/2014/02/05/bulky-diagonal-hat/
Heather I love this pattern and just finished my hat. I was wondering…would you consider writing the same pattern for some fingerless gloves to match this awesome hat?
I haven’t tackled fingerless gloves. I will add this to my list. Thanks for the suggestion.
this says for circular or double pointed needed. can it be done with just, i dont know what they are called im new to knitting, the regular needles?
Thanks for catching that! I should have just said regular needles. When I adapted the pattern from my in-the-round version, I failed to remove that reference.
thank you for clarifying 😀 this will be perfect match for the scarf im making for my daddy. havent seen him in 3 yrs since moving to europe, an wanted something special for this holiday.
I love this pattern! I am looking to make this and a matching scarf. Is this easy enough to just knit into a scarf and not in the round?
Thank you!
Thank you for writing such a lovely pattern!
Just make a little edging of seed or moss stitch and it will make a great scarf.
I’m math impaired. What is the stitch repeat on this pattern? I’d like to make a scarf, too.
It is a repeat of 14. I added 1 so that there would be an extra stitch for the seam on the hat. If you add a few stitches of moss or seed stitch at the edges of this, it would make a lovely scarf.
I am not familiar with magic loop? the hats i have done in the round have used 16″ circular needles. Can i do this pattern on the 16″ needle? Thanks!
I’m sorry it’s taken me so long to respond. The version of this hat that you’ve commented on is the straight needle version which is not done in the round so will have a seam. It can be made on a circular. The in-the-round version can be partially made on a 16″ needle, but once you begin the crown reductions it will get too tight. At that point you will have to either start working back and forth and seam the crown or transfer to some method of in-the-round for small circumferences, such as double pointed needles. I prefer the magic loop method personally, but there are several methods that are documented on the internet for doing it.
Thank you so much for this and all the other patterns you have for free. I just started this hat and although I am able to knit in the round I prefer knitting flat and seaming. To give the option of flat or in the round is great. Thanks again.
Thank you for providing this lovely pattern! I really enjoyed knitting it, it has a nice balance of easy rows along with rows that are trickier but fun to do. The 3-D outcome is beautiful!
I am having a lot of trouble with row 7, I always end up halfway through the pattern at the end of the needle. Can you help?
Absolutely. How many stitches did you cast on? Do you still have that same number of stitches after row 6? To what stitch do you get on the pattern before you run out of stitches to work?
I have double knitting wool, can I use 4mm needles with the amount of stitches for a large adult for a medium adult size hat.
Cast on for the extra large to get the medium size.
Thanks for sharing this pattern! I’m knitting the size with 99 stitches, but I’ve noticed on some rows my last stitch is halfway through the pattern, similar to what someone above described. Is there variation depending on how many stitches you cast on or should it match up with all the sizes?
In each size the repeat of 14 stitches is repeated a different number of times. For the 99 stitch cast on, that is the 1 extra stitch for the seam and 7 repeats of the 14 stitches. If you know which rows are not coming out right, that would probably give me a clue about what is happening. Another thing you could try is to put a stitch marker after each repeat so you will know if you get off count.
Everyone loves this pattern! I knitted it for my daughter and then had requests from my sister. The most popular hat pattern I have knitted EVER! Love that even though it is knitted on straight needles, the join with the pattern is almost invisible. Still, I am going to try the hat knitted in the round, of course using magic loop as I’m done with juggling four needles.
Thank you for this wonderful pattern. Years later, still knitting it.