
Basic Ribbed Hat

This is a very basic k1-p1 ribbed hat with tailored crown. Directions are given for seven sizes.
Sizes:
The circumferences are given for the hat unstretched. It is a very stretchy hat.
| Size | Circumference (Inches) | Height (Inches) | Ounces of yarn | Yards of yarn |
| Newborn | 8.75 | 6.5 | 0.88 | 54.54 |
| 6 months | 10 | 7 | 1.1 | 68.44 |
| 12 months | 11.25 | 7.75 | 1.35 | 83.88 |
| Toddler | 12.5 | 8.25 | 1.62 | 100.83 |
| Child/Small Adult | 13.75 | 9 | 1.92 | 119.32 |
| Medium Adult | 15 | 9.5 | 2.24 | 139.33 |
| Large/XL Adult | 16.25 | 10.25 | 2.59 | 160.88 |
Gauge: 17 stitches and 23 rows = 4 inches in stockinette
Materials:
Worsted weight yarn (see chart above for amount)
Size 8 (5 mm) 47″ circular needle (for magic loop) or set of size 8 (5 mm) double pointed needles
Yarn needle
Abbreviations:
k = knit
p = purl
s2kp2 – slip2 (together, knitwise), k1, pass 2 slipped stitches over
Pattern:
Amount to cast on for the different sizes:
Newborn = 56
6 months = 64
12 months = 72
Toddler = 80
Child/Small Adult = 88
Medium Adult = 96
Large/XL Adult = 104
Join to knit in the round. Divide stitches evenly among four double pointed needles or needles for a magic loop.
Repeat instructions across the round:
Ribbing: k1, p1
Continue this ribbing pattern until the hat measures as follows for size. Begin the crown at round given for size:
Newborn – 5.5″ high, begin crown on round 7
6 months – 5.75″ high, begin crown on round 6
12 months – 6.25″ high, begin crown on round 5
Toddler – 6.5″ high, begin crown on round 4
Child/Small Adult – 7.25″ high, begin crown on round 3
Medium Adult – 7.5″ high, , begin crown on round 2
Large/XL Adult – 8.25″ high, begin crown on round 1
Crown: Repeat across the round
Rnd 1: *(k1,p1) 6 times, s2kp2, p1, (k1, p1) 5 times*. Repeat *to* 3 more times. (96 stitches)
Rnd 2: *(k1,p1) 5 times, k1, s2kp2, (k1, p1) 5 times*. Repeat *to* 3 more times. (88 stitches)
Rnd 3: *(k1,p1) 5 times, s2kp2, p1, (k1, p1) 4 times*. Repeat *to* 3 more times. (80 stitches)
Rnd 4: *(k1,p1) 4 times, k1, s2kp2, (k1, p1) 4 times*. Repeat *to* 3 more times. (72 stitches)
Rnd 5: *(k1,p1) 4 times, s2kp2, p1, (k1, p1) 3 times*. Repeat *to* 3 more times. (64 stitches)
Rnd 6: *(k1,p1) 3 times, k1, s2kp2, (k1, p1) 3 times*. Repeat *to* 3 more times. (56 stitches)
Rnd 7: *(k1,p1) 3 times, s2kp2, p1, (k1, p1) 2 times*. Repeat *to* 3 more times. (48 stitches)
Rnd 8: *(k1,p1) 2 times, k1, s2kp2, (k1, p1) 2 times*. Repeat *to* 3 more times. (40 stitches)
Rnd 9: *(k1,p1) 2 times, s2kp2, p1, k1, p1*. Repeat *to* 3 more times. (32 stitches)
Rnd 10: *k1, p1, k1, s2kp2, k1, p1*. Repeat *to* 3 more times. (24 stitches)
Rnd 11: *k1, p1, s2kp2, p1*. Repeat *to* 3 more times. (16 stitches)
Rnd 12: *k1, s2kp2*. Repeat *to* 3 more times. (8 stitches)
Cut the yarn with several inches to work with. With a yarn needle, pull the yarn through all the remaining loops, secure and weave in end.
Edits:
12/17/2015 – replaced a broken link for Magic Loop method
10/23/2016 – added stitch counts to crown rows
1/1/2017 – modified crown directions for clarity


Could this pattern be used on straight needles.
Thanks,
Pam
Theoretically. The reverse equivalent of the s2kp2 stitch is a bit tricky. To make the purl equivalent of that stitch is as follows – with fingers or cable needle, slip first stitch off the needle and hold to the front. Slip next stitch to other needle. Return slipped stitch back to needle. Purl it together with the next stitch. Pass the slipped stitch over the just purled stitch.
There may be a better way of achieving that stitch they maybe a more experienced knitter will tell us about. If you are up for doing that stitch then I will work on writing up a straight needle version of the pattern.
I would love to do this hat, but I am a beginner and I would rather do my knitting on straight needles. Could you write up a straight needle version of this pattern. Thanks
The reverse equivalent of the s2kp2 stitch is a bit tricky. To make the purl equivalent of that stitch is as follows – with fingers or cable needle, slip first stitch off the needle and hold to the front. Slip next stitch to other needle. Return slipped stitch back to needle. Purl it together with the next stitch. Pass the slipped stitch over the just purled stitch.
There may be a better way of achieving that stitch they maybe a more experienced knitter will tell us about. If you are up for doing that stitch then I will work on writing up a straight needle version of the pattern.
Hi, circular needles are great for beginners. They help keep your stitches on, store the piece well between sessions. It is easy to use them.
Knitting this on straight needles sounds challenging for a beginner. Try a pattern made for straight needles. I am a beginner knitter. First hat I made was Israeli Soldier hat available for free on Ravelry.
Thank you for this simple hat! I’m a little tired of the hats with the I-cord topknots, or the cutesy this or that baby hats.
Romans 10:9-13
Not sure of the repeats on the crown section. It seems like on the 6, 8, 10 and 12 row I have enough stitches for an extra decrease. Not sure if I should be doing that decrease or just knit the extra stitches at the end of the round. Hope that makes sense. Love all your patterns. Knitting this hat in 6 months size for my grandson.
For the 6 month size you have 64 stitches before starting the decreases and you start the decreases with the 6th rnd.
This hat has 4 decreases, so for 64 stitches this would be 4 repeats of 16. Counting the stitches on Rnd 6 –
Rnd 6: (k1,p1) 3 times, k1, s2kp2, (k1, p1) 3 times
6 + 1 + 3 + 6 = 16
So you should be repeated those instructions exactly 4 times.
Dont knit with four needles. need patern for two needles.
The reverse equivalent of the s2kp2 stitch is a bit tricky. To make the purl equivalent of that stitch is as follows – with fingers or cable needle, slip first stitch off the needle and hold to the front. Slip next stitch to other needle. Return slipped stitch back to needle. Purl it together with the next stitch. Pass the slipped stitch over the just purled stitch.
There may be a better way of achieving that stitch they maybe a more experienced knitter will tell us about. If you are up for doing that stitch then I will work on writing up a straight needle version of the pattern.
There is no difference between knitting with straight or circulars, except that with circular needles you NEVER drop one, or lose one! Try it, you’ll like it. Another thing, straight needles are very hard on your hands and fingers, whereas circulars are very flexible, except for the tips. If you need to use four needles, you have that in two circulars….. magic, huh?
Enjoy,
Jan
I love this picture of the Basic Ribbed Hat, and I knit for charity. However, I only know how to knit on straight needles.
Can you help me? Thanks in advance.
Carolyn
ps: what is URI?
The reverse equivalent of the s2kp2 stitch is a bit tricky. To make the purl equivalent of that stitch is as follows – with fingers or cable needle, slip first stitch off the needle and hold to the front. Slip next stitch to other needle. Return slipped stitch back to needle. Purl it together with the next stitch. Pass the slipped stitch over the just purled stitch.
There may be a better way of achieving that stitch they maybe a more experienced knitter will tell us about. If you are up for doing that stitch then I will work on writing up a straight needle version of the pattern.
As for URL, that is another term for web address. It is not a required field, but there if someone wanted to share their blog address.
The reason you must use circulars and/or double pointed needles is that the area is to short and impossible to work on needles. The only other way I can think of us to use another set of needles because of how small the opening is. Hopse that helps.
Thank You very much for the free Basic Ribbed Hat pattern. I di notice a mistake in the pattern it calls for 47 inch circular needles, should that be cm
Keep up the good work
Cindy
I did actually mean 47″, which is an extra long circular. The main body of the hat can be worked on a small circular such as a 16″, but once you get into the crown reductions, you would either need to transition to double pointed needles or to some other method of knitting in the round with a small circumference. My preferred method for this is the magic loop method, which requires an extra long circular needle.
Love your pattern. It is so simple to follow. I have been thinking of creating a seed stitch brim for a man’s hat, but cannot find a pattern. Do you think this could be adapted by knitting a seed stitch for first 4 inches and then reverting to the original pattern?
It depends on the effect you are going for. Seed stitch makes a less stretchy fabric than ribbing. The ribbing portion would pull in and be snug to the head and the seed stitch portion would be larger and looser to the head.
Having a hard time with finishing. Understanding the rounds such as round 5. with the 72 stitches. How do I do this? stumped! or maybe I am making this to hard to understand. Please help
Is the question how to do round 5 or about the progression of the crown rows for a beginning cast on of 72?
Make it even easier. Cast on total stitches divisible by 3. For example 90 stitches, evenly divided between 3 double pointed needles. k1 p1 straight up until crown. At Crown I knit 2 together at beginning and middle of row. Until down to 6 stitches. Use all the time for what I call Warmth Boxes which I send to groups serving the reservations in the Northern Plains. Great way to use up left over yarn. You can do mono colors, or I just keep going with different colors of left overs, and get some pretty funky fun-looking hats.
Lovely, easy pattern, but it is a different pattern. Let’s deal with the one at hand.
For those of you who think you don’t know how to use circulars, I say you do! Try knitting a swatch with circulars-pretending the cord is not there- that would be FLAT knitting. Now you only need to learn how to join and then you just keep knitting with not turning. Look up circular join on Youtube. I love circular knitting, no seams to sew! good luck
Redhatchris,
You are right! I hadn’t knitted for years, but I started again last fall. I tried making a stocking cap on circular needles and now that is the only way I would do it. Once you get used to it, it is easy! Lots of times when you get past the ribbing you can just knit every row.
Did you ever do a straight needle version, I don’t use circular or double pointed needles … I can do most anything on straight needles but circular and dp are too confusing and hard for me.
Thank you
I haven’t because I’ve never written a pattern with the reverse equivalent of the s2kp2 stitch. To make the purl equivalent of that stitch is as follows – with fingers or cable needle, slip first stitch off the needle and hold to the front. Slip next stitch to other needle. Return slipped stitch back to needle. Purl it together with the next stitch. Pass the slipped stitch over the just purled stitch.
Have you done anything with that stitch before? I’ve been reticent to post a version with that stitch when I haven’t seen it used in other patterns.
All you would do is, for example cast on 90 stitiches, K1 P1 in the first row, then knit your knits and purl your purls every row. When the square is long enough, just knit 2 together every 15 stitches -starting with the first 2 stitches in the first row, then stitches 16 and 17 and 31 and 32, 46 and 47; 61 and 62, 76 and 77. Work a row without decreasing and then knit 2 together exactly over where you decreased before (stitch number would be different, just do it visually). Keep on going until you are down to 6 stitches. Then run your yarn through the 6 remaining stitches and sew up the sides.
But if you are confused with 4 needles, use your ‘tail’ from the casting on process to figure out where you are starting a new row.
If you knit the continental way (do not throw your yarn each stitch), the other difference is the stitches look backwards, with the knits being the closed stitch and the purls being the open stitch. I know this is not technically official instruction verbage, but it works for me and, hopefully, you.
I applaud your being able to visually identify the K2TOG from the previous row. I am unable to do that.
Great Job..!!!
Neat basic pattern, thanks! Could you please clarify these stitches for me: s2kp2
Does this mean Slip 2, knit 1, purl 2
Or Slip 2, knit 1, purl 1, twice
Thanks
It is in the abbreviations list in the pattern:
s2kp2 – slip2 (together, knitwise), k1, pass 2 slipped stitches over
Thanks! Sorry I didn’t notice the abbreviations. You have some very neat patterns!
Thank you for the pattern, I’ve been looking for a basic hat with multiple sizes for knitting in the round. How would I adapt this pattern for 2×2 rib?
Thank you!
In that one the crown reductions are specific to the 1×1 rib. I have another pattern that is a 2×2 rib that might work for you –
http://stitcheryprojects.com/2011/11/14/basic-ribbed-babychild-hat/
https://www.youtube.com/watch?v=wfUfdYBaCBM
I am knitting the toddler hat which requires 80 stitiches CO. When I come to the first decrease line I have 4 stitches over,what do I do with these 4 stitches?
The toddler size beginning with Rnd 4 of the crown. The crown directions are repeated 4 times per round, so the round 4 directions will be worked over 20 stitches each time.
Rnd 4: (k1,p1) 4 times, k1, s2kp2, (k1, p1) 4 times
2 x 4 + 1 + 3 + 2 x 4 = 20
Make sure that your s2kp2 is reducing 3 stitches to 1. Since you have 4 extra stitches remaining, that is my guess where it is happening.
Hi there, thanks for this lovely pattern. I am an experienced knitter and must say that I found the crown decrease instructions a little confusing as they are easy to interpret two ways.
I’m making the toddler size and read the instructions as follows:
K1,p1 x4, k1 s2kp2, k1,p1 x1 – then repeat these steps x4. I had loads of stitches left in the round after repeating these steps!
It wasn’t until I read the above comments that I realised you meant
K1,p1 x4, k1 s2kp2, k1,p1 x4 – then repeat these steps x4
Might I suggest a clearer re-write:
Rnd 4 – *(k1,p1) 4 times, k1, s2kp2, (k1,p1) 4 times*. Repeat *to* 3 more times.
Great suggestion. I made that change.
What does s2kp2 mean?
slip2 (together, knitwise), k1, pass 2 slipped stitches over
I love this but I want to use chunky yarn which is 3.5 stitches to the inch. Do you know if it would work if I went down a size, from medium adult to child/small adult
Use the needle size recommended by the yarn (or whatever gives you that gauge) and actually cast on 80 for the toddler size.
The height..was that including the cuff/brim?
Yes. The height from the cast on.
“Large/XL Adult – 8.25″ high, begin crown on round 1″
This is a quote from this pattern, i have a question is the 8.25” how long it should be when you begin the crown? Or something else entirely…
Thanks
-Aj
Yes. Once you have 8.25 inches begin the crown. This height allows for a cuff.
I am having a dickens of a time understanding how to decrease on a k1 p1 rib hat flat piece not in the round
help
Most of my patterns have decreases on every other round, so I can easily convert them to flat by keeping the decreases on the front. I haven’t converted this one to flat because the s2kp2 decrease is on every round and so would have to be done on back rows if made flat. The purl equivalent of that stitch is rather difficult and hard to explain, so I haven’t wanted to tackle it.
To make the purl equivalent of that stitch is as follows – with fingers or cable needle, slip first stitch off the needle and hold to the front. Slip next stitch to other needle. Return slipped stitch back to needle. Purl it together with the next stitch. Pass the slipped stitch over the just purled stitch.
Great simple pattern just in time for an Igloo event. Will make in sparkly white yarn.
Thanks
What type of cast on do you suggest i start with. (Im assuming thats a newbie question haha) i just started knitting but i think I can handle this pattern.
Other than for the tops of socks, I always just use the long-tail cast on. It is sturdy, yet stretchy and with practice is always very even and neat.
Great thank you!
Please let me know how I can print just the pattern
instructions only.
Thank you
Click the printer icon at the top of the pattern. It will create a clean printable version. Before printing it, you can click on sections to delete them.
oh my goodness i didn’t connect in the beginning can i sew, and then add the crown?
Yes. That should work fine. Just make sure you have the full number of cast on stitches after the seam.
how can I print the pattern with printing all the comments its 12 pages of paper with them on . thank you
There is a printer icon at the top of the pattern. It will create a clean, print-ready version of the pattern without comments.
I would like to knit this hat in alpaca yarn. The weight of the yarn is sport, do you have any suggestions on what size needles to use?
Typically the needles indicated on the yarn are best. Sport weight gauges vary a good deal. Let me know the gauge of your yarn and the size hat you’d like to make and I’ll calculate a cast on for you.
Hey Mama,
I have the same sort of question. I would like to use a bulky weight material. The gauge on the package is 11S x 16r with 9mm needles for a 4×4 inch swatch. Can you help me?
Use the 9mm size needles as called for on the yarn. All the sizes didn’t map but here are the ones that did –
6 months – cast on 40, knit 6.25″, begin crown at round 9
12 months – cast on 48, knit 6.25″, begin crown at round 8
child/teen/small adult – cast on 56, knit 7.75″, begin crown at round 7
medium adult – cast on 64, knit 8″, begin crown at round 6
XL adult – cast on 72, knit 9″, begin crown at round 5
Have you considered posting any YoutTube versions of your instructions. If so, please send the URL.
Thanks.
I haven’t, and haven’t had a good setup for making videos in a while, but I will add this one to my to-do list for making future videos.
I do not understand the s2kp2 – slip2 (together, knitwise), k1, pass 2 slipped stitches over.
Does this mean slip 2 knit, purl 2 times?
The (together, kintwise), what is this connected to? The slip2
or the Kl?
The slip2 (together, knitwise) means to insert your needle through two stitches as though you were going to knit them together, but instead of knitting them, just slip them both to the other needle at the same time. Now knit the next stitch. Then take your needle to get those two slipped stitches and bring them back so that they slip over the stitch you just knit.
Would like to know if I can knit this pattern using 3.5 mm (US-4) circular needles…as I do not know how to do the magic loop with the bigger size.
Thank you.
On the smaller size it will be a little less stretchy, so account for that when choosing a size. A small circular will work great until you get to the crown where the crown reductions make the circumference you are knitting smaller and smaller.
I have never tried to knit on DPNS or circular. I had been knitting baby hats flat with a rounded top, decreasing for the top. This is a rough basic instructions for the decrease rows. You can decrease down to three or four stitches.
Rnd 1: *k5, k2tog,* across, knit last 5 to end.
Rnd 2: *k4, k2tog,* across, knit last 4 to end.
Rnd 3: *k3, k2tog,* across, knit last 3 to end.
Rnd 4: *k2, k2tog,* across, knit last 2 to end.
Rnd 5: *k1, k2tog,* across, knit last 1.
Rnd 6: knit last few stitches.
Measure enough yarn to close up the top of the hat and down the side. Cut yarn, thread a yarn needle, and run the threaded needle through the stitches counterclockwise then remove the needle. Pull the thread tightly, working the threads to close in the hole. Sew up the side loosely.
*****************
Your pattern is wonderful. I do not have the expertise to knit it, yet. I just thought I would throw my two cents in if it will help any one. Thank you again for your pattern and assistance with the more complicated stitches. 🙂
Thank you for this pattern! It is basic but VERY useful. I love it! I’ve made the child’s size, and am now making a adult size. Can I send a photo to you somehow? Would love you to see how it looks in an Australian worsted. Thank you again. SUE
I’d love to see a picture. Send to mama at thetucker dot com.
I am having a heck of a time with this pattern. I am doing adult medium and when I get to round 4, I don’t have enough stitches to finish with k1p1 4 times.
The adult medium has 96 stitches and starts with Rnd 2 for the crown. All rounds are repeated four times.
Rnd 2: (k1,p1) 5 times, k1, s2kp2, (k1, p1) 5 times
10 stitches, 1, 1, 10 stitches = 22 stitches. Four times around will result in 88 stitches after this round.
Rnd 3: (k1,p1) 5 times, s2kp2, p1, (k1, p1) 4 times
10 stitches, 1, 1, 8 stitches = 20 stitches. Four times around will result in 80 stitches after round 3.
Rnd 4: (k1,p1) 4 times, k1, s2kp2, (k1, p1) 4 times
8 stitches, 1, 1, 8 stitches = 18 stitches. Four times around will result in 72 stitches.
The s2kp2 combines 3 stitches to 1, so there is a 2 stitch reduction in each of the four repeats, so an 8 stitch reduction on each round.
I would like to do this hat without the cuff. How thick is the cuff in the small adults size, so I can deduct that. Thanks!
1-1/2″ to 2″
Would it be possible to construct this hat with stockingette stitch? I’m a beginner and ribbing takes a lot of patience that I don’t have.
I would use this pattern instead: http://www.ravelry.com/patterns/library/basic-baby-hat
That pattern has some ribbing at the start. If you don’t want any ribbing, you can just make the entire hat in stockinette and then the edge will just roll and make a little rolled edge of purl.
This is a very nice pattern! I’m going to make some hats for kids in our town that need them this winter!
I’ve been reading these comments, trying to figure out why people are having problems. I think people are getting in trouble because they are starting the crown with Round 1, no matter WHAT size they are making. The directions say, “Newborn – begin crown with ROUND 7”, or “Toddler – begin crown with ROUND 4″, or Medium Adult – begin crown with ROUND 2”. If you read the directions CAREFULLY, you won’t have a problem with leftover stitches or not enough stitches.
I am having trouble also following the table for the crown decreasing. Please bear with me…Newborn start with 64 stitches: Use Round 7 of table to start decreasing..first decrease with k1p1 k1p1 k1p1 slip 2 knit 1 purl 1 k1p1 k1p1 = 14 stitches used from left needle which leaves a total of 50 to start 2nd decrease: k1p1 k1p1 k1p1 slip 2 knit 1 purl 1 k1p1 k1p1= 14 more stitches used from left needle which leaves a total of 36 stitches remaining: 3rd decrease using k1p1 k1p1 k1p1 slip 2 knit 1 purl 1 k1p1 k1p1 = 14 more stitches transferred to right needle which leaves a total of 22 stitches remaining on left needle: Start 4th and last decrease for round 7: k1p1 k1p1 k1p1 slip 2 knit 1 purl 1 k1p1 k1p1 which transfers another 14 stitches to right needle which leaves a remainder of 8 stitches on left needle…what do we do with these 8 stitches that are left over..something is missing somewhere…we appreciate all your hard work in making these patterns for us but some of us follow patterns to a tea and it seems the table is missing valuable information…Many thanks!
I’m sorry I’ve been so long getting back to you on this. The Newborn size does start with Round 7 for the decreases, but starts with a cast on of 56. The cast on of 64 is the 6 month size and starts the decreases with Round 6.
I am looking for a pattern on how to make a Bobble on a hat that I am making for a child
Here is a tutorial I found: http://www.pearlsandscissors.com/2012/12/diy-pom-pombobble-for-hat.html
I was so happy to see this particular cap pattern because I ounce had a very good full size knitted caps illustrated pattern pamphlet but over the years I some how lost it and I was so upset over it. I have been looking for a knitted cap pattern pamphlet with sizes from baby through adult size. THANK YOU SO MUCH!!! Marilyn Chilstrom
This is my “go to” pattern for a quick, warm hat for our Wisconsin winters. I found it originally in Country Woman Magazine, but theirs didn’t have as many size choices. It’s a great pattern and I’ve made over 100 of them!
First of all: I really love this pattern, thank you so much.
I tried the toddler size and all went very well, but it ended up measuring only 6.7 inch long (folded). It now looks more like a baby hat. Any idea what I might be doing wrong? I will definetly try again. Thanks in advance.
It should be 6.5″ before beginning the crown stitches. The 9 rows of crown stitches should make it closer to 8″ tall.
Hi,
This pattern looks fantastic; I am thinking about knitting this as a present for my brother. I might have missed it, but at what points did you change color? Also, do you have any idea what size I should pick for a 21 year old boy?
Thanks!!
I didn’t specify placement of color changes since it can be done solid or with many wide or skinny stripes. Remember that you start at the bottom and that the bottom part will fold up, so I just recommend making the first 4 inches or so at least in a solid color. I think a Medium Adult size should work.
I don’t understand the magic circle thing with the circular needles…please explain
You can do the main body of the hat on a small circular needle, but one you get into the reductions it will get too tight. At that point you will either need to move it to double pointed needles or some other method of working with small circumferences in the round. I prefer the magic loop method which is explained here (http://weebleknits.net/mloop.html) but there are others you research on the internet.
Hey!
I love this pattern and I have gotten through to Round 1 of the crown (which is technically round 5, for 12mos.)
My question is if I am supposed to be doing a regular round of K1,P1 between the crown rounds?
Thanks, in advance!
No. There are decreases made each round.
How can I print the basic Ribbed Hat without all the comments printing first?
There is a printer icon at the top of the pattern. Use that to create a clean printer-ready copy without comments.
Have read through all the comments but I guess despite the requests you never produced a version for straight needles. I dread reading American patterns (I live in England where we don’t tend to knit much in the round) that I like the look of because they are always in the round. I went to a class for knitting in the round and didn’t like it. I guess I could just knit it on straight needles but you don’t give a length to knit to before you start decreasing, and if you did it on Round 1 like you say surely that would mean you were decreasing straight away? Shame because it looks like a really nice hat.
I think with this special decrease on every row that this pattern would be difficult to knit on straight needles. I have created a very similar pattern that has decreases on front rows only so that it works more readily with straight needles.
http://stitcheryprojects.com/2016/01/29/my-favorite-ribbed-hat-for-straight-needles/
After knitting maybe 15 stocking caps with round needles, I tried doing one with straight needles, and I didn’t like it! I didn’t like sewing up the seam. It is so much easier in the round.
I am making the hat in the largest size. Working on 104 stitches, When I follow the directions for round one of the crown,as I understand them, I have 24 stitches remaining on the round. according to my calculations, one pattern takes 16 stitches, 5 repeats= 80 stitches. I hope I have made myself clear. Thank you much.
Rnd 1: (k1,p1) 6 times, s2kp2, p1, (k1, p1) 5 times
12 stitches, uses 3 stitches, 1, 10 stitches – uses 26 stitches – this is done four times around the round – 26 times 4 is 104.
If you put a stipe of a different color in the middle of the stocking cap, like in the picture, how long do you knit before you change colors?
Since this has the edge that flips up, I’d knit about 2/3’s of the body length before adding the stripe.
Thanks for the speedy reply! I’m going to start on the stocking cap tonight!
I am having a problem with “Toddler” size Crown decrease section. Instructions say to begin decrease with Row 4. I have counted my stitches 3x and I have 80, per cast on directions for Toddler size. I always have “left over” stitches at end of Crown decrease Row 3, but not enough to complete a full set of decrease directions. Should I begin decrease for the Toddler size on a different crown decrease row?
Thank you,
Cathy
You will need to repeat rnd 4 four times around the hat, so each repeat uses 20 stitches. There are 8 stitches in the “(k1,p1) 4 times” then the one k stitch, the s2kp2 uses 3 stitches, then finish the set with 8 stitches, “(k1, p1) 4 times”.
Going well so far, knitted my nephew a scarf in sticking stitch with his name, Zack, knitted in to the pattern in a different colour, it’s painful with changing colour all the time but I manage OK. Created the pattern in my head as I went. So now I’ve started the beanie with left over wool, damn tricky to knit in his initial only but again I managed, it’s kinda makeoutable, lol. I’d like to send you a picture when I’m done. How can I do this??
I’d love to see them! You can send a pic to mama at thetucker dot com.
How about an ability to print pattern without all the comments. I do not need 18 pages of which 3 were only referring to the pattern.
If you use the printer icon at the top of the pattern, it produces a clean, print-ready copy, without comments.
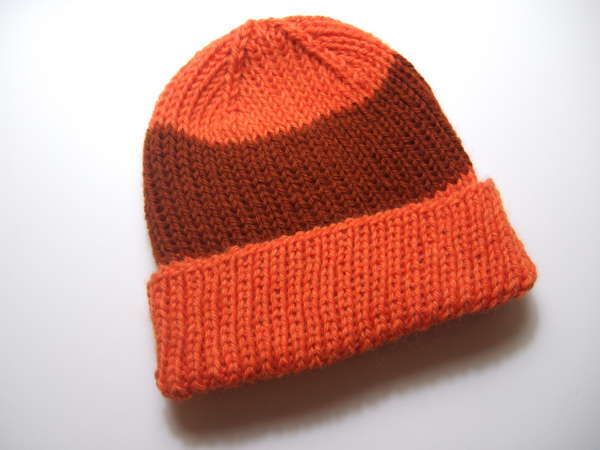
I’m not sure what you mean. I am doing a small child hat with the basic ribbed hat pattern. It is shown in orange and brown. How far do I go before switching to the brown?
Knit about 4 inches in the first color. Add about 2 inches of the alternate color then switch back to the first color to finish.
I think it would be helpful for beginners making the ribbed hat if you would include the # of stitches that should be on the needles at the end of each round in the crown
Thanks for the great suggestion. I made that modification.
I am having trouble getting my gauge for size large
i am using size US 3 circular needles and get 12stiches should I make a medium size instead of large?
You are getting 12 stitches for 4 inches? If so, then yes, go a size smaller.
I managed to do this on straight needles. I found that using a crochet hook to pull the stitch through the 2 slip stitches worked really well on the reverse side. really chuffed with the result. Thanks for the pattern, will definitely be using it again.
I have done this in a rubbed pattern, but 2 knit and 2 purl ..
how should I work the crown? I have a large adult (start 104 stitches)
Thanks
Move one of your stitches to the next row so that you begin with k1, p2 … and end with p2, k1.
Work the crown by repeat these 13 times across the round:
Rnd 1: ssk, p1, k2, p1, k2tog (78 stitches)
Rnd 2: k1, p1, k2, p1, k1
Rnd 3: ssk, k2, k2tog (52 stitches)
Rnd 4: k
Rnd 5: ssk, k2tog (26 stitches)
It he picture shows a two tone hat. Directions do not show when to change colors. Is that info somewhere!
The sample hat was made with variegated yarn.
How do I send you a picture of the finished products??
I’d love to see what you have made. You can send them to mama at thetucker dot com.
I want to make this with bulky yarn. How many stitches to cast on for the various sizes?
Use the needle size recommended by the yarn. I assumed a typical gauge of 14 stitches per 4 inch. If you cast on for the newborn size in the pattern it will make a 6 month size. If you cast on for the 6 month size it will make a Toddler size. If you cast on for the 12 month size it will make a Child/Small Adult. If you cast on for Toddler it will make a Medium Adult. If you cast on for Child it will make Large/Extra Large.
Nice looking hat. I suggest measuring your head. I assumed I would need adult large. I just st took the whole thing apart to do the med size.
I am wondering if the magic loop method can be used for all patterns written for “in the round”. I taught myself “magic loop” with 2 of your baby hats patterns. I love it and I think it eliminates the problem of twisting the yarn. Am I right?
Thanks for your fantastic patterns.
I’m not sure about the twisting yarn issue, but you can definitely use the magic loop method anytime you are making something in the round.
Love the pattern and the different sizes for the hats!!
I am a new knitter and I have not used the DPN.
Can I just decrease as the pattern states and then just take the long tail and draw tight the top of the hat??
Thank you for your patterns!!
Kathie
In-the-round knitting will get too tight as the crown reductions are made. You can us another method like magic loop or using two circular needles, or you can start doing back and forth knitting just for the crown and have a seam just for that part.
Hi! I used this pattern multiple times and I keep going back to it. Its been about a year since using and Im totally blanking on crowning a large hat at 104 stitches. Ive been reading the comments but I cant piece my questions together. Forgive me if this is repititive.
In round 1:K1, P1 6 times
Does that mean I should have 12 stitches? I think Im seeing it as K1 P1 being counted as 1 whole stitch combined.
Same being for the K1,P1 at the end. Does that mean I should have 10?
If not, then K1,P1 6x s2kp2 P1 K1,P1 5x leaves me ending on a knit stitch. Seems odd to start round 1 again on a purl.
Thanks for the help!
These directions are used 4 times on the 104 stitches so will use 26 stitches each time. The first set uses 12 stitches, then the s2kp2 uses three stitches, the p1 one stitch then the last set uses 10 stitches – 12 + 3 + 1 + 10 = 26.
Hi,
I’m 12 and don’t knit a lot but I love this hat and it seems simple apart from…
I can’t handle 88 stitches on my needle… any suggestions or advice??
This pattern is made for knitting in-the-round. What kind of needles are you using?
Thank you for sharing this pattern. It is my go to for any size hat. Adding a stripe helps use my odd bits of yarn. I particularly like the finish used for the crown.
What size is the hat in the picture shown?
Medium Adult
Thanks for this pattern,
One thing only i would like to change colour like you did
how do i know when?
sorry for the hassle, do you mind writing out, at what length you change colour for each size hat? unless you don’t know,
very sorry but thanks 🙂
Newborn – color A for 3 inches, color B for 1.5 inches, color A for 1 inch then begin crown on round 7
6 months – color A for 3.25 inches, color B for 1.5 inches, color A for 1 inch then begin crown on round 6
12 months – color A for 3.5 inches, color B for 2 inches, color A for .75 inch then begin crown on round 5
Toddler – color A for 4 inches, color B for 2 inches, color A for .5 inch then begin crown on round 4
Child/Small Adult – color A for 4.75 inches, color B 2.5 inches, color A begin crown on round 3
Medium Adult – color A for 5 inches, color B 2.5 inches, color A begin crown on round 2
Large/XL Adult – color A for 5.25 inches, color B 3 inches, color A begin crown on round 1
As for the decrease that seems to have everyone confused, I would put it like this: s2, k1, psso. Psso stands for “pass slipped stitch(es) over.” That shows up in many older patterns with a similar decrease, and doesn’t allow confusion with purling.
It’s worthwhile learning to use the dp needles. For all of you that are scared of it, it’s not that hard. I suggest putting rubber bands on the ends of the needles, especially in the larger sizes, to keep the stitches from falling off.
What size (total stitches at the start) applies to the stitch count at the end of each crown decrease row? I am making the chil / small adult hat and I’m getting hung up on the decrease rounds.
For the Child/Small adult size, skip the first two rounds of the crown. The stitch count at the end will apply after completing the round.
I am an Expert knitter from England but I do not understand the crown instructions for the large size starting with 104 stitches. I have tried the first row several times and it does not come out correctly. According to the pattern I knitted K1P1 x 6 then I did the sK1KP2 ( we say psso) then it says
K1P1 5 x repeat between the stars but doesn’t say sK1KP2. Of course I did sK1KP2 anyway but I only get 7 decreases and not 8. What am I doing wrong?
I’m sorry that it’s taken me so long to get back to you. The instructions between the stars are for the first quarter of the stitches so should be repeated three more times to work each quarter of the round. The initial 104 stitches make 4 sections with 26 stitches each. The s2kp2 stitch at the center of each quarter in round 1 of the crown reduces each quarter of the round by 2 stitches, so that after the round each quarter will have 24 stitches for an ending total of 96.
I just discovered this pattern and I love it. I knit hats for charity and find that hats knit on circular needles are so nice. I really don’t do well sewing the back seam on a piece knit on straight needles.
People should not be afraid of circulars.. They are really easy to use.
This is a great hat pattern to use up odd lots of #4 yarns…
[…] Click for Pattern Free Basic Rib Knit Hat Pattern Click for Pattern Rib Knit Hat Click for Pattern Knit Ribbed Hat Pattern Circular Needles Click for Pattern Ribbed Hat Knitting Pattern […]
[…] Basic Ribbed Hat – Clothing Knitted My Patterns […]
Thanks so much for all the patterns. I am making a no beginning chain bricks scarf for a friend and would like to make a hat to match. Do you have a pattern for a bricks hat even if it is not no beginning? Thanks for your help.
Wow! Thank you so much for the pattern. I can’t wait to start making these babies up in my shop soon, they are going be ADORABLE!!! <3 <3 <3 <3
I am using this pattern but an older version using 102 stitches for a M adult. The decrease isn’t coming out correctly. It is written- (k1, p2)11 times, k1, s2kp2, (k1,p1) 4 times.
Can you please send directions how to decrease w/ 102 stitches. Thank you!