Monthly Archives: February 2014

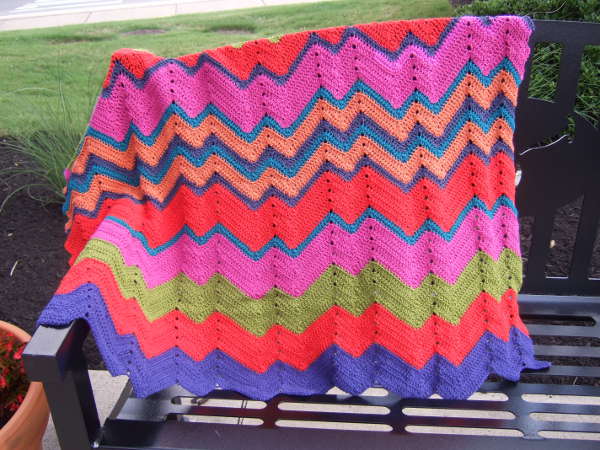
Dripping Lines Blanket

25 February 2014

drippinglines

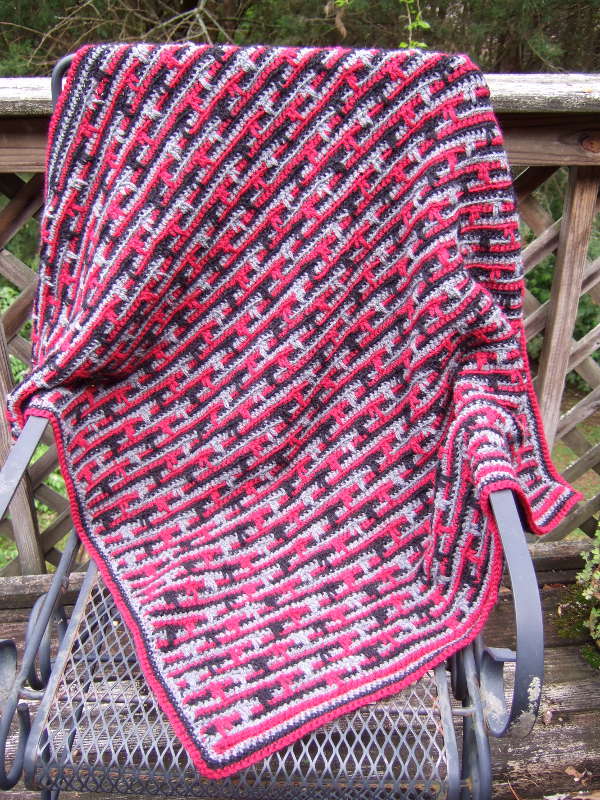
Little stripes of color look so fun, but weaving in ends from lots of color changes is far from fun. This blanket is designed to make it possible to change between three colors without cutting the yarn between stripes. The “drips” add interest to an otherwise just plain striped blanket.

Size: This blanket can be made any size. Five widths are given in the directions.

SizeWidth (Inches)Length (Inches)Ounces of yarn per colorYards of yarn per color
Extra Small26.5235.363.780.97
Small39528175.11
Medium51.4868.6413.94305.11
Large63.9685.2821.52470.98
Extra Large76.44101.9230.73672.71

Materials:
Worsted weight yarn in three colors
Size I (5.5mm) crochet hook

Abbreviations:
ch = chain
sc = single crochet

Special stitches:
ldc – long double crochet – yo, insert hook in stitch a row below next sc, yo and pull up a loop even with last stitch made, (yo and draw through two loops on hook) twice.
eldc – extended long double crochet – yo, insert hook in stitch 2 rows below next sc, yo and pull up a loop even with last stitch made, (yo and draw through two loops on hook) twice.
You can see a demonstration of these stitches in this video – http://www.youtube.com/watch?v=eSuvSZPGiLM&feature=youtu.be

The beginning chain should be a multiple of 40 plus 5.

For these widths, start with this number of chains:
26.5″ = 85
39″ = 125
51.5″ = 165
64″ = 205
76.5″ = 245

How to change colors for this blanket:
For making this blanket, you will use 3 colors that will stay attached to the work. You will drop and take up colors at the ends of rows, but will not have to cut or restart a color except to start a new skein. At the end of each row, finish all but the last pull through the two loops to finish the sc. Use the other color waiting at the end of that row to pull up through that loop. Use it to continue the next row back across to the other side.

After the first row, make all stitches in front loop.
Make beginning chain (see above for number of chains) in color A.
Beginning Border Row 1: Sc in second ch from hook, sc in each ch to the end of the row. On the last sc, finish all the but the last pull through the two loops. Attach color B, drop color A and pull color B through those last two loops.
Beginning Border Row 2: Color B. Ch 1, turn. Sc in first sc, sc in each sc to end of the row. On the last sc, finish all the but the last pull through the two loops. Attach color C, drop color B and pull color C through those last two loops.
Beginning Border Row 3: Color C. Ch 1, turn. Sc in first sc, sc in each sc to end of the row. On the last sc, finish all the but the last pull through the two loops. Drop color C and pull color A through those last two loops.

Continue this way of changing colors each row for the rest of the blanket. You will always know what color to change to because it will be the yarn waiting for you at the end of the row.

Repeat these 10 rows for the length of the blanket, continuing to change color each row in the same manner as above. There are not colors given on these rows because they rotate throughout the length of the blanket.

Row 1: Ch 1, turn. Sc in first sc, sc in next sc, working across the prior row stitches * eldc, ldc, 16 sc, ldc, eldc, 20 sc. Repeat from * across to the last two stitches. Sc in each of the last two stitches.
Row 2: Ch 1, turn. Sc in first sc, sc in next sc, working across the prior row stitches * 16 sc, eldc, ldc, 16 sc, ldc, eldc, 4 sc. Repeat from * across to the last two stitches. Sc in each of the last two stitches.
Row 3: Ch 1, turn. Sc in first sc, sc in next sc, working across the prior row stitches * 8 sc, eldc, ldc, 16 sc, ldc, eldc, 12 sc. Repeat from * across to the last two stitches. Sc in each of the last two stitches.
Row 4: Ch 1, turn. Sc in first sc, sc in next sc, working across the prior row stitches * 8 sc, eldc, ldc, 16 sc, ldc, eldc, 12 sc. Repeat from * across to the last two stitches. Sc in each of the last two stitches.
Row 5: Ch 1, turn. Sc in first sc, sc in next sc, working across the prior row stitches * 16 sc, eldc, ldc, 16 sc, ldc, eldc, 4 sc. Repeat from * across to the last two stitches. Sc in each of the last two stitches.
Row 6: Ch 1, turn. Sc in first sc, sc in next sc, working across the prior row stitches * eldc, ldc, 16 sc, ldc, eldc, 20 sc. Repeat from * across to the last two stitches. Sc in each of the last two stitches.
Row 7: Ch 1, turn. Sc in first sc, sc in next sc, working across the prior row stitches * 2 sc, ldc, eldc, 20 sc, eldc, ldc, 14 sc. Repeat from * across to the last two stitches. Sc in each of the last two stitches.
Row 8: Ch 1, turn. Sc in first sc, sc in next sc, working across the prior row stitches * 10 sc, ldc, eldc, 20 sc, eldc, ldc, 6 sc. Repeat from * across to the last two stitches. Sc in each of the last two stitches.
Row 9: Ch 1, turn. Sc in first sc, sc in next sc, working across the prior row stitches * 10 sc, ldc, eldc, 20 sc, eldc, ldc, 6 sc. Repeat from * across to the last two stitches. Sc in each of the last two stitches.
Row 10: Ch 1, turn. Sc in first sc, sc in next sc, working across the prior row stitches * 2 sc, ldc, eldc, 20 sc, eldc, ldc, 14 sc. Repeat from * across to the last two stitches. Sc in each of the last two stitches.

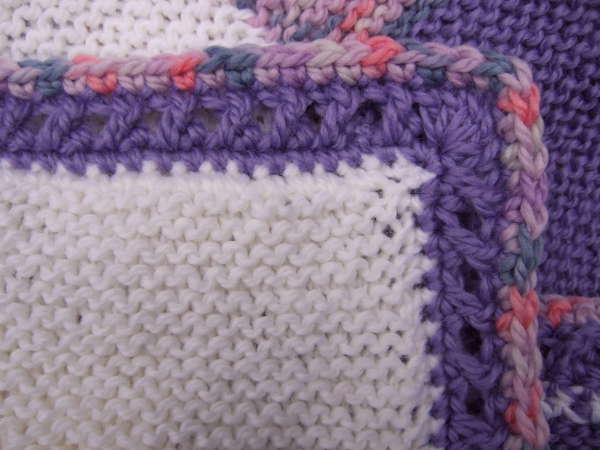
Finishing and border:

End with a color C row. Finish off. Cut the color A yarn and tie to the color C tail to finish off color A.
Round 1: At the beginning of the last row, insert hook into back loop of first sc and pull up a loop of color B. Ch 1, sc in first sc and sc across the top in each stitch to the last sc. Make 2 sc in the last sc of the top row. Sc in the side of each stitch going down the side of the blanket, working over the loops where the colors were changed at the sides to hide them. On the bottom, work across the bottom loops of each stitch, making 2 sc in the first and last stitches of the bottom, and 1 sc in each stitch between. Sc in the side of each stitch going down the side of the blanket, working over the loops where the colors were changed at the sides to hide them. Make another sc in the first stitch of the top row. Switch to color C. Sl st in the first stitch of the round to join.
Round 2: Ch 1, sc in same sc, sc in each sc around, with 3 sc in each corner sc. Once reaching the beginning, switch to color A. Sl st in the first stitch of the round to join.
Round 3: Ch 1, sc in same sc, sc in each sc around, with 3 sc in each corner sc. Once reaching the beginning, sl st in the first stitch of the round to join.

Laced Edged Chemo Caps for Straight Needles

21 February 2014

These two lace edged caps can be made in a solid color or with two colors. The one on the left is a madiera lace and the one on the right a scallop lace.

This version of the pattern is for straight needles. For the in-the-round version go here.

Size:
Adult woman, size medium – 20″ circumference, 7.5″ height

Gauge:
17 stitches and 23 rows = 4 inches in stockinette

Materials:
1.7 oz (90 yards) of soft worsted weight yarn
Size 8 (5 mm) straight needles
Yarn needle

Abbreviations:
k = knit
p = purl
k2tog = knit two together
sk2p = slip 1, knit 2 together, pass slip stitch over the knit 2 together; 2 stitches have been decreased
ssk = slip one knitwise, slip one knitwise, insert left needle into front of both slipped stitches and knit.
yo = yarn over

Madeira Lace Cast on and Body:
Cast on 85. Repeat directions between * across the row.

Row 1: p
Row 2: k
Row 3: * k2, yo, k4, sk2p, k4, yo, k1 * k1
Row 4: p
Row 5: * k3, yo, k3, sk2p, k3, yo, k2 * k1
Row 6: p
Row 7: * k1, k2tog, yo, k1, yo, k2, sk2p, k2, yo, k1, yo, ssk * k1
Row 8: p
Row 9: * k5, yo, k1, sk2p, k1, yo, k4 * k1
Row 10: p
Row 11: * k2, yo, sk2p, yo, k1, yo, sk2p, yo, k1, yo, sk2p, yo, k1 * k1
Row 12: p
Row 13: p
Row 14: k
For two colors, make color change here.
Row 15: k
Row 16: p1 * p1, k1, p9, k1, p2 *
Repeat rows 15 and 16 until the hat measures 5.75″ from the edge. End with a Row 16. Work Crown.

Scallop Lace Cast on and Body:
Cast on 85. Repeat directions between * across the row.

Row 1: p
Row 2: k
Row 3: * k1, yo, k3, ssk, yo, sk2p, yo, k2tog, k3, yo * k1
Row 4: k
Rows 5-12: Repeat rows 3 and 4 four more times.
Row 13: p
Row 14: k
For two colors, make color change here.
Row 15: k
Row 16: p1 * p1, k1, p9, k1, p2 *
Repeat rows 15 and 16 until the hat measures 5.75″ from the edge. End with a Row 16. Work Crown.

Crown:
Row 1: * k3, ssk, k5, k2tog, k2 * k1
Row 2: p1 * p1, k1, p7, k1, p2 *
Row 3: * k3, ssk, k3, k2tog, k2 * k1
Row 4: p1 * p1, k1, p5, k1, p2 *
Row 5: * k3, ssk, k1, k2tog, k2 * k1
Row 6: p1 * p1, k1, p3, k1, p2 *
Row 7: * k3, sk2p, k2 * k1
Row 8: p1 * p1, k1, p1, k1, p2 *
Row 9: * k2, sk2p. k1 * k1
Row 10: p1 * p1, k1, p2 *
Row 11: * k1, sk2p * k1
Cut the yarn with several inches to work with. With a yarn needle, pull the yarn through all the remaining loops, secure, seam side, secure and weave in end.

Ribbing and Lacy Chemo Caps for Straight Needles

16 February 2014

These two ribbing and lace caps are feminine yet functional. The one on the left is a feather lace and the one on the right a diamond lace.

This pattern is for straight needles. An in-the-round version is available here.

Size:
Adult woman, size medium – 20″ circumference, 7.5″ height

Gauge:
17 stitches and 23 rows = 4 inches in stockinette

Materials:
1.5 oz (90 yards) of soft worsted weight yarn
Size 8 (5 mm) straight needles
Yarn needle

Abbreviations:
k = knit
p = purl
k2tog = knit two together
k3tog = knit three together
p3tog = purl three together
ssk = slip one knitwise, slip one knitwise, insert left needle into front of both slipped stitches and knit.
sssk = slip one knitwise, slip one knitwise, slip one knitwise, insert left needle into front of the three slipped stitches and knit.
yo = yarn over

Feather Lace
Cast on and Body:
Cast on 85. Repeat the directions between the * across the row.

Row 1: * k11, p1, k1, p1 * k1
Row 2: p1 * k1, p1, k1, p1, k9, p1 *
Row 3: * k11, p1, k1, p1 * k1
Row 4: p1 * k1, p1, k1, p11 *
Row 5: * k2, yo, k2, ssk, k2tog, k2, yo, k1, p1, k1, p1 * k1
Row 6: p1 * k1, p1, k1, p11 *
Row 7: * k1, yo, k2, ssk, k2tog, k2, yo, k2, p1, k1, p1 * k1
Repeat rows 4 – 7 until the hat measures 5.75″ from the edge. End with a Row 4.

Crown:
Row 1: * k2, yo, k1, sssk, k3tog, k1, yo, k1, p1, k1, p1 * k1
Row 2: p1 * k1, p1, k1, p9 *
Row 3: * k1, yo, sssk, k3tog, yo, k2, p1, k1, p1 * k1
Row 4: p1 * k1, p1, k1, p7 *
Row 5: * k2, ssk, k2tog, k1, p1, k1, p1 * k1
Row 6: p1 * k1, p1, k1, p5 *
Row 7: * k1, k3tog, k1, p1, k1, p1 * k1
Row 8: p1 * k1, p1, k1, p3 *
Row 9: * k3, p3tog * k1
Row 10: p1 * k1, p3 *
Row 11: * k3tog, p1 * k1
Cut the yarn with several inches to work with. With a yarn needle, pull the yarn through all the remaining loops, secure, seem side, secure and weave in end.

Diamond Lace
Cast on and Body:
Cast on 85. Repeat the directions between the * across the row.

Row 1: * k11, p1, k1, p1 * k1
Row 2: p1 * k1, p1, k1, p1, k9, p1 *
Row 3: * k11, p1, k1, p1 * k1
Row 4: p1 * k1, p1, k1, p11 *
Row 5: * ssk, k3, yo, k1, yo, k3, k2tog, p1, k1, p1 * k1
Row 6: p1 * k1, p1, k1, p11 *
Row 7: * ssk, k2, yo, k3, yo, k2, k2tog, p1, k1, p1 * k1
Row 8: p1 * k1, p1, k1, p11 *
Row 9: * ssk, k1, yo, k5, yo, k1, k2tog, p1, k1, p1 * k1
Row 10: p1 * k1, p1, k1, p11 *
Row 11: * ssk, k2, yo, k3, yo, k2, k2tog, p1, k1, p1 * k1
Repeat rows 4 – 11 until the hat measures 5.75″ from the edge. End with an even numbered row.

Crown:
Row 1: * ssk, k7, k2tog, p1, k1, p1 * k1
Row 2: p1 * k1, p1, k1, p9 *
Row 3: * ssk, k5, k2tog, p1, k1, p1 * k1
Row 4: p1 * k1, p1, k1, p7 *
Row 5: * ssk, k3, k2tog, p1, k1, p1 * k1
Row 6: p1 * k1, p1, k1, p5 *
Row 7: * ssk, k1, k2tog, p1, k1, p1 * k1
Row 8: p1 * k1, p1, k1, p3 *
Row 9: * k3, p3tog * k1
Row 10: p1 * k1, p3 *
Row 11: * k3tog, p1 * k1
Cut the yarn with several inches to work with. With a yarn needle, pull the yarn through all the remaining loops, secure, seem side, secure and weave in end.

Wrapped Stitches Baby Hat for Straight Needles

9 February 2014

This is a simple baby hat in several sizes. The wrapped stitches look more complicated than they are. I have included a photo tutorial on the technique.

This is the straight needle version of the pattern. For the in-the-round version, go here.

There is also a pattern available for a coordinating baby blanket.

Sizes:
Small preemie – 8″ circumference, 4″ high
Preemie – 10″ circumference, 5.5″ high
Newborn – 12″ circumference, 6″ high
6 month – 14″ circumference, 7″ high
12 month – 16″ circumference, 7.5″ high
Toddler – 18″ circumference, 8″ high

Gauge:
22 stitches and 30 rows = 4 inches in stockinette

Materials:
0.5 to 1 oz (40 to 80 yards) of DK weight baby yarn
Size 6 (4 mm) needles
Yarn needle

Abbreviations:
k = knit
p = purl
k2tog = knit two together
ssk = slip one knitwise, slip one knitwise, insert left needle into front of both slipped stitches and knit.
w2s = wrap two stitches – with yarn in back, slip two stitches to right needle purlwise. Bring yarn to front and slip the same two stitches back to left needle purlwise. Bring yarn to back and slip same two stitches back to right needle purlwise. Bring yarn to front and slip same two stitches back to left needle purlwise. Bring yarn to back and knit each of the two stitches.

Pattern:
Small preemie – Cast on 49
Preemie – Cast on 61
Newborn – Cast on 73
6 month – Cast on 85
12 month – Cast on 97
Toddler – Cast on 109

Repeat instructions between * across the row.
Ribbing (6 rows for preemie size, 8 rows for other sizes):
Row 1: * k2, p2 * k1
Row 2: p1 * k2, p2 *
Repeat these two rows until you have the size ribbing you want.

Body:
Row 1: k
Row 2: p
Row 3: k1 * w2s, k4 *
Row 4: p
Row 5: k
Row 6: p
Row 7: * k4, w2s * k1
Row 8: p

Repeat these eight rows (end with an even row) until the hat measures the desired height for size including the ribbing:
Small preemie – 3″ high
Preemie – 4.25″ high
Newborn – 4.75″ high
6 month – 5.75″ high
12 month – 6.25″ high
Toddler – 6.75″ high

Crown:
Repeat instructions between * across the row.
Row 1: * k4, k2tog, ssk, k4 * k1
Row 2: p
Row 3: * k3, k2tog, ssk, k3 * k1
Row 4: p
Row 5: * k2, k2tog, ssk, k2 * k1
Row 6: p
Row 7: * k1, k2tog, ssk, k1 * k1
Row 8: p
Row 9: * k2tog, ssk * k1
Cut the yarn with several inches to work with. With a yarn needle, pull the yarn through all the remaining loops, secure, stitch side and weave in end.

Edits:
2/17/14 – changed even rows to purls in crown.

M and W Ripple Blanket

7 February 2014

MandWripple2

This updated ripple afghan really showcases color. It gets its name from the M’s and W’s you see in the ripples from a distance.

The example is made in DK weight cotton/silk yarn, but can be made with most yarn weights.

Size:
This blanket can be made any size. Five widths are given in the directions.

SizeWidth (Inches)Length (Inches)Ounces of yarnYards of yarn
Extra Small30.2940.3819.691294.38
Small425637.862488.89
Medium53.7171.6261.924070.45
Large65.4287.2391.876039.05
Extra Large77.13102.85127.78394.71

Materials:
DK weight yarn (see chart for amount)
Size H (5mm) crochet hook

Abbreviations:
ch = chain
dc = double crochet

Special stitch:
dc5tog – double crochet 5 stitches together (uses five stitches, decreases by four stitches) – [Yarn over, insert hook in next stitch, yarn over and pull up loop, yarn over, draw through 2 loops] 5 times (6 loops on hook), yarn over, draw through all loops on hook.

The beginning chain should be a multiple of 58 plus 34.

For these widths, start with this number of chains:
30.25″ = 150
42″ = 208
53.75″ = 266
65.5″ = 324
77.25″ = 382

There is also a chart available.

Row 1: Dc in 4th ch from hook, dc in next 7 ch, 5 dc in next ch, dc in next 4 ch, dc5tog (uses next 5 ch), dc in next 4 ch, ** 5 dc in next ch, dc in next 12 ch, dc5tog (uses next 5 ch), dc in next 4 ch, 5 dc in next ch, dc in next 4 ch, dc5tog (uses next 5 ch), dc in next 12 ch, 5 dc in next ch, dc in next 4 ch, dc5tog (uses next 5 ch), dc in next 4 ch. Repeat from ** to last 9 ch. 5 dc in next ch, dc in next 8 ch.

Row 2: Ch 3, turn. Dc in 2nd dc, dc in next 8 dc, 5 dc in next dc, dc in next 4 dc, dc5tog (uses 2 dc, dc5tog, 2 dc), dc in next 4 dc, ** 5 dc in next dc, dc in next 12 dc, dc5tog (uses 2 dc, dc5tog, 2 dc), dc in next 4 dc, 5 dc in next dc, dc in next 4 dc, dc5tog (uses 2 dc, dc5tog, 2 dc), dc in next 12 dc, 5 dc in next dc, dc in next 4 dc, dc5tog (uses 2 dc, dc5tog, 2 dc), dc in next 4 dc. Repeat from ** to last 12 dc and turning chain. 5 dc in next dc, dc in next 8 dc.

Repeat row 2 until afghan is desired length. Finish off and weave in end.

The blanket can be made in a solid color or can be made with any number of color changes. The best way to make a color change is to finish all but the very last pull through of the two loops of the last stitch of a row. Cut yarn with a few inches of tail and join with new color next to stitch. Pull new color through last two loops. Weave in ends.

Crossed Double Crochet Border

7 February 2014

crosseddoubleedging

You can add this edging for a finishing touch to any crocheted, knitted or even a fabric blanket. Make it using one or two colors for the effect you want.

Materials:
Yarn – Use the same weight yarn as your project
Crochet hook – use a hook size compatible with your yarn

Abbreviations:
ch = chain
dc = double crochet
sc = single crochet
yo = yarn over

Special stitch:
cdc – crossed double crochet – skip a stitch, dc in next stitch, yo, go behind that dc, insert needle through loops of skipped stitch and then complete a dc

Make all stitches in both loops.

To prepare the blanket for the edging, form a loop with the yarn, and with the front of the blanket facing you, make 2 sc into one of the corners. Sc evenly across each edge, putting three sc in each corner. Back at the beginning corner, make one more sc in the beginning corner and slip stitch to join to the first sc.

Row 1: Ch 3, 4 dc in same sc. Cdc in next sc and along the row until reaching the last 2 or 3 stitches. If there are two sc before the corner sc, then cdc as you have been. If there is only one sc before the corner sc, cdc by working in the next sc and then going behind it to made the other dc in the same sc as the prior stitch. Make 5 dc in each corner sc. Work all the way around the blanket and slip stitch to join in the top of the beginning ch-3.

Row 2: If you are using a different color for this row, finish off row 1 and begin row two by forming a loop and making a sc in any stitch. If you are continuing in the same color, you can ch 1 and sc in the same stitch. Sc in every row 1 stitch around, putting 3 sc in each corner stitch. Slip stitch to join in the first sc. Finish off and weave in end.

March 2013 Hospice Batch

6 February 2014

 
For March 2013 I sent six lap blankets with the batch of items for hospice.

These five are made with my own patterns:

asymmetric200This is made from some donated Lion Brand Homespun. The pattern is No Beginning Chain Asymmetric Shell.
blackblock200This was made with Jo-Ann Sensations Rainbow Boucle Multi. The pattern is No Beginning Chain Crazy Block Afghan.
lacyroundripple200This is made from Jo-Ann Sensations Rainbow Classic. The pattern is Lacy Round Ripple Blanket.
shellandwrapped200This blanket is made from Jo-Ann Sensations Rainbow Classic Pattern. The pattern is Shell and Wrapped Stitches Blanket.
strawberry200This is made from Yarn Bee Boucle Traditions. The pattern is No Beginning Chain Strawberry Lace Blanket.

mitered

This is a scrap lapghan I made from worsted weight scraps I’d saved. The pattern is Mitered Squares Afghan by Chris de Longpré but I laid the squares out square rather than on the bias.

Gift for the Neighbor’s Grandson

6 February 2014

cottonroundripple

cottonhat

My neighbor was giving a baby shower for her daughter-in-law who was expecting her first grandson. I had some Bernat Cottontots in my stash that had no other plans, so I made a crocheted blanket and knitted hat. The blanket pattern is Lyn’s Round Ripple Baby Afghan and the hat is my Basic Baby Hat.

I made a pair of bootie ornaments to put on the package that can be used as an ornament.

bootieornaments

Bulky Diagonal Hat

5 February 2014

bulkydiagonal

This is a beanie hat for bulky yarn with a diagonal purl texture. Directions are given for seven sizes.

Sizes:

SizeCircumference (Inches)Height (Inches)Ounces of yarnYards of yarn
12 month15.56.52.4174.77
Toddler16.572.7785.83
Child17.57.53.1597.66
Teen18.7583.55110.25
Small Adult19.758.53.99123.6
Medium Adult2194.44137.71
Large Adult229.254.92152.59

Gauge:
14 stitches and 18 rows = 4 inches in stockinette

Materials:
Bulky weight yarn
Size 10-1/2 (6.5 mm) 47″ circular needle (for magic loop) or set of size 10-1/2 (6.5 mm) double pointed needles
Yarn needle

Abbreviations:
k = knit
p = purl
p2tog = purl two together

Pattern:
Cast on this number of stitches and join to knit in the round. Divide stitches in multiples of 4 between double pointed needles or needles for a magic loop.

12 month = 56
Toddler = 60
Child = 64
Teen = 68
Small Adult = 72
Medium Adult = 76
Large Adult = 80

Ribbing: k2, p2 repeated across round for 4 rounds

Repeat each instruction across the round.
Rnd 1: k2, p2
Rnd 2: k1, p2, k1
Rnd 3: p2, k2
Rnd 4: p1, k2, p1

Repeat these four rounds until the hat measures the desired height for size including the ribbing. Begin the crown after a round 4 :
12 month – 4.5″ high
Toddler – 5″ high
Child – 5.5″ high
Teen – 6″ high
Small Adult – 6.5″ high
Medium Adult – 7″ high
Large Adult – 7.25” high

Crown:
Repeat across the round
Rnd 1: k1, p2tog, p1
Rnd 2: p2, k1
Rnd 3: k1, p2tog
Rnd 4: p1, k1
Rnd 5: p2tog
Rnd 6: p
Rnd 7: p2tog

Cut the yarn with several inches to work with. With a yarn needle, pull the yarn through all the remaining loops, secure and weave in end.

Edits:
12/17/2015 – replaced a broken link for Magic Loop method

Basic Bulky Beanie Hat

4 February 2014

bulkybasic

This is a very basic beanie hat for bulky yarn in four sizes.

Sizes:

SizeCircumference (Inches)Height (Inches)Ounces of yarnYards of yarn
18 month16.2571.6856.2
Small Child17.57.51.9364.52
Small Adult20.58.752.6387.82
Large Adult23.25103.44114.7

Gauge:
14 stitches and 18 rows = 4 inches in stockinette

Materials:
Bulky weight yarn
Size 10-1/2 (6.5 mm) 47″ circular needle (for magic loop) or set of size 10-1/2 (6.5 mm) double pointed needles
Yarn needle

Abbreviations:
k = knit
p = purl
k2tog = knit two together
ssk = slip one knitwise, slip one knitwise, insert left needle into front of both slipped stitches and knit.

Pattern:
Cast on this number of stitches and join to knit in the round. Divide stitches between double pointed needles or needles for a magic loop.

18 month = 56, Divide with multiples of 8 on each needle.
Small Child = 60, Divide with multiples of 10 on each needle.
Small Adult = 72, Divide with multiples of 12 on each needle.
Large Adult = 80, Divide with multiples of 16 on each needle.

Ribbing: k2, p2 repeated across round for 6 rounds

Knit until the hat measures the desired height for size including the ribbing:
18 month – 5″ high
Small Child – 5.5″ high
Small Adult – 6.75″ high
Large Adult – 7″ high

Crown for 56 stitch cast on:
Repeat across the round
Rnd 1: k2, k2tog, ssk, k2
Rnd 2: k
Rnd 3: k1, k2tog, ssk, k1
Rnd 4: k
Rnd 5: k2tog, ssk
Rnd 6: k2tog

Crown for 60 stitch cast on:
Repeat across the round
Rnd 1: k3, k2tog, ssk, k3
Rnd 2: k
Rnd 3: k2, k2tog, ssk, k2
Rnd 4: k
Rnd 5: k1, k2tog, ssk, k1
Rnd 6: k
Rnd 7: k2tog, ssk
Rnd 8: k2tog

Crown for 72 stitch cast on:
Repeat across the round

Rnd 1: k4, k2tog, ssk, k4
Rnd 2: k
Rnd 3: k3, k2tog, ssk, k3
Rnd 4: k
Rnd 5: k2, k2tog, ssk, k2
Rnd 6: k
Rnd 7: k1, k2tog, ssk, k1
Rnd 8: k
Rnd 9: k2tog, ssk
Rnd 10: k2tog

Crown for 80 stitch cast on:
Repeat across the round
Rnd 1: k6, k2tog, ssk, k6
Rnd 2: k
Rnd 3: k5, k2tog, ssk, k5
Rnd 4: k
Rnd 5: k4, k2tog, ssk, k4
Rnd 6: k
Rnd 7: k3, k2tog, ssk, k3
Rnd 8: k
Rnd 9: k2, k2tog, ssk, k2
Rnd 10: k
Rnd 11: k1, k2tog, ssk, k1
Rnd 12: k
Rnd 13: k2tog, ssk
Rnd 14: k2tog

Cut the yarn with several inches to work with. With a yarn needle, pull the yarn through all the remaining loops, secure and weave in end.

Edits:
11/19/2014 – corrected division of stitches multiples. Changed Young Adult cast on to 72 and changed Crown for Young Adult.
12/17/2015 – replaced a broken link for Magic Loop method.

Next Page »