
The Best Crocheted Potholder
15 August 2010

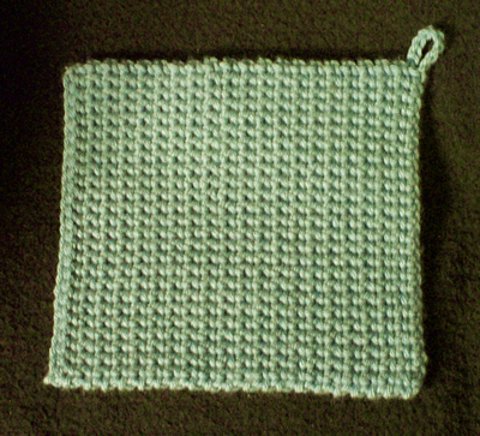
This is a quick to make double-thick potholder.
This sample is made with 100% acrylic worsted weight yarn with a size I (5.5mm) crochet hook. If potholder is going to be used with high heat, it is best made in a natural fiber like cotton or wool. With kitchen cotton, I typically use an H (5mm) hook.
Abbreviations:
ch = chain
sc = single crochet
sl st = slip stitch
ch = chain
sc = single crochet
sl st = slip stitch
Instructions:
There is a video here showing the technique for this potholder.
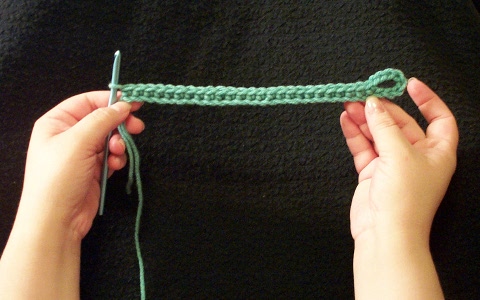
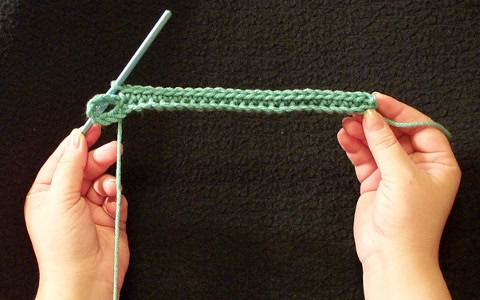
Ch 33. Turn.
Row 1: Sc in 9th ch from hook. Sc in remaining ch. (25 sc). Ch 1. Turn.
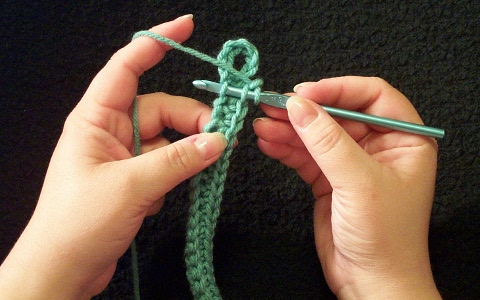
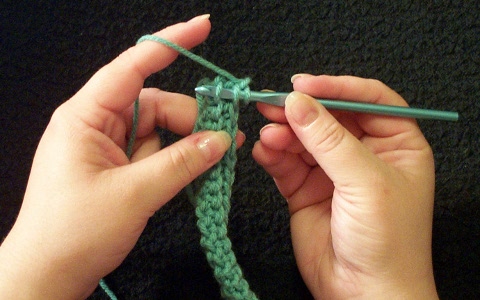
Row 2: Insert the hook through the back loop of the prior row sc. Also insert the hook into the loop below it that is in the chain row. Sc.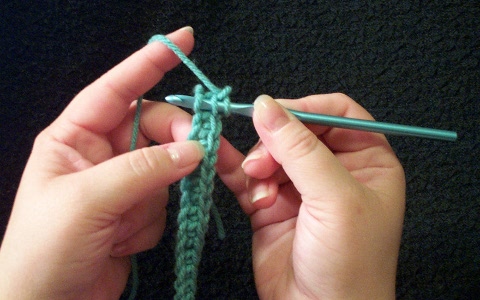
Sc the rest of the row in this fashion, inserting the hook through both loops. (25 sc).
Ch 1. Turn.
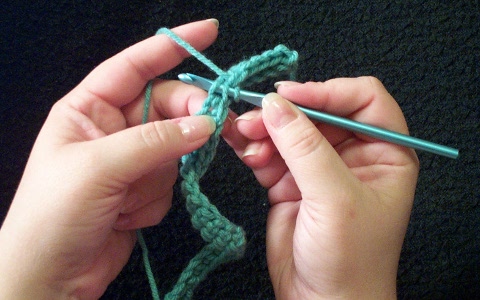
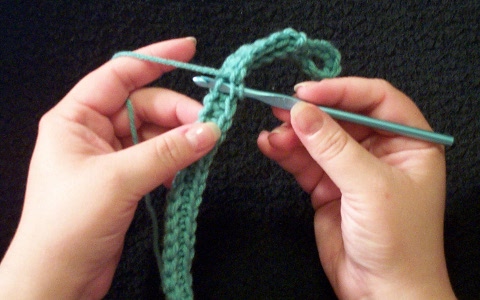
Row 3: Insert the hook through the back loop of the prior row sc. Also insert the hook into the loop below it that is in the first sc row. Sc.
Sc the rest of the row in this fashion, inserting the hook through both loops. (25 sc).
Ch 1. Turn.
Row 4-42: Insert hook in back of prior row sc and in loop below from the other row of sc. Sc across row in similar manner. (25 sc).
Ch 1. Turn.
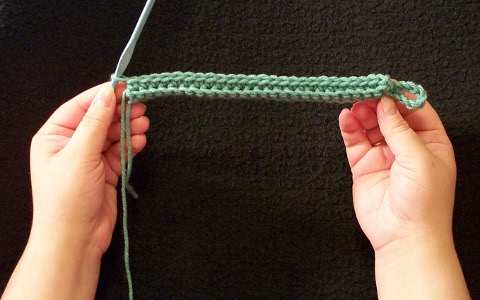
Row 43: Insert hook in back of prior row sc and in loop below from the other row of sc. Sl st. Sl st in a similar manner across. (25 sl st). Finish off.


This is a great pattern. I really like the sc through the back loop and the row below. What yarn did you use?
I’ve always used a worsted weight. 100% acrylic, but other fibers would probably work.
I use 100% cotton on the ones I made. I love them and so does my dad. He asked for more. You cant even feel the heat on the pans when you take them out of the oven
I love 100 Percent Cotton it’s much better if you make it a Double Pad and see it together or there is a hot Pad that makes up so it’s already put together for you when you crochet it up in the Pattern it’s really Nice single Crochet Hot Pad pretty Pattern to 🥰
Can you tell me how much yard to buy for one potholder?
Between 70 and 80 yards.
For an oven mitt you should not use anything other than 100% COTTON, other fibers will melt or catch fire….only 100% cotton!!
It is fine to use 100% wool for an oven mitt. Firefighter turnout gear (the clothing) is made of wool because it doesn’t catch fire easily and if it does, it self extinguishes. 100% cotton is fine, but actually wool is better.
I’ve done wool to make knitted potholders and diagonal trivets and then “boiled” them. They are the best! I think they’d be great for crocheted projects too. Also, items like these are a great way to use up leftover wool from other projects. (BTW, it is unsafe to wear synthetic wigs when baking – they can melt to your head!!!)
Dear Mama, I have always used acrylic for my potholders but lately “everyone” is saying only cotton or wool should be used because of the flammable issue. Mine have never caught fire, or melted. I want to make some for friends but cannot find the right color in cotton, only acrylic. What should I do? What should I say?
As long as they are aware that acrylic can melt when exposed to high heat so that they use them accordingly. For lower heats they work just fine.
Hobby lobby has great colors of cotton!
I have been using this pattern for close to 40 years. It looks awesome as a afghan as well. The difference is you tie off at the end of the row and change colors. It’s a thermal blanket.
Hi Val,
I was wondering if there is a set pattern to make the thermal blanket.
I would really like to make one. We live in New York, up near lake Ontario and we get alot of snow and really cold tempertures.
Looking forward to your answer.
Reply from Val,
There is no set pattern. you can make them any size from a baby blanket about 80 stitches to a queen size about 150 stitches for the bed. I like the variegated yarns on one side and a solid on the other. Red Heart or Hobby Lobbies ‘I love this yarn’ seems to work the best as some of the other yarns split.
There are a few ways to make it. first is like the pot holder where you don’t change colors and just go back and forth. The next is with color change at the end of each row and this gives you the fringed look. Cut yarn about 5″ longer at the end of the row and loosely tie off. You will untie this later and combine 4 strands to make a fringe. You can make a striped pattern if you like by swapping colors every 20 rows or so. The first 3-4 rows can be a bit unwieldy then it gets easier. The other I have done is a scrapgan. Made a bunch of squares 25 stitches and crocheted them together. (Giant potholders)
The only trick I can tell you is at the end of every row there is a hidden 1/2 stitch… If you don’t crochet this stitch, then the blanket will get narrower. hook size is about a O,P, Q depending on how tight you crochet. Good luck. Let me know if you have any questions.
The happy hooker,
Val S.
Thank you so much for this pattern. I have been making the pot holders and love doing them. However, I have two sons who have requested blankets and we live in Florida. They love afghans and love to cover up with them. When they are sick, the cure is cover up with an afghan. I made my pot holders from cotton yarn but think I will try regular yarn for the blanket. Thanks again. Cathy
Question for Val. Do you have any idea of the amount of yarn the 150 stitch afghan will need. I just tried a P hook and red heart yarn. Thought I might do it all one color at first to make sure I can do it. Looks like the P hook will make it quite large even with the 25 but will it be real loose? Thanks for your help. I just love this pattern.
Response from Val:
Hi Cathy,
Yes, a P can make it quite loose, depending on your tension. If you can poke your finger thru between the stitches, it may be to loose. I’d go down to an O size then. A 150 stitch afghan takes about 8 skeins of yarn..If you are doing single color it may take 7 due to no fringe. Glad you love it. I have been doing this stitch for almost 35 years and my MIL probably close to 70 years.
Val
Val,
What do you mean when you say a hidden 1/2 stitch at the end of every row?
Also I see you say to use either O P Q hook, which would you say is the best one to use?
Thank you for any help you can provide,
This is the response from Val:
Hi Lori,
First hook size,
If you crochet loosely and want a warm blanket, then use a smaller hook. The warmth of this blanket is from the ‘ honeycomb’ that the crochet makes. Like thermal underwear.. If you make a test sample and start with 20 stitches. Count each row make sure you have 20 stitches. You will usually find that there is a stitch hiding at the end. Make at least 10 rows back and forth. Make sure you still have 20 stitches. This is a fringe version dual color blanket(http://blogs.thetucker.com/knit/files/100_0572.jpg). Crocheted with an O hook. ( Hobby lobbys I love this yarn) Because you cut and tie off and go back it is a little different than chain one and turn. The first 3-5 rows are tough and the blanket is wiggley. It will look like a macrame rope. If your tension is not consistent it will be wavy on the edges. I can always tell when I was watching an exciting movie as the stitches get really tight… To finish off the afghan go down one hook size and crochet a single crochet at the beginning and end of the afghan. Not to tight it will bubble, this helps it not to splay out over time. You can see this picture with the purple yarn.(http://blogs.thetucker.com/knit/files/100_0571.jpg)
Hope this helps.
Val S.
The happy hooker.
I would love to make a blanket with a different color on each side. How is that possible? I could just be having a brain fart.
To do that you need a pattern with two rows per color on a given side so that the yarn is brought back to the beginning point before the color switch for the other side. I have pondered my potholder pattern and can’t think of any way to do that with it.
I have made this one before: http://www.knitting-crochet.com/crochet/revbabafg.html
It is a shell pattern and some of the other color shows through the holes to the other side, but does give a nice effect of beginning different on the two sides.
I’m interested in the pattern, but it doesn’t say what size hook to use.
The very first sentence says that the sample(made with acrylic, worsted weight) in the picture was made with size I (5.5mm) crochet hook, but with cotton she uses a H hook! Happy crocheting!
Pattern states hook is size I
I love this pattern!!
Ms. Wilrey,
Ms. Shannon has it all right: Size “I” generally, but “HH for cotton. You have it mostly right. This is what happens when WE ALL stay up too late!
OH NO!!!! I meant “H” of course, NOT “HH. I promise not to write again and to go to bed.
very clear pictures. I can’ wait to make some.
very simple and fun!
plus i like the demo ezy 2 follow thanx.
I love these, but confused. So do you bring the yarn through all three loops or just two loops on the hook? If I read this right, you bring the yarn through the back loop, which is on top of the chain and then the loop across from it, then bring the yarn through those and then do a sc then move on to the next loop. Is that corect?
Sorry, it looks like you are folding the yarn together. So could you please help me. I do crochet but this one is just not coming to me. Thanks,
Grandma Hutch
I’m so sorry it’s confusing. You insert the hook through the two loops on the two rows of sc as shown. Yarn over and pull through those two loops. Then yarn over again and pull through the two loops on the hook to complete the single crochet.
Oh my goodness!!!!! I have made two of these this evening and I don’t think I’ll ever use another potholder pattern again!!!! I LOVE how this is so think you can’t possibly get burned through holes in the pattern!! My married daughter who lives next door grabbed the first one I made and said “This is MINE!” Thanks ever so much for this awesome pattern!! Just in time to stockpile these for Christmas! If ya’ll haven’t tried it…..get busy!! My husband wants a blanket in this pattern!! Whew!
Thanks!!! I learned this pattern from my sister but couldn’t figure out how to write it down. Good job! And the pictures do help. I use a G hook and cotton yarn. This is the best potholder because it is thick and durable and can take many washings. I was waiting at the doctors office and sold three on the spot!! I make them longer for a hotpad for the table to match the potholders. It is easy to add various colors to make striped patterns and the ends of the yarn hide well. They do make wonderful gifts!
What a great hot pad! I have made hot pads in the past and doubled them, but this is fantastic! Have been knitting for the past year, just learned, but now we are beginning to travel, so crocheting is back!!! Makes a nice thick pad! Thanks so much.
Several years ago, a pattern similar to this one was in a pattern book. I have memorized that pattern and use it all the time making potholders with cotton yarn. I love it.
I found this pattern on Ravelry.com and followed the link here. I have made some dish cloths from a ball band pattern, and decided this might make a great accompanying pot holder to make a set.
I’m using Peaches & Creme cotton worsted weight, and I love how dense and thick this is coming out, even on only the fourth row. This is a great pattern! I can in good conscience give this out, knowing that the likelihood of someone getting burned because the potholder is poorly designed is zero. This is thicker than some potholders I’ve purchased! What a great pattern!
Thank you for making it freely available!
I have made this same stitch for potholders for over 20 years and have never seen anyone else use it. You are right it is the best potholder ever. Good to see someone else use it.
Absolutely the best potholder I’ve ever crocheted! Found this pattern two hours ago, and now my new cotton potholder is ready. I’ll never again burn my fingers when baking. Thank you!
I Am a new crocheter but do knit and I have tried to do this pattern but just can’t seem to figure out where to pit my hook. I have even gone and watched the u tube but it isn’t clear enough for me. I have not found a potholder I would rather make so If u cld tell me where else I can go for help I sure wld appreciate it! Thank you!
I’m sorry about the poor quality of the video. I need to get a better camera to make a better one, but don’t know when that will be.
What may be confusing about the pictures is that I’m holding the work differently than usual to try to best show the loops I’m using. Maybe if I try just describing it in words.
The first row of single crochet is completed as usual. Do a chain and turn the work. Normally you insert your hook in the front loop of that first single crochet to make the first single crochet of this new row. Instead, insert your hook in the back loop. With your needle still in that loop, reach with your needle down the back of the work to the available loop of the starting chain row. Insert your hook into that loop as well, so that you now have two loops on your hook. Yarn over and pull through both of those loops. Yarn over and pull through the remaining two loops to complete the first single crochet.
On the next row, again insert your hook in the front loop of the first single crochet. Again, with that loop on the hook, reach behind the work to the available loop of the single crochet from the prior row.
I hope that description helps.
Love this pattern, just hope i did it right. I made one the other day and i love it, but i didnt reach behind any stitch to grab a loop. I did it as pictured i hope. My name on Ravelry is croknitmama if you get the chance would you please look at mine and see if it looks like i done it the right way. The color of mine is country mauve, which looks purple to me 🙂
Thanks for the pattern
Great pics! Looks just right to me.
Hello, I’m a new crocheter, about how much yarn do you need to make one of these? Will 100 grams (2 balls) do it? Thanks for sharing this lovely pattern!
It takes approximately 50 grams (75 yards) for one.
I love this pattern and have tried it a couple of times but some how keep losing stiches.So as the pattern progresses I have it looks like a Mayan Temple shape. 🙁
Hi, Kara, I’ve had the same problem – either lose or gain stitches. The only advice I can give you is to count each row after you complete it. I kind of get the “hidden stitch” at the end of the row: the row looks complete, but the count is off. So I need to add a stitch at the end and sometimes I really have to “dig” for the two loops if the work is too tight. I hope this helps. I can’t tell you how many times I’ve had to frog (rip out) down to the first row!! Very frustrating.
Oh, I forgot to mention that when you “turn your work” you aren’t turning it from one side to the other (front to back) as in normal crochet. You are rotating it, not flipping it over, if that makes any sense. So you are always working on the same side/surface of the piece. I am right-handed, so I usually crochet from right to left along the top edge; when I reach the end of the row, I am at the left end of the row. I then flip the piece over front-to-back, so that the beginning of the next row is at the right end of the piece and I am holding it so that I work along the top edge. When making this “double-thick” pattern, though, I am holding the piece in my left hand and the right edge is the row I’m working on. At the end of the row I am at the “bottom” of the right edge, so I rotate the piece around – but on the same “front” side – so that I am at the “top” of the right edge. I hope this makes some kind of sense to you!!
Thank you so much for posting this pattern. These ARE the best potholders. I have about six of them made by a grandma, who did not pass along the pattern. The pattern is simple to follow and I am thrilled to have it. Thanks again.
Thanks for sharing the pattern. The instructions & pictures are very helpful. Even being a lefty I can follow them. However for me counting the rows is hard, so I’ll probably just keep going until it looks like a potholder size but for a reference what is the measurements of your finished one?
Thanks!
The cotton with an H hook (5mm) made a 7″ square. The acrylic with an I hook (5.5mm) made a 7 1/2″ square.
thanks so much…
Happy Crocheting!
Love the thickness of this potholder. Just having a bit of problems at the edges, and I’m increasing and decreasing in error so my edges are getting really wavy. I count the stitches, but looking a the edge gets me a bit confused. Any hints?
I can’t find a single I hook in my stash darn it anyway, but a J hook seems to be working just fine. I am going to try this pattern with the wool I found at Goodwill – around 18 skeins of wonderful Icelandic soft spun. I am thinking that I will probably use a J hook since the wool is so much thicker. I don’t know, though, I still might want to use all the wool for a shawl or blanket. Decisions decisions!
Oh, and thanks for this wonderful pattern. Either out of sheer dumb luck or… well, no, it’s sheer dumb luck, but it is working out beautifully!
This truly the BEST Potholder. Thank you so much for sharing it with everyone. I can find nothing wrong with the way you have presented it. Thanks a Millon bannie 🙂
looks interesting but confusing will give it a try however/GGmaKitty
Hi! Thank you for this pattern!!! I absolutely love it. I made some of these potholders for a Okinawan friend and now her daughter wants to learn how to make these too. Thank goodness for the Bing Page Translator. I used it to translate your instructions to Japanese so that she can follow your directions in her native language. 😀
Warm Regards,
DeeAnna
Hi,
Was wondering if you plan to make a video of this potholder. It’s so nice, some people may find it easier if instead of seeing the crochet hook already thru the loops, they can see step by step where the hook is moving. Your explanation is good, but not everyone, especially beginners can follow written instructions. Just a thought.
I have made a video (http://www.youtube.com/watch?v=_QvOAc9lqCs) but it is poor quality. Sometime when my life is a bit calmer (yeah, right) I am going to try to make a better quality one. Thanks for the suggestion.
Hi I just started crochet a month ago I am a 59 and have a back problem and cant work any more so I thought I would do this to keep my mind active. I been looking for pot holders to do I have the sc crochet stich down good but not the dubble lol kind of long in the tooth to start but been to busy all my life to do this kind of thing, now I have the time I love this pot holder and am going to try to do it live your vito of it I learn better when I can watch over and over again. Thanks so much for posting that.
Joyce NANA to the grandkidos
I have also just gotten into crocheting. My mum has been after me my entire life to sit still n give it a try. Got the opportunity to spend almost 2 mths with her recently and made 2 blankets. Id like to make this potholder but cant get u-tube to load. Any trick to learning to read pattern correctly would be appreciated. Good luck to u Nana Joyce. Never to late to start. (p.s. I’m 46 myself) lol.
Well, ladies, I have you beat! I taught myself to crochet at age 78. I’m enjoying this potholder pattern.
Thanks so much for the pics. I have made this before a very long time ago and forgot just how to start it. Mind freeze lol I am going to make some for gifts for the holidays.
I’ve made several of these – from a no longer existing website – and I love them because they are my eaters-of-too-short-ends-of-yarn. If the length of yarn is over a foot long, it goes in. Because the ‘front’ and ‘back’ join, the ends can be hidden between them, leaving no ends to weave it!
My favourite felted cat-mat is made with this pattern and 100% wool yarn that someone had cut into four-foot lengths. I don’t know if it was cut that way for some reason or if someone had a skein and cut through it. At any rate, it made a very thick and cushy mat that – if moths never get it – will last forever. Over a hundred strands of yarn and NEVER an end to weave in! Yowzah!
I received one of these potholders several years ago and finally have found your pattern for replicating it, causing me to pull out my crochet hook for the first time in 20+ years. Once I got the hang of it, I found it to be very fast to do, and I can see these potholders in the futures of many loved ones. Thank you for sharing the patter with good photographs.
This is the ONLY potholder I use in the kitchen! I have been making this pattern since the early 1980s, so that’s about 30 years. It is worked in one piece but is double-thick. I like the way you made your hanging loop with the starting chain and will try that next time. Thanks!
Love this pattern, thank you for sharing.
I only came upon your website today after I had been searching the web for years, and in magazines and books for decades to find out if anyone had come up with ‘my’ stitch which I have named the double density(dd) stitch. A long time ago I invented it for myself when I needed a higher density for a door mat made out of jute twine. I was so happy with ‘my’ invention that I kept working with it designing everything from potholders (square and round worked from the centre; square worked from one corner), to oven mitts (my most popular item), and bath mats, coasters, heat pads, egg warmers, tea cozies, you name it. My sales have been very successful, and since I live in a tourist town, Vancouver, B.C., my products have found homes in kitchens all over the globe. My difficulty has been and still is to write down the patterns so that they are easily understandable. I did take pictures of how to crochet the basic dd stitch, just like you did, also of how to make oven mitts, but I do not know how to do the publishing of it all. You really made my day today because I truly worried that this wonderfully functional stitch would not make it ‘out there’ before I die. I am 80 years old and only a novice on the computer. Thank you so much for the posting of the ‘best potholder ever’. I am so relieved to find out that the stitch has been known for quite some time. Is there a name for it? If you are interested in any of my designs please do get in touch with me. – Ursula
I wish I could remember who first showed me this stitch. It was about 35 years ago and would have been either a friend or relative of my grandmother. I have had lots of people comment to me that they’ve known about this stitch for a long time, but I don’t know if anyone really knows how old it is or where it came from. Like you invented it, it seems to have been invented by others as well, and used literally all over the world for years and years. I actually put together the photos and pattern about 8 years ago for a friend that wanted to pass it along to a friend. Once I got involved with the online knit/crochet community Ravelry, it gave me the idea of putting the pattern online, which I did about a year and half ago.
Always good to meet a fellow long time crocheter.
Hi Ursula,
Would it be possible to buy your patterns for using the double density (dd) stitch to make your round and square potholders and the oven mitt? This is just what I have been looking for for years,a thicker potholder. I am a self taught novice crocheter and not creative in making my own patterns. I enjoyed reading your post from someone so experienced with crochet.
Hi Maryann, I am happy to read about your interest in my designs. As I said before, I am still struggling with the writing down of the patterns. It is very difficult. So far I’ve been showing the method of making the various potholders and oven mitts from person to person. But I will seriously get to work now and look for help with either step-by-step photographs or video recordings and the corresponding explanations. I am such a pitiful novice with all that technology. Please do get in touch with me directly. I can send you photos of some of my products and also my first attempts of explaining and demonstrating the basics of working with the dd stitch. If you understand those then I am on the right track with creating the patterns, and you will already be able to play around with the stitch. Hope to hear from you.
Ursula
Hi Ursula,
Please resend the patterns. I had email problems and lost your email and the attachment. Thank you so much. Maryann
I too have been looking at re-learning how to do yarn crafts, when I was younger I used to do the “no-look” method,happily making a throw while watching tv. I was very experienced, but after a recent surgery, I find that I am in fact getting reacquainted with the whole process…..
As for writing down directions, perhaps invest in a type as you talk program, and you can simply talk your way through the stitch as you do it… it has helped me in the past to understand what I am doing watching a youtube, and translating it to myself 🙂
This is a request for Ursula Graf. I love this pattern and am amazed at the quality of the finished potholders. I would love to do one in the round and wonder if you could send me the pattern. It would be so much appreciated.
Thank you!
This is from Ursula –
the fact is that I still have not been able to write down the pattern which is quite the complicated process. I have been making lots of oven mitts on order and also taught others from person to person how to make them. One day in the future I will get the pattern on paper and on the Internet. I hope to find somebody soon to help me with the latter. Right now though my priorities lie with urgent family matters. I am sorry that I am not able to help you out at this moment. Thank you for your interest.
Ursula
I have been reading your correspondence regarding the DD stitch patterns for round potholders and oven mitts. I would love it if you would send me them also…. I would like to test your patterns and try to help with any corrections needed. Thank you very much…. Jodi
Hi Ursula,
Would you still happen to have your oven mitt pattern available?
My friend called me this morning with this pattern. I immediately went to the computer, looked it up and started it with her help. It is the cleanest thickest potholder with only one yarn, that I have ever done. My husband says he wants a blanket out of it also. Thanks so much for the pattern.
Thank you so much for this post. I have been using this method for my potholders for a long time thanks to the internet crochet community. This stitch or technique is known by various names, the earliest I have found being the Honeycomb Stitch from the early 1900’s. Other names are Helena’s Potholder Stitch, the Double Thick Stitch, the Siberian Stitch, the Waffle Weave Technique and Thermal Crochet. I am sure there are many more.
I was first introduced to this stitch in a pattern by Priscilla Hewitt, http://priscillascrochet.net/freepatterns.html, who used a ‘Potholder Stitch’ to make oven mitts. http://priscillascrochet.net/free%20patterns/Kitchen/Potholder%20Stitch%20Oven%20Mitt.pdf
Later, she also used this technique in a five piece bath set for the back and facial scrubber. http://priscillascrochet.net/free%20patterns/Bed%20&%20Bath/Five-Piece%20Bath%20Set.pdf
I searched for other uses and found a potholder pattern by Sally George, the Double-Thick Potholder. http://web.archive.org/web/20100823161416/http://www.hookandyarn.com/Free_Crochet_Patterns.html, This stitch was presented as another use for a reversible afghan pattern. http://web.archive.org/web/20100821013721/http://www.hookandyarn.com/uploads/afgan.pdf
As I continued my search I found two posts that seem to have become the most frequently referenced although both of the original websites are defunct.
Helena’s Potholder Stitch:
http://web.archive.org/web/20011225021033/http://www.spotfans.com/unplugged/spotfans/archives/980113/Cheryl/index.html
http://web.archive.org/web/20011201212512/www.spotfans.com/unplugged/spotfans/archives/980113/Cheryl/potholder.html
The Double Stitch Potholder Tutorial by Lauri Bolland:
http://www.ravelry.com/patterns/library/double-thick-crochet-potholder
Since then there are a number of tutorials and videos posted on the net. They include:
http://www.crochetville.org/forum/showthread.php?t=91315
http://siberianstitch.com/tutorial.html
http://www.thehookandi.com/2008/10/16/technique-thermal-crochet/
http://ettirgam.blogspot.com/2007/10/waffle-weave-technique.html
http://www.youtube.com/watch?v=Tu2GzJHCgwE
http://maketotebag8.blogspot.com/2012/02/single-crochet-thermal-stitch-tutorial.html
I have found that the basic technique used by Sally George is repeated in most tutorials. The only difference seems to be how the last row can be worked as used in Lauri Bolland’s tutorial. Two important additions of which I am aware are a method to change colors which produces a nice edge (Lauri Bolland) and now Mama’s addition of a loop in the first row that makes that process so simple. Thank you Mama.
I was also very excited to read the posts by Ursula Graf. She seems to have expanded the uses for this stitch. I hope she is able to memorialize her patterns and that she receives the assistance she requires to do so. I would be happy to lend a hand.
Thank you for all this information! This is amazing. I know everyone else will also really appreciate all of your history and links.
the video shows that you donot turn at the end, your instruction say to turn-which is it??
Turn. I turn in the video too, but it may not look like it by the way I have to hold it to demonstrate going through both loops.
FINALLY! I have been searching forever! Thanks for sharing this stitch.
I love this pattern! Have you tried to do the double thickness stitch in the round or as a circle? I cannot figure out how to do it, but would love to make matching hot pads
I love the idea. I will give it some thought and see if I can figure out how to do it.
Can’t wait to try this! I’m the potholder queen in the family so I’m always looking for something new to give.
Thank you for this pattern. At last a thick potholder made in one piece. Once you understand the pattern it’s a cinch. I also made one without the loop as a washcloth to go with my granddaughter’s Easter gift of her favorite body wash. I have been crocheting for over 40 years and always love new patterns.
I love this pattern. Many years, a similar pattern came out in one of my pattern magazines. I made so many of the potholders, I memorized the pattern. The only difference is the loop at the beginning of the pattern. I use cotton yarn for my potholders and a size H hook. I have made lots of them. And I have quite a few in my kitchen. I prefer to use them instead of others that I also have in the potholder drawer.
Thanks for the pattern. I can now save it to my computer to use in the future for more potholders.
I know what everybody is getting for Christmas next year! I’ve seen a similar pattern but never worked at it hard enough to figure it out. Your pics and tutorial make ALL the difference! Thank you! I’m thinking that if I can find some sport-weight cotton yarn, maybe I’ll make washcloths, too. Right now I have work to do and can’t drop everything to try this — groannnn!! 🙂 Maybe tomorrow. 🙂
These are wonderful, and just in time too! I just finished crocheting a dozen each of hand towels and dish cloths for my kitchen make-over. I was looking for a new pot holder pattern. My old go-to was a magic square one that made it in two layers, but didn’t wear quite as well as this one will. Also I wanted a cushy rug for in front of the sink that I could make with the same yarn. Two problems solved with one pattern. Thank you, thank you, thank you!
Thanks for such a clear and easy to understand tutorial of this potholder. I am going to give it a try very soon.
I have made several with a double thickness then stitch them together. This would eliminate the need to make two and save yarn in the process.
Thanks again.
JCG1224
Love this pot holder/hot plate pattern. I just have to make them for my DR table..and also like the many other patterns on you site….
You do BEAUTIFUL work…
I…
The old pattern you may remember may be Helena’s Potholder Stitch. I love the pattern and my copy is getting very worn out. You have added a nice touch. I like the extra chain at the beginning that becomes the loop. It’s a lot nicer than adding it at the end like I have been doing.
Once again thank you for you wonderful patterns. I have made many dish towels, dish cloths, the scrubbies and now I have finally found a great pattern for hotpads. My Christmas shopping for 2012 will be conplete before the summer is over. Love it
Thank you for this pattern – perfect! I’ve made 12 of them already. Had trouble at first missing the first stitch and ending up with it getting smaller and smaller.
My favorite sitch marking tool is a bobby pin. Started putting one in the first stitch as I turned the row, and was able to keep the count right.
I’m 83 and on a very limited income, have been buying the multicolor Sugar n Cream cotton when Michael’s has them on sale for $1.00 — one ball makes the perfect size..Christmas presents for all – solved.
Ruth,
Walmart often has the lowest price if you live near one!
May I please add a link to this pattern to my site listed above? I am very strict about following copyright laws and only post links, not patterns.
Even if you say no to my request, this pattern is being listed to my personal list of items to make.
Thank you for considering my request.
Norma
Absolutely!
Thanks for the tutorial. I now have a favorite potholder pattern. I have made several since finding this link a few weeks ago. Thank you again for taking the time to make and post this tutorial.
Pattern looks pretty. I’ll try to make it.
Thanks for this pattern. I’ve made several & gave some as wedding gifts. They loved them & wanted the pattern – I’ve directed them to your site.
Wow. It s new fir me. At first I made mistake, and I re do again and I start to understand how to do it and I am going to make lots!
I absolutely LOVE this pattern. I discovered it about two months ago and in the time since I believe I have made somewhere in the neighborhood of 50 of them. I also make a hot pad, or trivet, whichever you prefer to call it, for the table, for hot pans or dishes. All I do to make that is leave off the loop and make it larger. I still chain 33, then a single in the second chain from the end, and continue just like the potholder. It comes out about 7 1/2 inches square. The potholders are about 6 inches square. Of course, I guess not everyone makes them square, but I prefer them that way. They can be made in 2 colors as well, but carrying the other color on each side, but I haven’t figured out quite how to make the edges look right. If anyone else has experimented with this idea, I would appreciate your input. I want them to be one color on one side and another color on the other side. Thanks.
I tried printing off the pattern but all I get are the comments, I just want the pattern. Am I doing something wrong? Thanks
At the top is a printer icon you can use that will make a printer friendly version without the comments.
Truly the best!!! I am my own guinea pig and after burning my hands using many different methods, putting two together to make up for the holes was my only solution. This is THE solution, as someone stated earlier, I do feel comfortable giving these as gifts knowing they wont get burned.
Thank you
I have also made these potholders for along time.
You cant hold on to them for long ,my family wants them, as soon as I get them made. I make them out of peachs and cream.
They are the very best pattern for pothlders, but very confusing for some people. I tried a tutorial for a lady once, but yours is better, and I didnt put the hoop on mine first, but I like that.
Thank you
Is it possible to use 2 different colors, to make it two-sided?
The only problem with doing one color on one side and another color on the other is that the stitches for a given side are always worked in the same direction, so you would have to terminate the yarn for every row. What the pattern naturally lends itself to is doing two rows in one color and two rows in another. It works out to be one row of the color on each side, so stripes one row thick, and then the colors can just be left out to the side while not in use, so no having to cut yarn and weave in ends. You can see an example of one of these in this post: http://blogs.thetucker.com/knit/2011/01/23/more-potholders/
Hi Emily, actually there are two ways. At least that is how many I figured out. It is quite easy when you are able to crochet with either hand as I am. If you are not you can still do it but the fabric will look a bit different.
Start with a chain row of colour A, turn.
Row 1: sc to the end, ch 1, abandon loop, turn.
Row 2: insert the ‘naked’ hook through the second back loop from hook and the corresponding loop of the chain row below, grab yarn of colour B and pull through both loops, ch 1 and re-insert hook through the same loops for the first sc st. Do the double thickness stitch to end of row, ch 1, abandon loop.
Row 3: turn the work around, grab abandoned loop of colour A, insert hook the reversed way, eg from the bottom up, eg through the lower loop first, then the top one for a sc st. Continue in this fashion to end of row, ch 1, abandon loop.
Row 4: turn the work around, grab abandoned loop of colour B, crochet the same way as in row 3, ch 1, abandon loop.
Row 5: turn, grab loop of colour A, insert hook from the top down. You will notice that the sts all lie the reversed way. You may get confused by the looks of it. Just stick to the principle to always insert the hook first through the loop on the side and colour facing you and then through the available loop of the other side/colour, no matter whether the loops are situated high or low or whether you have to insert the hook from the top or the bottom. I wish you luck with it, I am open for any questions. Sorry it took me so long to respond, I only came across your comment today. For the longest time I totally neglected to follow this very fascinating blog. I will certainly look at it more often now. Ursula
Just tried this potholder for the first time. So easy. It is also so thick. Love it. Great illustrations. I used Sugar n Cream and size H. Thanks for the great job.
Forgive my ignorance, but in the last set of directions it says: S1 st. What is an “S1 st”? Thank you!!!
Slip stitch. Doing slip stitches across sort of seals the gap between the two staggered layers of single crochet.
I love this potholder pattern. I’ve made quite a few to send to family members and give as gifts. They are nice and thick but not TOO thick or bulky. Thanks for posting and by the way, all of your work is gorgeous. I have picked out a few projects from your site to start on for Christmas gifts. Keep up the wonderful work!
Great pattern. I make the hanging loop at the end rather than the beginning. The double-thick stitches would be ideal for tote bag straps that are sturdy and have minimum stretch in either direction.
Oh my goodness! I’m so glad I found you on Ravelry! This is a great pattern for THE BEST CROCHETED POTHOLDER in the WORLD! The first thing I did when I was directed to your pattern site, was read the whole thing…then I watched the video, then I printed out the pattern. I live in WA state, and right now it is only 4pm, so I am going to Michael’s for yarn! I’ll have a whole bunch of these little jewels made up in no time! I will try to figure out how to send you a picture of my very first one! I can’t tell you how long it’s been since I had butterflies like this, I am soo excited to make the Potholder! Thanks for sharing, and for the photos and video!
gramma2seven
Can’t wait to try this. This would also be great in varigated yarn. Thank you so much.
Finished my first one, and am working on my 2nd…I’m making several for Christmas gifts. Love this pattern! Can you please email me your email address so I can send you a photo? Thanks again for the pattern!
gramma2seven
I just finished this potholder and it is the best pattern I have ever seen. So nice and thick and easy to make and easy to finish off. I LOVE IT, and wish I had found this pattern years ago. Thank you so much!!!
Love this pattern. Already made a few potholders and they are great! Thank you for sharing.
I’m new to crocheting. I love these potholders.My problem is they go out on the edges.a zig zagin an out on the edges.
I have heard of this problem before. It usually has to do with lining up the correct two loops. You are probably getting the correct loop from the last row, but for the loop from the row before that, you may be getting the one from the stitch to the left of the first loop.
I learned to “dig” for the last stitch of the row – it’s pretty well hidden – and be sure to pull up two when you do it. My first attempt resulted in the zigzag – it was very pretty, but I’m not sure that I can duplicate it on purpose! Made a nice edge.
I found this pattern several months ago, and I have made many pair of potholders with worsted weight cotton. Everyone loves them! I’ve even sold them at charity sales to raise money for a local food bank. Thanks so much for posting this pattern.
I just found this pattern last week somehow and started making one right away. I am using cotton yarn and the potholder is nice and thick. Thank you very much for posting the pattern.
It sure is the best crochet pattern for potholders. I’m doing some more for myself and my friends. Thanks a lot for sharing this pattern. 🙂
This tutorial is great – it includes the step that the other popular one leaves out. I’ve made a half-dozen potholders in the past couple days – trying to figure out what I’ll do with them all. Have shared the pattern and “taught” it to a friend. Found some pretty acrylic yarn at Walmart and used this stitch to make a placemat. Used an H hook and chained 56, then worked the pattern horizontally. It’s a little stiff, but will be perfect to protect the table. Think the stitch will be great for headbands/earwarmers if worked horizontally – does have some “give” that way. Sky’s the limit! Thanks for really clear instructions. I am an experienced crocheter, but could not figure out that the “turn” isn’t really a turn until I saw it here.
Just came across your pattern from the knitting paradise
forum and sat right down in front of my computer and made one of your potholders. It’s absolutely fabulous! Thank you for sharing.
I love this pot holder. I make a double thickness by Ch36 or 40 chains. sc in 2nd st and each st across and around the other side of the chain. You continue going around(never using 2 st in one) until when you bring the edges together they meet diagonally in the center until they touch. Cut the yarn with enough length to whip stitch together. My mother made these for years and we love them.This would give a differnt look and something different to work on.
I LOVE this potholder!!! I had made two for myself, but my daughter ‘swiped’ them…lol. Now I have to make some more… :). it is really easy once you get the hang of it and works great!!!!
Found this pattern today. I have been making potholders for years with two layers that I crochet together with a round of sc. I made one with your pattern using a ball of cotton Peaches and Cream I got on clearance from Walmart a few weeks ago for 75¢ . It turned out great! My husband requested that I make it longer, so I completed about 55 rows instead of 42. As I tend to crochet very tight, I believe I will try a size I hook next time — tomorrow!
I finished the second potholder using an I hook yesterday. Today I am working on my third potholder using half double crochet instead of single crochet. I think I will like this even better. The potholder will still be double thickness, but should not take as many rows to complete and therefore will be quicker to work up. I am using an I hook again because I crochet tightly.
Thank you for posting this! I love the pattern, the pot holders are nice and thick.
I might as well add to the comments here. This is truly the BEST potholder. Way better than anything store bought. I am crocheting a bunch to give away as Christmas gifts this year. I love that it is durable, I can actually take a pan out of the oven WITHOUT having to double it over like my store bought ones, and I can machine wash and dry it! Does it get any better?! Thanks for sharing this with all of us now making this wonderful item!
Oh, one question… How big does yours measure? Mine is a little over 6″ by 6″ and I am a ‘tight’ crocheter so I am trying to loosen up my tension. I’m wondering if it will make a difference in the heat resistant ability.
My cotton ones are 7″ square. Tighter ones might be a bit more heat resistent, but my somewhat looser ones still do the job.
This was a great potholder once I figured it out……thanks for the pictures – they did help. I must crochet loose as I used the “H” hook and mine was about 8-1/2 inches square….I think I’ll try a smaller hook next time or just start with less chain. I do think this is the best potholder as it is so thick and can be used as a trivet also.
accidently came across this potholder pattern.read all the comments,so many happy ladies not one bad review.I’ll make one tomorrow.
took me three tries but I finally saw the pattern. Still trying to get the edges nice n neat.I like the bobbypin hint.I think I’ll make fingerless hand warmers and add some pretty beads on the wrist section.sew the sides togather,leave the thumb section open,then continue past to end and bind off. many posibilties.
I came up on your pattern just afew hours ago. I just started making one. I really love this pattern. I’m starting early for next year Christmas presents, for my sisters and some people I work with. Thank you for the pattern. I had no problem of following how to do the pattern. Very will easy to follow.
does anyone know houw to do this stitch in the round? Am on my second pot holder, love the pattern, and want to make a matching round pad for my daughter to put under an appliance. Help!
How much yarn does each one take? A full ball of Peaches and Cream? What about worsted weight?
You will have some left from a ball of Peaches and Cream. It takes a little under 100 yards per.
Hi!
I do love how this stitch turns into a nice, square product. I made a much smaller potholder and found they work great as thristy coasters if you use cotton yarn. Great for using up partial skeins. I found some cotton yarns are thinner than others, so I do anywhere from 14 to 18 chains in the base, depending on the yarn I am using, and then keep track of how many rows I do so I can make a set of four the same size if I want. Usually it is from 25 to 30 rows.
Thanks for posting this tutorial. I recommend the link to my crochet friends all the time.
I know I’m the hundred twentieth-something commenter, but I’m wondering–would you make two of these and join them together, or is one layer enough? I’m making these for my aunt, and I want to make sure she doesn’t get burned. 🙂 Thanks for the quick and easy tutorial!
With the double thickness they are designed to be sufficient as is. I would recommend using cotton or wool since those won’t melt like a man-made fiber when exposed to high heat. Use at least a worsted weight yarn for adequate thickness.
Alright, good! Thank you! 🙂
I tested the yarn I’m using under a hot pot for a minute, and it didn’t melt, even though it felt like it was synthetic. So I’m pretty sure that it will work.
Thanks again!
-Esther
I have hunted for what seems like forever to find a suitable hot pad to go with some kitchen sets I was knitting. I didn’t find anything knittable that I was satisfied with. So I began hunting for crochet. After looking at what felt like thousands of patterns I cam across your pattern here. I am in love with it!!!!! The pattern the stitching creates lent well with the knitted hand towels, oven mitts, trivets and the like. Thank you so much for the pictures you posted. I really don’t think I ever would have understood how to make this otherwise. Thank you thank you thank you!!!! 🙂
I Love this stitch, have been doing it for awhile… I wonder how it would work with double crochet instead of single? I think i will try it, I sure wish I had the patience to make a blanket with it but I’m sure that will never happen!!
Thank you for the pattern. Made one for myself and now it looks like I will be making many, many more. Family, friends, co-workers…..etc…
Just made two of these today!!!! They are so easy once you get the hang of it. If you have trouble with the shape becoming a little like a trapezoid, like I did at first, I would suggest counting each stitch in the row and make sure u end up with 25. Also watch the last stitch in each row sometimes you have to look hard to find the top loop.
I just love this pattern. Thank you so much for the pattern.
Is it possible to get just the printed directions without the photos so that I can print it? I don’t want to copy all 26 pages ( including all the comments). thanks.
If you click the print icon at the top of the pattern, it will create a clean version of the pattern without comments. You can just click on the pictures to delete them before printing.
I was introduced to your site and pattern about a year ago. I was so excited to find such a thick potholder and made more than a handful of them for myself. Then I started making them for my daughers and couldn’t stop making them so found a way to sell them so I can keep making them. They are so fun and easy to make, can take it with me when I have to wait somewhere, and they make lovely gifts. Thank you so much for sharing such a wonderful pattern and tutorial. I have been crocheting for over 50 years and always enjoy finding some new trick.
Hi, I have just started crocheting and have been wanting to make a potholder. I saw this and have tried to start one, but I am not sure it is coming along right. Do you have a post with a picture of the underside of the potholder? Mine appears to be much different than what yours looks like. Thanks for the post of how to do it!! I just hope I can pull it off!! I thought this would be a good seller at a church craft booth.
It actually just looks the same on both sides. Both sides will basically look like the back side of single crochets (if you had rows of single crochet that weren’t turned from row to row). If you tell me more about how yours is looking I may be able to help.
I am left handed and found I had to use the front loops instead of the back ones. They came out beautiful with 100% cotton and an “H” hook.
Row 3 should read: Insert the hook through the back loop of the prior row sc. Also insert the hook into the loop below it from the first row of sc. Sc. Sc the rest of the row in this fashion, inserting the hook through both loops. (25 sc).
Otherwise, you WILL be doubling back!!
You are right! I am so surprised as long as this pattern has been out here and as often as it has been used that you are the first to catch that. I have fixed it in the pattern. Thank you!
Love this pattern. I have been doing potholders with a pattern my Mom had taught me called magic potholder…which is also doubled but in a different way…I love this…its so easy. I can do tons of potholders with this pattern. I just make it bigger…I Like larger potholders. The pattern is awesome!!! Thanks so much for sharing!!
Thank you very much for this pattern. I used it to make 2 potholders to sew together for a Kindle protector!
I am left handed and am very visual therefore I like the video showing for left handers , there is not much this way. I like this pattern, double thick pot holder.
Thank you, Roberta
Thank you for sharing. You did an excellent job in showing how to make the magic potholder, both on this site & on you tube. Thank you again. God bless always…
Absolutely love this pattern, thank you so much for sharing this. Would love to try making a kitchen or bathroom rug using this method, would be so nice and cushy to stand on!
Lovely, lovely! Just printed this out and can’t wait to make some of these great potholders. Thank you so much for sharing this. Your pics and directions are perfect. I have a bunch of cotton varigated yarn I got on sale, so I’m all set!
Guidance / recommendation for hook size:
Begin with hook size recommended for yarn.
Then try one size larger. For fibers without much stretch (cotton, linen, hemp), the larger hook is easier on the hands. For fibers with stretch/spring (wool), the yarn “springs” back together for a softer, thicker fabric.
Thank you for this pattern! I love it because it is so thick.We do alot of grilling & use them alot. Thanks
Thank you for the pattern! I am a beginner and figured it out fairly quickly. It gets much easier after about 4 or 5 rows! I made my first one with a size I hook and it came out to be about 8″ square. I am going to try an H hook next time and see how it turns out! Also, I had trouble finding the last stitch in the rows, so I used a bobby pin to mark it to make sure I didn’t lose a stitch! Thanks again
I love this pot holder, but feel stupid as I just cannot make it without losing stitches! Very frustrating! Can you give me any hints at all?
My guess is you are missing the first stitch of the row sometimes. It can be easy to miss because it doesn’t always look obvious. Have you watched the video tutorial?
Love this pattern! It’s so simple and creates a thick potholder that is just perfect! I used a varigated cotton and the colors worked up so nicely. I made it extra large for my niece’s husband (he’s a big guy who loves to cook)which I thought would be great for use when he’s using his big smoker for meat. It is not something that goes fast, because you’re creating a double thick hot pad.. but every minute spent is worth it! You can create square or rectangulare sizes to suit your needs easily. (I loved Kayla’s advice about marking the last stitch with a bobby pin, great idea as they tend to hide!)
Just made one of these. Love it. Easy to follow pattern and great result. I think a few of these will be on Christmas presents this year. Thank you.
Thank you for the pattern, i would like to ask permisión to post your page on a group page named crochet 4 the masses please and Thank you.
If you are meaning a link to my page, then certainly you have my permission.
This was the first project I did when I was learning how to crochet. My grandmother (God Bless her soul) taught me to crochet when I was just 3 yrs old. I did this project when I was only 6. Thank you for having this pattern.
Hi,
We’d like to use your pattern for a crochet class at our upcoming Fall Women’s Retreat.
We need to make copies for the women taking the class.
May we have your permission to make under 50 copies and use them in this way?
Best Regards,
Kelly Grace
PS I’m so glad I found your blog and Ravelry patterns. I want to make a zigzag afghan and I’ve lost my Aunt’s old hand written directions.
You can make copies. All I ask is that the blog url appears on the copies. Thanks!
Hello again,
We are making little slips with the materials list for the women in the class at the Retreat and I want to confirm that the potholder requires:
1 ball worsted weight acrylic yarn
1 size I (5.5mm) crochet hook
*If wool is used then it isn’t washable—correct?
Would you recommend cotton over acrylic?
Thanks,
Kelly Grace
Wool would have to be carefully hand washed, although they probably wouldn’t need washing often.
I would definitely recommend cotton over acrylic. Acrylic will melt when exposed to higher temperatures.
Has anyone found a way to do this pattern in the round? I really love this pattern and find it’s nice to always have a potholder started for “pick-up” work to relax with and not have to think about the pattern. Doing this in the round would be a nice addition.
I think the video is great! A friend taught me this stitch, but I couldn’t figure it out at home. Your photos and video are really helping! Thanks!
Hi Mama,
I LOVE this pattern! I want to try and make this for a guy who does all the cooking in his family; however he has pretty big hands. How would I increase the size of this and still keep it a square? Is there a method to increase the chain and rows easily? Thanks so much!
I know lots of people have made this in all different sizes and shapes. Increase the number of chains so that excluding the chains for the loop it is the width you like. Then continue past the number of rows called for in the pattern until it is as tall as it is wide then just complete with the final slip stitch row.
Thank you for replying! I increased the number of stitches across and then kept going up in rows until it was a square. The two I made came out great! I already have plans to make more; it really is THE BEST crocheted potholder!
I have another question. I saw in the previous comments that folks had asked about a pattern using this stitch for an oven mitt and a pattern for a round hotpad. Is there any possibility that you might post a pattern for these? I’m having a hard time wrapping my brain around how to go about them using this stitch; I really love it!!! Thank you again!
I don’t think anyone has conquered doing this stitch in the round. I have an idea for it that would take two balls of yarn worked at the same time, but I haven’t had a chance to work it out for a pattern. One of the readers has made oven mitts with this stitch, but I don’t think she made them around and around, but a flat piece sewn together.
I absolutely LOVE this pattern. I have already made almost a dozen sets, some of which will be Christmas gifts. The first set went to my neighbour who does a lot of cooking and baking and she said these were better than her store bought one’s. Thank You so much for sharing your pattern.
I have also modified the pattern to use for coasters and I also have plans to use it for a bath rug.
I have been using your pattern for about a year. Have made about 16 pairs of these potholders and everyone loves them, especially me. I make them with 100% cotton to avoid burns. I usually make one during the intermission at our hockeys games. Thank you for this wonderful pot holder pattern. I also want to use this pattern to make a bath mat. It should be very absorbent.
I use the pattern to make moebius hats by working flat to the circumference of the person’s head. Then twist and seam to make the hat. Stitch the top together. I put a Mother’s Day Flower [from Ravelry.com] on one. Both have been declared the warmest ever. I make a moebius neck warmer using hdc following a regular moebius pattern.
I’m making this pot holder and it seems easy and nice and think thanks
Love this pattern! Makes two sides at once and really makes a beautiful design with ombre.
I had trouble keeping one side straight (guess I kept missing end stitch) and also the last row- I didn’t understand how to finish it off cleanly.
If you think you are losing stitches you may need to keep a count of stitches on each row until you get a better feel for the first and last stitches. They are very different from the traditional stitch and just take practice to get used to.
The last row is the same as the others except that instead of making sc across, you make slip stitches across. The sc rows are staggered and would leave an unfinished looking end if just ended. The slip stitch row evens out the end to be rounded like the beginning.
Looks like this is an old post, but still so pertinent. Have heard of this potholder but did not understand the technique. Can’t wait to give it a try with these excellent pictures and directions. Tha k you for sharing.
I found this pattern the other day. started making it yesterday and was’t quite sure if I was doing it right.
Found you on you tube wasn’t doing it wrong Looks like I’m going to have a real nice thick pot holder went I’m done.
Thanks a lot I Like your lap blanket Going to try that later
Very easy pattern to follow. Excellent directions. Will make excellent Christmas gifts for friends and family.
What a cool pattern! Took me few tries, but, finally mastered it! I’m a self taught crochetier ( sp. ??). I’m always game to try new things, & this one is too great! Thanks!!! Heck…a much larger rectangle would make a neat bathmat!
OMG! I can’t believe it! My grandmother taught me this exact stitch…I have been trying to remember how to make the really thick nice potholders she taught me to make and THIS IS IT! Thank you so much. I will have to start making some of these again
I know you have plenty of thank yous here, but I just have to add one more. Thank you so much for posting this pattern for free. I’ve been looking for a good potholder pattern that didn’t require me to use two strands together. This is perfect! Much appreciated!
I found this pattern on Free Crochet and for weeks have been trying to make one of these. As I was reading through the comments, one stated you have a video on you tube. I am hoping to find this because I have struggled to understand the beginning of this pattern. Love to do this type of thing to give away.
I didn’t realize I hadn’t put a link to the video in the pattern. Here it is –
http://www.youtube.com/watch?v=_QvOAc9lqCs
This is really a neat pot holder. “Whipped up 2 in no time. Thank you so much for sharing.
This is the first time I have seen this pattern in print. An elderly lady taught me how to make these potholders many years ago and I have taught several people myself. Everyone loves it. I like to make mine stripped. I do 2 rows of main color then switch to white or a contrasting color and do 2 rows. That way I don’t have loose ends to weave in when I am done. Also, I found that on the last row if I slip stitch the 2 loops instead of crocheting, it makes a real nice finish. I usually stitch a plastic ring for a hanger, but like your idea just a well. Thanks for sharing.
Love this pattern. I’ve become very bored making “magic square” potholders. Thanks for sharing!
Hi everyone. I have made so many of these and they are well appreciated as gifts!!! One skein of yarn will make two pot holders and if you want a truly thick one (though that isn’t really important with this pattern) you need to use Vanna White’s yarn. It makes it extra, extra thick. But even with regular 4 ply yarn you do NOT feel the heat of any pan through this pot holder. I love using the variegated yarns for a neat pattern on the pot holder. All my married granddaughter (in-law) got a set for Christmas this year. This is a fantastic pattern and the instructions are very clear and concise!! Thanks for putting this up!
I’ve tried this pattern numerous times with no success. My pattern gets twisted. Any ideas?
Twisted meaning that stitches aren’t aligned or that the potholder curls? Especially at the beginning, it will curl quite a bit, and may have a slight tendency to curl corners in when finished, but it usually flattens pretty easily.
Sorry, but I’m not “there” yet. I only just finished making a copy of the pattern, and making some specific notes for reference. It sounds like THE potholder of the world of all handiworks. :-).!!
‘Can’t add anything more to the comments except that this really, truly is a wonderful stitch! Novice, intermediary, or pro – you’ll love this! Try to make just one! I’m on my fourth one and have no desire to stop making them!! Thank you very much for a clear, concise pattern/directions.
My dad found a potholder in his stash, double sided, looks to be in the round. I would like to provide a picture for you to study. It might be one made by Ursala or anyone else.
I’d love to see it. You can send photos to me at mama at stitcheryprojects dot com.
I am making this pattern right now thanks to you! It is so easy and quick,and nice and thick(I’m not a poet wannabe!) But seriously,it is perfect for me as I cook with mostly cast iron pans and need many pot holders..and thick like these work up! Thanks so much!
I am making this pattern right now thanks to you! It is so easy and quick,and nice and thick(I’m not a poet wannabe!) But seriously,it is perfect for me as I cook with mostly
with cast iron pans
and need many pot
holders..and thick
like these work up! Thanks so much!
Add me to the list of lovers of this potholder! It is truly THE BEST! My daughter loves it for cast iron pans, also. We both love it for baking. We’ll never get burned again!
Using Sugar n Cream yarn and an I hook I’ve made several very nice very thick potholders. I plan on using the stitch to make some baby blankets and can’t wait to see how they will turn out.
I found this pattern and couldn’t wait to get some cotton yarn for it!
I used 2 balls of Peaches & Creme 100% Cotton Yarn. Worsted Weight. 95yds, 2.0oz, in Natural Ombré. My potholders are 6 1/4″ square. With the remaining yarn, I made a third one that is a few rows shorter, and 6 1/4″ x 5 3/4″.
I used a size F/5 (US) 3.75mm hook, with a fairly tight stitch.
I hope you don’t mind that I put the URL to this blog post on my Pinterest board, with the pic of my potholders! Feel free to use my picture for another example, if you’d ever like. 🙂
Absolutely LOVE these! I’ve tossed my old potholders, and plan on making more! Thanks so much for sharing!
Here are my potholders
http://www.pinterest.com/pin/468092954991953106/
Hello Mama
I would like to thank you again for this fantastic pattern. I just love it and love the pot holders. They don’t stay long when I make them. Seems my kids love them also. That’s okay I love making them and they make up so fast and you can take them anywhere. I would also like to thank Val for the help and info on the queen size blanket. I made one up in about a week with all one color. What a beautiful addition to the bed. I love the all one color and no fringe. I used the P hook for the blanket and then at the end went around it with sc for a few rows to give it a border and lock it in. Thanks so much.
42 rows seems double the size. I am at 25 rows, and it looks like the photograph. or do you fold it in half if 42 rows?
There may be a little variation from crocheter to crocheter, but it shouldn’t be square at 25 rows. It sounds like your rows are building on each other. The 3rd row should build on the 1st row, then the 4th row build on the 2nd row. With 25 rows, if you are getting the right loops to do the stitches, then there should be 12 rows on the sides if you count.
This is a great potholder to make for gifts and give along with some dishcloths. I do block them on a board with pins and steam them – really makes a difference.
QUE PUNTO MAS LINDO, DOBLE Y ABRIGADOR, SI SE HACE CON LANA;
ME ENCANTO LA IDEA Y VOY HA HACER UNA MANTA DE COLORES, GRACIAS MIL,
CELIA
I suggest that you limit the comments to no more than 25 by eliminating the first ones as more are added. I am not an expert computer user and did not realize that i would be getting page after page of comments (32) before finally getting to the pattern (4 pages). The cost of paper and ink to print useless comments hardly makes your patterns free.
I’m sorry you wasted paper. There is a printer icon at the top of each pattern that you can use to create a clean, comment-free version of the pattern that is printer ready.
haha, there is always one in the group. I love people’s comments, please allow them to remain.
If you are still looking for someone to write some patterns contact me. I’ll take a stab at it. I’ve written quilting patterns before.
Found this pattern last week and I have to say it is a great potholder!!
It is very thick and the cotton yarn I got on a cone at my local Walmart is
great for these!! I chose the multicolored cone and I really like how they
have come out.
I made both acrylic and cotton and hands down a huge win with the cotton yarn!! You will love the feel of the cotton do much more.
I am making several to give out at a family reunion. I am sure they will like them as much as I do!
I totally agree with the crowd, this is the best crocheted potholder hands down!
For those of you struggling with the pattern, be patient, it looks wonky for the first few rows , but stay on course and it lays flat as it grows in length.
Thanks for sharing this wonderful pattern!! It is great!!
Wish I could send a pic.
You can send pictures to mama at thetucker dot com. I love to see pictures of projects. For anyone sending me pictures, also let me know if you would like me to post your project pictures on the blog.
Hi! I have been looking for you for Many MANY years! ;-)) I was taught this stitch in AZ in 1974. I teach it to any one who wants to learn. The teacher was a very dear friend. And when she passed on, I decided to teach it also, in her memory. She called it DOUBLE SINGLE CROCHET. Said she could trace it back 3 generations in her family. That came to about 150 years. I have made it in all sizes of yarn. And with all sizes of hooks. I take a pot holder in progress, with me most places as that is the perfect size for travel. I make them for gifts & sale. Just add a simple dish cloth with 2 potholders & you have a nice gift. Thank you so much for showing this to so many. Where did you learn this stitch? I am amazed to finally find it written up. Blessings
A second cousin taught me this in the mid-1970’s. At the time I didn’t take any notes, but made them off and on over the years so remembered the stitch. I wish I knew where she had learned it.
I am so excited with this pattern. This will make great gifts for everybody! Thank you so much!
Do you have a video of this pattern?
http://www.youtube.com/watch?v=_QvOAc9lqCs
Thanks for sharing your pattern. I am making a potholder right now. I’m going to check out your other patterns too.
Working up great!
Hint: use stitch holder on each end for the last stitch before turning. Easy to find when not too near it. Goes fast when you don’t have to hunt.
Can watch World Cup instead of were hook poking .
Hi!! Great pattern!! Was wondering what you charge for them when you sell them… Care to share?? Thanks!!
Michelle
I haven’t sold any but maybe someone else has and will share. I give these for wedding and housewarming gifts.
When I sell them, I charge $3.00 ea. I mainly try to cover the cost of supplies and a little for my time, because for me crocheting is how I relax. A good gauge to go by, is to look up similiar items on Google or Etsy and do some comparing. Tnen decide on a price you feel comfortable with. Hope this helps.
I love this pattern so much that it is the only potholder I make now. I have altered the pattern because I prefer a thicker loop rather than just a single chain. I start by: Chain 12, slip stitch (sl st) in each ch to end. Remove hook from loop and insert through two strands of opposite end, pick up dropped loop and pull through as in a sl st. Then I begin the chain for the potholder, which also makes it easier to find the end stitch on your first single crochet row. I then follow the pattern until the end. I like to make them a generous 7 1/2 to 8 inches square, so I chain 32 to begin. You will have 31 stitches in each row. I use 100% cotton yarn and H hook. I gave my friend a set three years ago and she has requested that I make her some more. Everyone I have given them to has thoroughly enjoyed them. Thank you so much for posting this wonderful pattern!!!! I am a forever fan!
I am going to crochet this in cotton string. I have made several round ones using string so am looking forward to making this one.
I have read through and think I missed an important part. How much yarn is needed for a potholder made from cotton? I currently have a few Sugar and Cream balls that are 2 oz.
Those would each make one. They use about 1.75 oz each.
Thanks! One other question. Is there any easy way to see which row you are on, I tend to lose count very easy.
Once you make a few rows, mark one of the sides and note if it has the odd rows or the even rows. Count the rows on one side and double it and that will tell you how many even rows you have done and will be the exact row when you are on the even side.
Was reading comments was not able to find a base pattern.
how would you go about making a large pot holder and a longer holdet?
Thanks for sharing!
The base pattern is for 25 stitches across, 42 rows (then a final sl st row), with the chain loop being 8 chains. This makes a 7″ potholder with an H hook and a 7-1/2″ potholder with an I hook.
30 stitches, 50 rows – H hook = 8-1/2″, I hook = 9″
35 stitches, 59 rows – H hook = 9-3/4″, I hook = 10-1/2″
40 stitches, 67 rows – H hook = 11-3/4″, I hook = 12″
Add as many chains to the beginning chain as you want for your loop, and then skip those number of chains before beginning the sc stitches.
love this pattern! thanks for sharing! need to pay better attention to my tension, though! my sides keep bowing in, and i want them to be perfectly square. 😛
Hi there and thanks for an awesome pattern! 🙂 I’ve just got one problem.. I lost count of the rows and now with these double rows, I can’t figure out how to count them… xD Anyone who can give me a hand? Thanks again!
Count the rows on one side and double that. If your loop is on the side opposite of the hanging loop, then add one more row.
This was genius ! Looking for nicer pattern for round potholder, any ideas?..
I have an idea of making a round one alternating between two skeins, but I just haven’t had a chance to play with it.
Do you have a pattern for an oven mitt? These are the best pot holders ever and I would like to make oven mitts using the same technique.
I don’t, but I like the idea. Sorry.
Mama, i have made many pot holders and afghan for bed from this pattern. This is so fast and relaxing. I also make a quick dish cloth with the remaining yarn from peaches & Creme 2 oz. nice set. Now I would like to try a bed afghan doing the 25 stitches with big hook and putting together. Do you know how large the “big” pot holders should be each. If not could you ask Val? Thank you so much and yes this is one of my favorites! GOD Bless you for sharing. Happy Holidays
From Val:
I usually make the squares 25 stitches wide by 21-22 rows long, for a twin or double bed. For a queen or king, I make the squares 30 stitches wide by 26 or 27 rows long.( Row is one pass of each color, front and back) .It depends on how tight or loose you crochet. Make one pass around the edge like you do the potholders to help keep it flat and give an edge to join to the other squares. To join them my favorite is a solid color that compliments the colors in the blocks. Black makes it look like stained glass, if you are using left overs and making a scrapghan.
I use two strands when it is all done to go around the entire edge of the afghan to give it a nice border.
You can also mimic giant quilt blocks, this requires that you color block on graph paper so you know how many squares of each color to make and how to put them together. There are lots of grannie square patterns that do this, just stay away from the triangles. (It gets bulky.) You can also use up your bits by making stripes on one side and a solid on the other. Hope this answers your question.
Merry Christmas,
Val S.
The Happy Hooker
Thank you for sharing your pattern. It truly is the best crocheted potholder and so easy to make. 😀
These are indeed the best potholders ever!! That said they are a headache to start. The beginning stitches are easy to miss so count, count & count. I use markers because I’m tired of frogging my work. After the first two rows they are a breeze. I’ve made over 25 & always use 100% cotton. Thanks for the pattern.
Cindy, try doing foundation single crochet. There are many excellent tutorials and videos to teach you the technique. Makes life so much easier.
Hi Mama,
Was wondering if anyone was able to come up with this pattern in a round potholder yet? I have made many of these and everyone loves them and I really want to make them in the round. I have tried experimenting with the pattern but am missing something. I wrote to Ursula Graf but she was too busy at the time but possibly might have had the chance to do it since then.
Thank you so much!
It is on my long to-do list. I have a basic idea of how to do it but just haven’t had the chance to work it out completely and make a prototype.
yes, there is one on Ravelry, someone had the same idea and someone did a trial and error version. I have made one as a coaster and like it. Will try it again. I liked it,I have made several of these square ones and I use square “loosely” because not a one of them is square. I keep messing up when I turn, I guess 🙁
Use a slip stich at the end of each row plus one fairly lose chain before turning. It will do the trick, and you’ll end up with THE perfect square.
http://www.ravelry.com/projects/-Kimi-/the-best-crochet-potholder-v20
Hi Donna,
I am delighted to find your pattern of round potholders or coasters. I have been making those for years, over 7 stitches though, not eight because I found them to lie flat much better that way. I always shied away from writing down the pattern, found it too difficult and time consuming. The same goes for a pattern of my very popular oven mitts, made from the same stitch. It finally is in the works and should be out there fairly soon.
So love this potholder, I also make a smaller version to use as a sponge to clean the kitchen. My friend just loves the one I gave her as a test one. Although trying to teach a left handed friend to do this was a challenge
I would like instructions for left hand to ‘The Best Crocheted Potholder’. Thank you
I’m sorry it has taken me so long to respond.
The instructions are written to be used either handed. Is it the photos you’d like to see left handed? If so, would they just need to be mirrored?
Thanks for posting this pattern. I’ve made two of these (so far) for my mother and I used cotton yarn. She loves them and uses them as oven mitts. I’m actually going to make a couple more for her and maybe some for Christmas gifts.
I love this pattern, I find myself making them to all my family and friends and everyone asks for more. They say these are better than the store bought ones. Thank you so much!
Can this potholder be made with half doubles or double crochet
I tried it on a small sample and was able to do it successfully. I would just suggest trying a sample first and see if it looks the way you want. The stitches will scrunch a bit since the tops and bottoms are pulled toward each other in the center, so the rows will not be as tall as you’d expect with just single ply stitches.
hi i am a left hander and can’t figure it out using right hand instructions can you help me with the instructions thanks
The instructions are written to be used either handed. Is it the photos you’d like to see left handed? If so, would they just need to be mirrored?
I have made several pot holders using this technique and also a mat to drain glasses on when they can’t go in the dishwasher, and it works great!!…..it absorbs the water and does not wrinkle up or even move around on the counter!
I LOVE the pot holders and use them all the time. They are easy to wash….I just throw them in with my laundry and also into the dryer and they come out great!! I bet you could make a throw rug with bulky yarn and a larger hook that would be awesome in a bathroom or laundry room! I will have to try that and let you know!
Has anyone worked out a pattern for a round potholder using this beautiful thick stitch?
I have put a lot of thought into it and I can’t think of a perfect way to do it. The method relies on crocheting back and forth. Round potholders are made in the round. Neither of the two methods I’ve thought of are very good solutions, so I have left this on the shelf. Maybe someone else can come up with an idea.
First idea – make one side in the round entirely. Start the second side and after the foundation round, make all stitches though prior round but also through corresponding loops on the “front” of the completed side.
Second idea – make round, but with a seam.
I love your patterns. Have you figured out the round hot pad or oven mitt?
Thanks, Teresa
On the round, I have put a lot of thought into it and I can’t think of a perfect way to do it. The method relies on crocheting back and forth. Round potholders are made in the round. Neither of the two methods I’ve thought of are very good solutions, so I have left this on the shelf. Maybe someone else can come up with an idea.
First idea – make one side in the round entirely. Start the second side and after the foundation round, make all stitches though prior round but also through corresponding loops on the “front” of the completed side.
Second idea – make round, but with a seam.
On the oven mitt, I haven’t experimented, but I think it could be done. I’d start with a basic pattern and modify it. It would have to be a pattern where the two sides are made separately because any made in the round would have the same problem as the round version. Follow the basic pattern shape, do each row a second time, but in reverse.
I love this potholder as well! When I first looked at the pattern I thought I also saw a pattern that changed colors which made the colors look like triangles. Wish I would have grabbed that one as well!
Let me know if anyone has the triangle pattern please.
Does the type of thread matter since you are touching hot pans? I would think cotton would be the best since polyester would melt???
Yes, cotton or wool are best to not melt with use.
Hello Val
LOVE IT.EXCELLENT TUITION.EASY TO UNDERSTAND AS ENGLISH IS MY SECOND LANGUAGE!!!!!!!!!!
THANK YOU
Love the potholders and how thick they are …..question do you but a border around it ? I tried a sc all around but hard to make border even
I don’t put a border on mine but I believe some have. You will have to space out sc on the sides because two rows on these are the equivalent height of one row of regular crochet.
I made so many of this, I gave for gifts, and also I made little bigger for casserole pans instead of two pot holders. They are best and most beautiful as I don’t know how colour comes out but they came out excellent! I use one skein (50g) for each pot holders such as sugar n cream or bernat. I usually wait for sale, I buy 10 or so, then I made them. I love them. Now you mention about blanket. I never thought of it! My daughter alway get chilly so I will make one for her. Probably too late for Christmas. Eh?n
Thank you so much for this pattern. I’ve been looking for a good pot holder pattern for a while now. I am now obsessed with this pattern. Thank you again!
There’s a good you tube of this stitch called Single Crochet Thermal Stitch Tutorial. Very helpful!
Love the pattern but the sides are messy not straight and smooth. What’s wrong? I’m sure I have missed something. Help? Thanks!
If you send me a picture I’ll try to diagnose the issue.
I have been making these for several years now. Whenever someone gets married I make a pair for the shower gift. I also will make a couple a bit larger to use as hot pads for the table to match. I have already had requests for new ones from those who have received them as gifts. The messy sides could be from not picking up the very last (very difficult to get) stitch in each row! When my husband came home from a nursing home I gave all the aids and nurses a set and they all loved them. The do make fantastic gifts!
Hi Mama, it’s been a long time in coming but here finally it is, not a pattern per se, but a tutorial of how to make the ‘double density’ oven mitts I have been talking about quite a few years ago in your blog. I hope this will be helpful to many of your followers. (I put the link in the URI place without having an idea what URI stands for)
I am so glad to see this! Thank you, Ursula!
Something seems to have gone with my initial message. So here is the link again: https://www.youtube.com/watch?v=oBmVVJg-RJU
I’ve been trying this over the past several days with no success. My problem is that I am left handed and although every other pattern given for right handed crocheters is easily converted, this one just doesn’t work. Can you give us south paws some help?
I think the instructions should work left-handed. Would it help if I reversed the photos?
Thank you for your pattern the best pot holder ever, is the very best. Is a pattern perhaps for a oven mitt using the same stich? Thank you
One of my readers, Ursula Graf, makes an oven mitt using this stitch. She made a video demonstrating it:
https://www.youtube.com/watch?v=oBmVVJg-RJU
I have been crocheting for 45 years & still had a terrible time figuring out the beginning of this, even with the photos. I guess there’s not a clear term for where you insert the hook to start the first row of stitches. I’d call it the middle of the SC, but now can see it’s under a loop. After pulling it out & starting over five or six times, I finally saw that detail in the photo. Now the hardest pattern I ever attempted has become the easiest. I can imagine making these for as many years as I can still hold the crochet hook.
Still having trouble. Starting the second row and each after. Does ch1 count as a stitch or not? Confusing to me and the end of each row never seems right.There really isn’t a place to finish last stitch of each row. This is why my side edges look ragged.
confused.
The ch 1 does not count as a stitch. It is needed to get your hook at the correct height to make the first sc without the sc being pulled down on the side. The two loops that you need to use at the beginning of the row are usually the hardest to find. Until you get used to what they look like, you might need to count back from the end of the row to find them.
Hi again,
How can I make these striped? Where should I join the different colors?
Thanks
On the row that is the last of color A, make all but the last loop pull through of the last sc. Change to color B and then pull through that loop and continue the pattern.
For those requesting an oven mitt pattern, there was one linked in the comments in 2012 by Clarence, of a pattern by Priscilla Hewitt:
http://priscillascrochet.net/free%20patterns/Kitchen/Potholder%20Stitch%20Oven%20Mitt.pdf
It’s two pieces crocheted flat and joined together, though. Ursula’s version looks to be crocheted in the round!
I love that the loop is done right in the pattern at the beginning chain. I don’t know why I hadn’t thought of that. I haven’t tried this pattern yet but am going to start it in just a minute. It looks great and if i can avoid the problem that some had with the edges I can see myself making many, many of them.Thank you for sharing this wonderful pattern.
Would you consider doing an updated video? I watched the one linked to this and it’s too blurry and white yarn makes it too hard to see what you are doing. I love this concept and that the loop is added at the beginning.
I will remake this one at some point. I don’t have a good video setup at the moment.
I use bobby pins on my first and last stitch so I always have even rows. I make a smaller version the size of a sponge, which my friend loves to clean with then throw in the washer
Hi Iris, I am brand new to crocheting and am interested in your solution to keep track of the first and last stitches. Is it possible to either email me or post a picture so that I can see exactly how you do it? Thanks:)
beautiful,thick and useful. I love them,thanks.
Moc pěkný nápad.. jednoduché a účelné háčkování pro chňapky..
Děkuji za nápad .. hezký den
S pozdravem Jana
Found this pattern last night. Watched the first few minutes of the video and had no trouble getting started. I’ve already made 2 full sized potholders, and I love them. Just thick enough to protect hands from heat, but not so thick that they are awkward. Thanks for a great pattern and video.
Fell in love with this pattern about 2 years ago thanks to your website. Does the stitch have a name? I just made the first of a pair of slippers using this stitch for the sole.
A suggestion for those having a problem losing the last stitch, thus getting a pyramid effect! I learned how to spot that elusive 25th stitch using stitch markers. When I start a new row, I stop after about the third stitch and place a stitch marker in the first stitch. It’s easier to count back three stitches than count the whole row. I leave the marker in place until I’ve worked my way back to that end of the row. The marker lets me know exactly where to put the hook. I worked with two markers at the same time – one for each end of the current row. After a while, you probably won’t need to use them as you’ll have a good idea of where that stitch is hiding! Thanks so much for posting this pattern.
Some of the readers have suggested the term Double Density Stitch. Thanks for the tip on keeping up with the last stitches of the rows.
That’s a wonderfull pattern!
I shall love do some thinking to you. I shall offer them to my friends(girls and boys) for christmas.
Thank you very very much.
Absolutely love this pattern! I’ve made 3 pot holders, 2 with acrylic yarn and the latest with 100% cotton. We like the cotton pot holder best because we can’t feel the heat near as easy as we can with the acrylic ones. Thank you so much for your wonderful pattern!!
I use this pattern to make a scarf. I like the way it looked I hope I could do that and sell my work still yet. Thank you your videos and patterns are really good.
I had to change to a dc it was taking too much yarn
Absolutely. Here is my policy page: http://stitcheryprojects.com/using-my-patterns/
I’m doing fine in crocheting this potholder but I’m not making extra chains to make a loop for hanging. My stitches turn out to 35 on every row which I want but on the end that has the starting chain when you get to 2nd & 3rd row there is a part that sticks out alittle from the other rows. It isn’t a missed stitch as the count is correct. Could you just finish all the edges then to make it look better although it evens out on 2nd row onward. I hope this makes sense. Thank you for the free pattern.
Just wanted to say I’ve figured out the problem I was having. It was due to the tension of my stitches at the end of the row.
Thank you for the pattern. I knit potholders,but like this also.
How do you make the loop on the end
It is formed by the 8 chains you skip at the beginning of row 2.
I have made your potholder in cotton yarn and I was surprised to find how protective and insulated it is even when I handled hot cast iron pans. I make it a little smaller because the size is too floppy for my hands.
Nevertheless, great pattern! Beats store bought ones by a mile.
I like this technique. I like the way 2 strands of yarn and a small crochet hook are used together. It creates a nice stiff texture. I crocheted a fedora hat using the bobble or puff stitch. I also crocheted the visor to a newsboy hat. Both resulted in a nice and stiff surface. It is not feel flimsy.
This is hands down my most favorite potholder pattern. I use it frequently. Thanks so much!
Love this! Definately going to try it!
I have made these for my entire family and they love them. I’m now starting to get requests for more! I make them out of Sugar and Cream yarn, which is 100% cotton (and so won’t melt) and comes in a ton of colors.
I simply love this pattern!!! I’m going to share on Facebook. As I’m making this potholder, I’m thinking this would be great to do as an afghan. I’m going to try that later this year. Thanks for the pattern!!! Great idea!!!
I love this pattern!!! Thanks soo much for sharing it with everyone. I was thinking, too, of using this for the basis of an afghan. It would be super warm!!!
I’m learning to crochet and wondering what you do with the no-knot slip knot loop after the project is finished. Does it miraculously disappear when the tail is woven into the project? Thanks.
No so miraculous and not necessarily completely invisible, but basically yes. Here is a video about it.
https://www.youtube.com/watch?v=RCTwwyQF298
Love this best one I’ve seen as you dony
Half to stitch two tog etc want to
start today but do you turn e dry row
And chain 1 or do ya just flip
Also someone commented how you make
The hanging loop in beginning I
do not see this on your video or
directions do you maybe have a diff
Video as just discovered this todalove it
Please email me thanks
You turn the work back and forth in the same way as traditional crochet but you may need to hold it a little differently to pick up both loops. The hanging loop is formed by skipping several chains before making the first row.
I agree. I’ve made at least 50 of these over the years and always used acrylic. None of them every melted or caught fire. And cotton is what is used for wicks in lamps. It catchs fire very easily.
I don’t doubt your experience–that you have successfully used acrylic, but cotton is far less flammable and the reason it is used in lamp wicks is that it burns slower. Acrylic wicks would be gone in a heartbeat but cotton is used to convey the fuel to the flame.
Your comment intrigued me so I looked it up: https://en.wikipedia.org/wiki/Candle_wick
“A candle wick is usually a braided cotton that holds the flame of an oil lamp or candle. A candle wick works by capillary action, conveying (“wicking”) the fuel to the flame. When the liquid fuel, typically melted candle wax, reaches the flame it then vaporizes and combusts. The candle wick influences how the candle burns.”
Hi, I love this pattern and have made 12 potholders for friends, family and myself. I use Caron yarn and a size F hook. The stitches are really close together. Jenny Watts
Does anyone know where to find RED, green, white ombre Christmas yarn ?
Your best bet to find ombre Christmas yarn is online. I struggled to find it a couple of years ago and I think that’s how I finally found it.
Oh my goodness, how I love this site. Thank you for this really good pattern, the video, pictures and links. I’m about to take a long road trip and this will be my take along project.
And thank you everyone for your comments and tips. You’ve all been a great help to me as I continue to better my skills at crocheting. You are all wonderful. I hope someday I will have some new idea or info that I can pass on to you.
I discovered this pattern a few years ago and love it! It is the best pot holder! I’m not surprised to see that the comments are still coming! Mine have seen better days so I came back to the pattern because I want some fresh ones!
Thank you for such a great, functional, safe pot holder pattern!
Thanks! I do agree. This is the best crocheted potholder ever.
I love this potholder pattern! Of course I had to figure out where the last stitch was hiding after that it’s been a breeze! I have been selling themat a local salon and everyone just loves them! Thanks for a great pattern! Next I am going to make an afghan using this stitch.
This is a very easy pattern to make. I was concerned about
the thickness of it for hot pans taking them out of the
oven. the potholder is double thickness & when removing
hot pans, I do not feel the heat. When I want to make any
potholders, this is the one. The yarn used was knitting
worsted & used size I hook.
I truly love your blog.. Great colors & theme. Did you make this site yourself? Please reply back as Iím planning to create my own personal blog and would love to know where you got this from or exactly what the theme is named. Kudos!
Thanks for sharing this pattern. I especially loved adding the hanging loop immediately instead of at the end of the project. Keep your hook hot♥
I have been making these potholders for 15+ years. They wear like iron and are everyones favorite potholder. I only use 100% cotton. The original pattern calls for an E hook, but I use an E or F. Once you get the hang of it they are very easy to make.
Ten+ years later, I just realized I never came back here to mention I used this technique to make rugs for the bathroom. I wanted something nice and thick without having to use double yarn and a big hook.
https://silver-gateway.com/etc/crafts/striped-bathroom-rugs/ (I didn’t post pics at the time, but I have some so I need to go back and add them to the post.)
I was looking the pattern up because now I need to make some _potholders._ 🙂 Thanks again for sharing it!