Two Feminine Chemo Caps for Straight Needles

25 March 2015

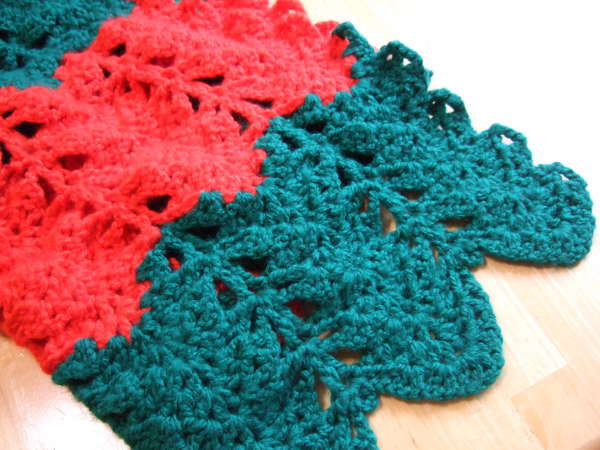
These two ripple edged hats are feminine yet functional. The one on the left is pleated pattern and the one on the right art deco pattern.

This is the straight needle version of this pattern. The in-the-round version is here.

There are now coordinating scarf patterns available for each of the hats: Pleated pattern and Art deco.

Size:
Adult woman, size medium – 20″ circumference, 7.5″ height

Gauge:
17 stitches and 23 rows = 4 inches in stockinette

Materials:
1.5 oz (90 yards) of soft worsted weight yarn
Size 8 (5 mm) knitting needles
Yarn needle

Abbreviations:
k = knit
m1 = make one: With left needle pick up thread between last and next stitch inserting front to back. With right needle knit back loop.
p = purl
k2tog = knit two together
k3tog = knit three together
p3tog = purl three together
sk2p = slip 1, knit 2 together, pass slip stitch over the knit 2 together; 2 stitches have been decreased
ssk = slip one knitwise, slip one knitwise, insert left needle into front of both slipped stitches and knit.

Pleats
Cast on and Body:
Cast on 85. Repeat directions between * across the row.

Row 1 (wrong side) and all odd rows: p1 * k1, p1, k1, p11 *
Row 2: * k1, m1, k1, p2, p3tog, p2, k1, m1, k1 , p1, k1, p1 * k1
Row 4: * k1, m1, k2, p1, p3tog, p1, k2, m1, k1 , p1, k1, p1 * k1
Row 6: * k1, m1, k3, p3tog, k3, m1, k1 , p1, k1, p1 * k1
Repeat rows 1 – 6 until the hat measures 5.75″ from the edge. End with a Row 6.

Crown:
Row 1: p1 * k1, p1, k1, p11 *
Row 2: * k2, p2, p3tog, p2, k2 , p1, k1, p1 * k1
Row 3: p1 * k1, p1, k1, p9 *
Row 4: * k2, p1, p3tog, p1, k2 , p1, k1, p1 * k1
Row 5: p1 * k1, p1, k1, p7 *
Row 6: * k2, p3tog, k2 , p1, k1, p1 * k1
Row 7: p1 * k1, p1, k1, p5 *
Row 8: * k1, k3tog, k1, p1, k1, p1 * k1
Row 9: p1 * k1, p1, k1, p3 *
Row 10: * k3, p3tog * k1
Row 11: p1 * k1, p3 *
Row 12: * k3tog, p1 * k1
Cut the yarn with two feet to work with. With a yarn needle, pull the yarn through all the remaining loops, secure, seam side, secure, and weave in end.

Art Deco
Cast on and Body:
Cast on 85. Repeat directions between * across the row.

Row 1 (wrong side) and all odd rows: p1 * k1, p13 *
Row 2: * k1, p11, k1, p1 * k1
Row 4: * k1, m1, ssk, k4, k2tog, k3, m1, k1, p1, k1, m1, k3, ssk, k4, k2tog, m1, k1, p1 * k1
Row 6: * k1, m1, k1, ssk, k2, k2tog, k4, m1, k1, p1, k1, m1, k4, ssk, k2, k2tog, k1, m1, k1, p1 * k1
Row 8: * k1, m1, k2, ssk, k2tog, k5, m1, k1, p1, k1, m1, k5, ssk, k2tog, k2, m1, k1, p1 * k1
Row 10: * k1, m1, k3, ssk, k4, k2tog, m1, k1, p1, k1, m1, ssk, k4, k2tog, k3, m1, k1, p1 * k1
Row 12: * k1, m1, k4, ssk, k2, k2tog, k1, m1, k1, p1, k1, m1, k1, ssk, k2, k2tog, k4, m1, k1, p1 * k1
Row 14: * k1, m1, k5, ssk, k2tog, k2, m1, k1, p1, k1, m1, k2, ssk, k2tog, k5, m1, k1, p1 * k1
Repeat rows 3 – 14 until the hat measures 5.75″ from the edge. End with a row 14.

Crown:
Row 1: p1 * k1, p13 *
Row 2: * k1, ssk, k4, k2tog, k4, p1, k4, ssk, k4, k2tog, k1, p1 * k1
Row 3: p1 * k1, p11 *
Row 4: * k1, ssk, k2, k2tog, k4, p1, k4, ssk, k2, k2tog, k1, p1 * k1
Row 5: p1 * k1, p9 *
Row 6: * k1, ssk, k2tog, k4, p1, k4, ssk, k2tog, k1, p1 * k1
Row 7: p1 * k1, p7 *
Row 8: * k1, ssk, k2, k2tog, p1, ssk, k2, k2tog, k1, p1 * k1
Row 9: p1 * k1, p5 *
Row 10: * k1, ssk, k2tog, p1, ssk, k2tog, k1, p1 * k1
Row 11: p1 * k1, p3 *
Row 12: * k3tog, p1, sk2p, p1 * k1
Cut the yarn with two feet to work with. With a yarn needle, pull the yarn through all the remaining loops, secure, seam side, secure, and weave in end.

Train Track Baby Hat for Straight Needles

16 March 2015

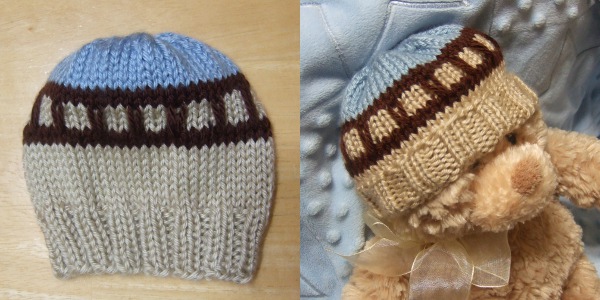
This little hat is made to coordinate with my Train Track Baby Blanket. Instructions are given in several sizes. The sleepers are formed by elongated stitches that are picked up on the opposite rail. This is the straight needle version of this pattern. The in-the-round version is here.

Sizes:
Preemie – 10″ circumference, 5.5″ high
Newborn – 12″ circumference, 6″ high
6 month – 14″ circumference, 7″ high
12 month – 16″ circumference, 7.5″ high
Toddler – 18″ circumference, 8″ high

Gauge:
18 stitches and 24 rows = 4 inches in stockinette

Materials:
0.7 to 3 oz (40 to 150 yards) of soft worsted weight yarn
Size 8 (5 mm) knitting needles
Yarn needle

Colors:

At least two colors are needed to make the hat, but up to four can be used. The example has three.

Abbreviations:
k = knit
p = purl
k2tog = knit two together
ssk = slip one knitwise, slip one knitwise, insert left needle into front of both slipped stitches and knit
pw4w – purl with four wraps: insert right needle to purl, but wrap yarn four times and pull through
dws – drop with slip: slip the stitch with the extra wraps purlwise, dropping the extra wraps. There will be a single elongated stitch.
spw – slip purlwise

Pattern:
Start with color for ribbing and below track.
Preemie – Cast on 49
Newborn – Cast on 57
6 month – Cast on 65
12 month – Cast on 73
Toddler – Cast on 81

Ribbing (6 rows for preemie size, 8 rows for other sizes):
Repeat between * across the row
Ribbing 1: * k2, p2 * k1
Ribbing 2: p1 * k2, p2 *
Make these rows 3 times for preemie size, 4 times for other sizes.

Make rows of stockinette as outlined below for the size you want. Odd rows are knit and even rows are purl.
Preemie – 6 rows of stockinette
Newborn – 8 rows of stockinette
6 month – 10 rows of stockinette
12 month – 10 rows of stockinette
Toddler – 12 rows of stockinette

Track:
Repeat instruction between * across the row:
Change to track color.
Row 1: * k *
Row 2: p1 * p2, pw4w, p1 *
Change to between-rail color.
Row 3: * k1, dws, k2 * k1
Row 4: p1 * p2, spw, p1 *
Row 5: * k1, spw, k2 * k1
Row 6: p1 * p2, spw, p1 *
Change to track color.
Row 7: * k *
Row 8: * p *
Change to above track color.

Knit stockinette (knit odd rows, purl even rows) until the hat measures the desired height for size including the ribbing:
Preemie – 4.5″ high
Newborn – 5″ high
6 month – 6″ high
12 month – 6.5″ high
Toddler – 7″ high

Crown:
Repeat between * across the round
Row 1: * k2, k2tog, ssk, k2 * k1
Row 2: * p *
Row 3: * k1, k2tog, ssk, k1 * k1
Row 4: * p *
Row 5: * k2tog, ssk * k1
Cut the yarn with two feet to work with. With a yarn needle, pull the yarn through all the remaining loops, secure, seam the side, secure and weave in end.

Wavy Baby Blanket

17 October 2014

wavybaby

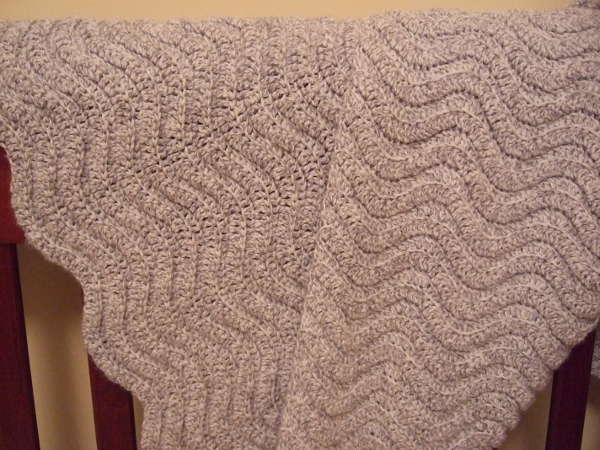
This blanket is soft to the touch and has gentle calming waves. After the first row, the same row is just repeated over and over, so a really easy pattern to learn. Make it in a solid color or with as many color changes as you like.

The example is made in Bernat Softee Baby, a DK weight (Light-3, 8 ply) acrylic yarn.

Size:

SizeWidth (Inches)Length (Inches)Ounces of yarnYards of yarn
Extra Small31.5842.1118.961372.74
Small364824.631783.58
Medium40.4253.8931.052248.12
Large44.8359.7838.22766.36
Extra Large49.2565.6746.13338.31

Materials:
DK weight (Light-3, 8 ply) yarn – see chart above for amounts. This blanket can be made in almost any weight yarn. Use the size hook suggested on the yarn you use. The dimensions and yarn amounts in the chart only apply to the yarn weight and hook size given in this pattern.
Size G (4mm) crochet hook

Abbreviations:
ch = chain
dc = double crochet
yo = yarn over

Special stitch:
Dec – Decrease 2 stitches – yo, insert hook in next stitch, yo and pull up a loop, yo and draw through 2 loops on hook, yo, insert hook in next stitch, yo and pull up a loop, yo and draw through 2 loops on hook, yo and draw through all 3 loops on hook.

The beginning chain should be a multiple of 20 plus 3.

For these widths, start with this number of chains:
31.5″ = 143
36″ = 163
40.5″ = 183
44.75″ = 203
49.25″ = 223

Row 1: Skip first 3 ch (counts as first dc), **[2dc in next ch, dc in next ch] twice, [dec (uses next 2 ch), dc in next ch] four times, [2dc in next ch, dc in next ch] twice. Repeat from ** across to end. Turn.

For the rest of the blanket, work all stitches in the back loop only.

Row 2: Ch3 (counts as a dc), skip first dc **[2dc in next stitch, dc in next stitch] twice, [dec (uses next 2 stitches), dc in next stitch] four times, [2dc in next stitch, dc in next stitch] twice. Repeat from ** across to end. The last dc will be in the top of the turning chain. Turn.

Repeat row 2 until afghan is desired length.

The blanket can be made in a solid color or can be made with any number of color changes. The best way to make a color change is to finish all but the very last pull through of the two loops of the last double crochet of a row. Cut yarn with a few inches of tail and join with new color next to stitch. Pull new color through last two loops. Weave in ends.

Embossed Leaves Hat for Straight Needles

21 September 2014

EmbossedLeaves

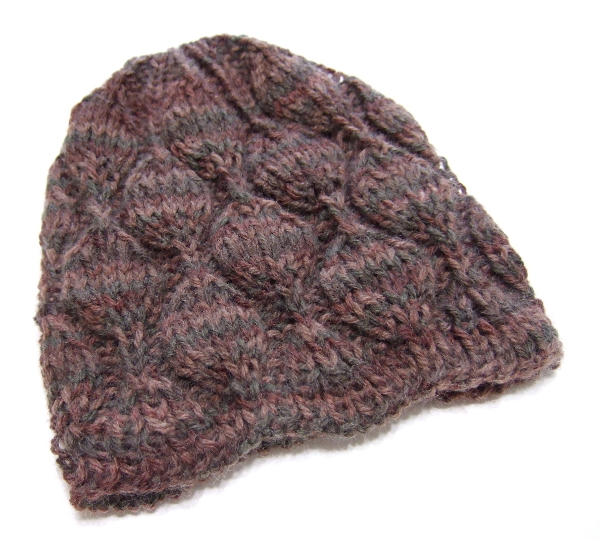
The knit stitch leaves stand out against a purl background, which makes this hat very stretchy. The poles the leaves climb meet very neatly at the crown. The bottom edge has a very slight scallop.

This is a straight needle version of the pattern. See the in-the-round version here.

Sizes: The circumference measurements given are unstretched. This is a very stretchy hat.

SizeCircumference (Inches)Height (Inches)Ounces of yarnYards of yarn
Baby10.755.50.6241.13
Toddler13.256.50.9361.44
Child167.51.385.77
Medium Adult18.758.751.73114.11
Large Adult21.259.752.22146.46
Extra-Large Adult2410.752.78182.83

Gauge: 17 stitches and 23 rows = 4 inches in stockinette

Materials:
worsted weight yarn (see chart above for amount)
Size 8 (5 mm) needles
Yarn needle

Abbreviations:
k = knit
p = purl
m1 = make one: With left needle pick up thread between last and next stitch inserting front to back. With right needle knit back loop.
k2tog = knit two together
ssk = slip one knitwise, slip one knitwise, insert left needle into front of both slipped stitches and knit.
s1k-k2tog-psso = slip1 knitwise, k2tog, pass slipped stitch over
s2kp2 = slip2 (together, knitwise), k1, pass 2 slipped stitches over

Pattern:

Amount to cast on for the different sizes:

Baby = 57
Toddler = 71
Child = 85
Medium Adult = 99
Large Adult = 113
Extra-Large Adult = 127

Repeat instructions between * across the row:

Row 1: k1, * p1, k1 *
Row 2: p1, * k1, p1 *
Row 3: k1, * p1, k1 *
Row 4: p1, * k1, p1 *
Row 5: p1 * p1, m1, k1, m1, p3, k1, p1, s1k-k2tog-psso, p1, k1, p2 *
Row 6: * k2, p1, k1, p1, k1, p1, k3, p3, k1 * k1
Row 7: p1 * p1, k1, m1, k1, m1, k1, p3, ssk, k1, k2tog, p2 *
Row 8: * k2, p3, k3, p5, k1 * k1
Row 9: p1 * p1, k2, m1, k1, m1, k2, p3, s2kp2, p2 *
Row 10: * k2, p1, k3, p7, k1 * k1
Row 11: p1 * p1, k7, p3, k1, p2 *
Row 12: * k2, p1, k3, p7, k1 * k1
Row 13: p1 * p1, ssk , k3, k2tog, p3, m1, k1, m1, p2 *
Row 14: * k2, p3, k3, p5, k1 * k1
Row 15: p1 * p1, ssk, k1, k2tog, p3, k1, m1, k1, m1, k1, p2 *
Row 16: * k2, p5, k3, p3, k1 * k1
Row 17: p1 * p1, s2kp2, p3, k2, m1, k1, m1, k2, p2 *
Row 18: * k2, p7, k3, p1, k1 * k1
Row 19: p1 * p1, k1, p3, k7, p2 *
Row 20: * k2, p7, k3, p1, k1 * k1
Row 21: p1 * p1, m1, k1, m1, p3, ssk, k3, k2tog, p2 *
Row 22: * k2, p5, k3, p3, k1 * k1
Row 23: p1 * p1, k1, m1, k1, m1, k1, p3, ssk, k1, k2tog, p2 *
Row 24: * k2, p3, k3, p5, k1 * k1
Row 25: p1 * p1, k2, m1, k1, m1, k2, p3, s2kp2, p2 *

Repeat rows 10 – 25 until the hat measures 1.75 inches less than desired finished length. Begin crown after a row 12 or a row 20.

Measurements from edge before beginning crown:

Baby – 3.75″ high
Toddler – 4.75″ high
Child – 5.75″ high
Medium Adult – 7″ high
Large Adult – 8″ high
Extra-Large Adult – 9″ high

Crown after a row 12 (repeat between * across the row):

Row 1: p1 * p1, ssk, k3, k2tog, p3, k1, p2 *
Row 2: * k2, p1, k3, p5, k1 * k1
Row 3: p1 * p1, ssk, k1, k2tog, p3, k1, p2 *
Row 4: * k2, p1, k3, p3, k1 * k1
Row 5: p1 * p1, s2kp2, p3, k1, p2 *
Row 6: * k2, p1, k3, p1, k1 * k1
Row 7: p1 * s2kp2, p2, k1, p2 *
Row 8: * k2, p1, k2, p1 * k1
Row 9: p1 * k1, p1, s2kp2, p1 *
Row 10: * k1, p1 * k1
Row 11: k1 *k1, s2kp2 *

Crown after a row 20 (repeat between * across the row):

Row 1: p1 * p1, k1, p3, ssk, k3, k2tog, p2 *
Row 2: * k2, p5, k3, p1, k1 * k1
Row 3: p1 * p1, k1, p3, ssk, k1, k2tog, p2 *
Row 4: * k2, p3, k3, p1, k1 * k1
Row 5: p1 * p1, k1, p3, s2kp2, p2 *
Row 6: * k2, p1, k3, p1, k1 * k1
Row 7: p1 * p1, k1, p2, s2kp2, p1 *
Row 8: * k1, p1, k2, p1, k1 * k1
Row 9: p1 * p1, k1, p1, s2kp2 *
Row 10: * p1, k1 * p1
Row 11: k1 * s2kp2, k1 *

Cut the yarn with several inches to work with. With a yarn needle, pull the yarn through all the remaining loops, secure, seam side, secure and weave in end.

Edits:
12/8/14 – removed references to needles needed for in-the-round knitting

Reversible Cable and Lace Afghan

7 September 2014

cablelace

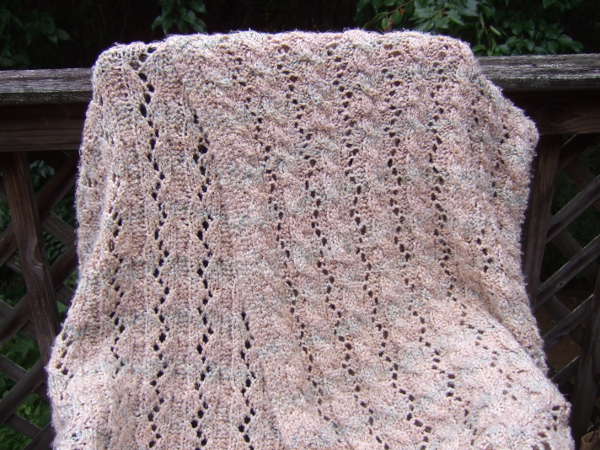
Usually knitted creations have a “right side” but this afghan has cables on one side and lace on the other. This is a practical afghan for actually using, because it is soft and warm and looks great on both sides. The example is made with Lion Brand Homespun yarn.

Sizes:

SizeWidth (Inches)Length (Inches)Ounces of yarnYards of yarn
Extra Small33.8445.1217.32533.88
Small44.5659.4130.03925.78
Medium55.2873.7146.211424.86
Large668865.872031.12
Extra Large76.72102.2989.012744.57

Gauge: 12 stitches and 18 rows = 4 inches in stockinette

Materials:
Bulky weight yarn
Size 10-1/2 (6.5 mm) knitting needles
Yarn needle

Abbreviations:
k = knit
p = purl
k2tog = knit two together
ssk = slip one knitwise, slip one knitwise, insert left needle into front of both slipped stitches and knit.
yo = yarn over
C4F = cable 4 front – Slip the next 2 stitches onto cable needle and hold in front of work. Knit the next 2 stitches from left-hand needle, knit the 2 stitches from the cable needle.

Instructions:

The number of cast on stitches should be a multiple of 8 plus 5 .

Cast on these number of stitches for these widths:
33.75″ = 101 (113 stitches in body of blanket)
44.5″ = 133 (149 stitches in body of blanket)
55.25″ = 165 (185 stitches in body of blanket)
66″ = 197 (221 stitches in body of blanket)
76.75″ = 229 (257 stitches in body of blanket)

Repeat directions between * across the row.
Row 1: k1, * p1, k1 *
Rows 2 – 6: repeat row 1
Row 7: k1, (p1, k1) twice, k1, knit in front and back of next stitch, k1, * p5, k1, knit in front and back of next stitch, k1 *, k1, (p1, k1) twice
Row 8: k1, (p1, k1) twice, p4, *k2, yo, ssk, k1, p4 *, k1, (p1, k1) twice
Row 9: k1, (p1, k1) twice, C4F, *p5, C4F *, k1, (p1, k1) twice
Row 10: k1, (p1, k1) twice, p4, *k3, yo, ssk, p4 *, k1, (p1, k1) twice
Row 11: k1, (p1, k1) twice, k4, *p5, k4 *, k1, (p1, k1) twice
Row 12: k1, (p1, k1) twice, p4, *k1, k2tog, yo, k2, p4 *, k1, (p1, k1) twice
Row 13: k1, (p1, k1) twice, k4, *p5, k4 *, k1, (p1, k1) twice
Row 14: k1, (p1, k1) twice, p4, *k2tog, yo, k3, p4 *, k1, (p1, k1) twice
Row 15: k1, (p1, k1) twice, C4F, *p5, C4F *, k1, (p1, k1) twice
Row 16: k1, (p1, k1) twice, p4, *k2, yo, ssk, k1, p4 *, k1, (p1, k1) twice
Row 17: k1, (p1, k1) twice, k4, *p5, k4 *, k1, (p1, k1) twice
Row 18: k1, (p1, k1) twice, p4, *k3, yo, ssk, p4 *, k1, (p1, k1) twice
Row 19: k1, (p1, k1) twice, k4, *p5, k4 *, k1, (p1, k1) twice
Row 20: k1, (p1, k1) twice, p4, *k1, k2tog, yo, k2, p4 *, k1, (p1, k1) twice
Row 21: k1, (p1, k1) twice, C4F, *p5, C4F *, k1, (p1, k1) twice
Row 22: k1, (p1, k1) twice, p4, *k2tog, yo, k3, p4 *, k1, (p1, k1) twice
Row 23: k1, (p1, k1) twice, k4, *p5, k4 *, k1, (p1, k1) twice
Row 24: k1, (p1, k1) twice, p4, *k2, yo, ssk, k1, p4 *, k1, (p1, k1) twice
Row 25: k1, (p1, k1) twice, k4, *p5, k4 *, k1, (p1, k1) twice
Row 26: k1, (p1, k1) twice, p4, *k3, yo, ssk, p4 *, k1, (p1, k1) twice
Row 27: k1, (p1, k1) twice, C4F, *p5, C4F *, k1, (p1, k1) twice
Row 28: k1, (p1, k1) twice, p4, *k1, k2tog, yo, k2, p4 *, k1, (p1, k1) twice
Row 29: k1, (p1, k1) twice, k4, *p5, k4 *, k1, (p1, k1) twice
Row 30: k1, (p1, k1) twice, p4, *k2tog, yo, k3, p4 *, k1, (p1, k1) twice
Row 31: k1, (p1, k1) twice, k4, *p5, k4 *, k1, (p1, k1) twice
Row 32: k1, (p1, k1) twice, p4, *k2, yo, ssk, k1, p4 *, k1, (p1, k1) twice
Row 33: k1, (p1, k1) twice, C4F, *p5, C4F *, k1, (p1, k1) twice
Row 34: k1, (p1, k1) twice, p4, *k3, yo, ssk, p4 *, k1, (p1, k1) twice
Row 35: k1, (p1, k1) twice, k4, *p5, k4 *, k1, (p1, k1) twice
Row 36: k1, (p1, k1) twice, p4, *k1, k2tog, yo, k2, p4 *, k1, (p1, k1) twice
Row 37: k1, (p1, k1) twice, k4, *p5, k4 *, k1, (p1, k1) twice
Row 38: k1, (p1, k1) twice, p4, *k2tog, yo, k3, p4 *, k1, (p1, k1) twice
Row 39: k1, (p1, k1) twice, C4F, *p5, C4F *, k1, (p1, k1) twice
Row 40: k1, (p1, k1) twice, p4, *k2, yo, ssk, k1, p4 *, k1, (p1, k1) twice
Row 41: k1, (p1, k1) twice, k4, *p5, k4 *, k1, (p1, k1) twice
Row 42: k1, (p1, k1) twice, p4, *k3, yo, ssk, p4 *, k1, (p1, k1) twice
Row 43: k1, (p1, k1) twice, k4, *p5, k4 *, k1, (p1, k1) twice
Row 44: k1, (p1, k1) twice, p4, *k1, k2tog, yo, k2, p4 *, k1, (p1, k1) twice
Row 45: k1, (p1, k1) twice, C4F, *p5, C4F *, k1, (p1, k1) twice
Row 46: k1, (p1, k1) twice, p4, *k2tog, yo, k3, p4 *, k1, (p1, k1) twice
Row 47: k1, (p1, k1) twice, k4, *p5, k4 *, k1, (p1, k1) twice
Row 48: k1, (p1, k1) twice, p4, *k2, yo, ssk, k1, p4 *, k1, (p1, k1) twice
Row 49: k1, (p1, k1) twice, k4, *p5, k4 *, k1, (p1, k1) twice
Row 50: k1, (p1, k1) twice, p4, *k3, yo, ssk, p4 *, k1, (p1, k1) twice
Row 51: k1, (p1, k1) twice, C4F, *p5, C4F *, k1, (p1, k1) twice
Row 52: k1, (p1, k1) twice, p4, *k1, k2tog, yo, k2, p4 *, k1, (p1, k1) twice
Row 53: k1, (p1, k1) twice, k4, *p5, k4 *, k1, (p1, k1) twice
Row 54: k1, (p1, k1) twice, p4, *k2tog, yo, k3, p4 *, k1, (p1, k1) twice
Row 55: k1, (p1, k1) twice, k4, *p5, k4 *, k1, (p1, k1) twice

Repeat rows 8 through 55 until blanket is desired length ending with a row 10, 16, 22, 28, 34, 40, 46 or 52. Complete these last rows:

Row 1: k1, (p1, k1) twice, k1, k2tog, k1, *p5, k1, k2tog, k1 *, k1, (p1, k1) twice
Row 2: k1, * p1, k1 *
Rows 3 – 7: repeat row 2

Cast off with last row, finish off, secure and weave in end.

Butterfly Lace Blanket

18 August 2014

butterfly

This lacy throw looks classy in a solid color, but can be made with stripes. The example is made in worsted weight acrylic yarn.

Size:
This blanket can be made any size. Five widths are given in the directions.

SizeWidth (Inches)Length (Inches)Ounces of yarnYards of yarn
Extra Small3546.6726.671376.67
Small41.6755.5637.791951.06
Medium48.3364.4450.852625.34
Large5573.3365.853399.52
Extra Large61.6782.2282.784273.6

Materials:
Worsted weight yarn
Size I (5.5mm) crochet hook

Abbreviations:
ch = chain
ch sp = chain space
dc = double crochet
sc = single crochet
tr = triple crochet
yo = yarn over

Special stitch:
Cluster – in ch sp indicated (yo, insert hook in ch sp, yo and pull up a loop, yo and draw through 2 loops on hook) three times, yo and draw through all 4 loops on hook.

There is also a chart available here.

The beginning chain should be a multiple of 12 plus 6.

For these widths, start with this number of chains:
35″ = 126
41.75″ = 150
48.25″ = 174
55″ = 198
61.75″ = 222

After the first row, make all stitches in front loops.

Row 1: Dc in 5th chain from hook. Dc in each chain across row.

Row 2: Ch 3. Turn. Dc in second dc and in each dc across. Dc in next ch.

Row 3: Ch 3. Turn. Dc in second dc and in each dc across. Dc in top of turning ch.

Row 4: Ch 1. Turn. Sc in first dc and in each of the next 6 dc. Ch 2, skip 1 dc, sc in next dc, ** skip 3 dc, work (3 tr, ch 4, sc) in next dc, ch 2, skip 1 dc, work (sc, ch 4, 3 tr) in next dc, skip 3 dc, sc in next dc, ch 2, skip 1 dc, sc in next dc. Repeat from ** to last 5 dc. Sc in each remaining dc in and in top of turning chain.

Row 5: Ch 3. Turn. Skip first sc, dc in each of next 6 sc, ch 1, dc in next ch-2 sp, ch 1, skip 3 tr, sc in top of ch-4, ch 2, work Cluster in next ch-2 sp, ch 2, skip 3 ch, sc in next ch, ch 1, ** work (dc, ch 1, dc) in next ch-2 sp, ch 1, skip 3 tr, sc in top of ch-4, ch 2, work Cluster in next ch-2 sp, ch 2, skip 3 ch, sc in next ch, ch 1. Repeat from ** to last ch-2 sp. Dc in last ch-2 sp, ch 1, dc in each of last 7 sc.

Row 6: Ch 1. Turn. Sc in first dc and in each of the next 6 dc. ch 2, skip (ch and dc), ** sc in next ch-1 sp, work (3 tr, ch 4, sc) in next ch-2 sp, ch 2, skip Cluster, work (sc, ch 4, 3 tr) in next ch-2 sp, sc in next ch-1 sp, ch 2, skip 1 ch-1 sp. Repeat from ** to last 6 dc and turning chain. Sc in each remaining dc in and in top of turning chain.

Repeat rows 5 and 6 until afghan is desired length. After a row 5, work these final three rows.

Third to last row: Ch 3. Turn. Dc in second dc and in each st across. Dc in top of turning ch.

Second to last row: Ch 3. Turn. Dc in second dc and in each dc across. Dc in top of turning ch.

Last row: Ch 3. Turn. Dc in second dc and in each dc across. Dc in top of turning ch. Finish off and weave in end.

The blanket can be made in a solid color or can be made with any number of color changes. The best way to make a color change is to finish all but the very last pull through of the two loops of the last stitch of a row. Cut yarn with a few inches of tail and join with new color next to stitch. Pull new color through last two loops. Weave in ends.

Edits:
4/24/17 – Added link to chart.

No Beginning Chain Diamond Lace Throw

26 July 2014

diamondlace2

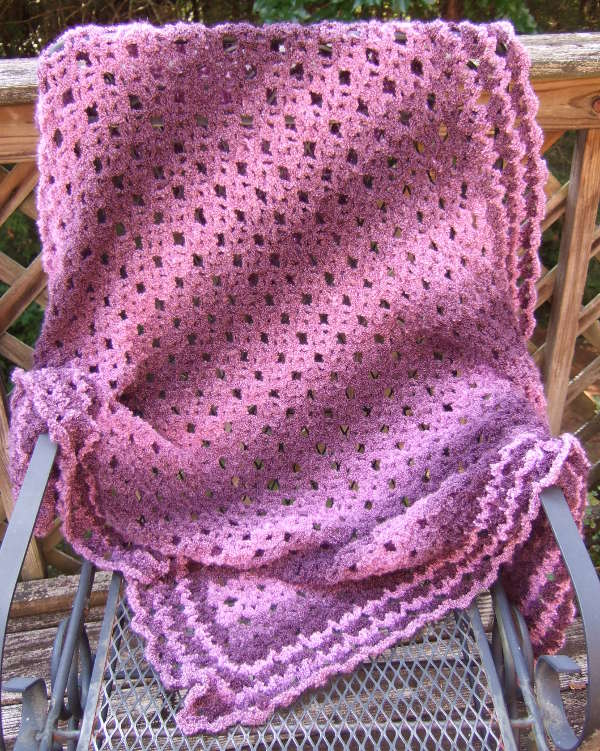
The first row of an afghan with homespun or bouclé or other knobby style yarn can be frustrating. This afghan does not require finding chain stitches, even for the first row. The lacy diamond pattern keeps the afghan light even with a heavier yarn.

This pattern was designed to be easy for homespun or bouclé style yarns, but it can be made with just about any yarn. Make it in a solid color or with as many color changes as you like.

The example is made in Jo-Ann Sensations Rainbow Boucle (now made by Purl Essence).

Size: This blanket can be made any size. Five widths are given in the directions.

SizeWidth (Inches)Length (Inches)Ounces of yarnYards of yarn
Extra Small30407.87610.32
Small34.6246.1510.48812.56
Medium39.2352.3113.461043.69
Large43.8558.4616.811303.71
Extra Large48.4664.6220.541592.62

Materials:
Yarn – Sizing given for Bulky weight yarn but other weights can be used
Size I (5.5mm) crochet hook

Abbreviations:
ch = chain
ch sp = chain space
dc = double crochet
sc = single crochet
tr = triple crochet

Special stitches:
Shell – work the following in the ch sp indicated: 2 dc, ch 2, 2 dc
V-stitch – work the following in ch sp indicated: 1 dc, ch 1, 1 dc

Instructions:
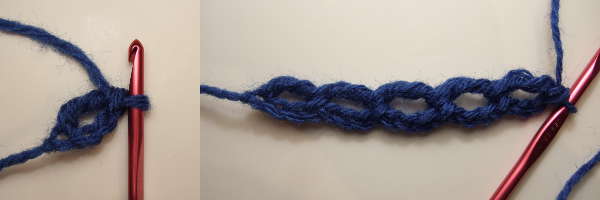
Instead of a beginning chain, the blanket is begun with a first row of chain and tr spaces.
For these widths, start with this number of chain and tr spaces:
30″ = 39
34.5″ = 45
39.25″ = 51
43.75″ = 57
48.5″ = 63

Row 1: Ch 3, tr in first ch, (ch 3, tr in last ch sp) until you have made desired number of tr/ch spaces. Make an odd number of tr/ch spaces.

Do not turn.

dlt1

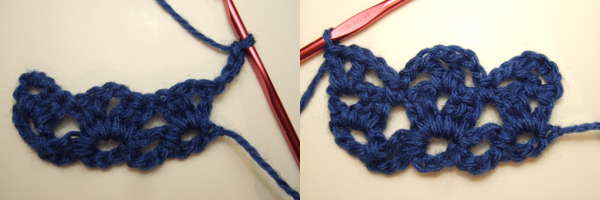
Row 2: Ch 4. Without turning the work, make 2 dc in first space (over tr just made). Working across the spaces (holding it so that the tr stitches are on top, so work will be made over the tr stitches), skip one space and make a Shell in the next space across to the last two spaces. In the last space make 2 dc, ch 1, 1 dc.

dlt2

Row 3: Ch 4 and turn. 1 dc in ch-1 sp, ch 2, sc in space before next Shell (between dc of partial Shell and first full Shell) ** ch 2, V-stitch in ch-2 space of Shell, ch 2, sc in space between Shells. Repeat from ** across to end with the last sc made between the last full shell and the partial shell at the end of the row. Ch 2, V-stitch in ch-4 space.

dlt3

Row 4: Ch 4 and turn. 2 dc in ch-1 sp, ** skip ch-2, skip sc, skip ch-2, Shell in the next V-stitch. Repeat from ** across to ch-4 turning chain. Skip ch-2, skip sc, skip ch-2, (2 dc, ch 1, 1 dc) in ch-4 sp.

dlt4

Repeat rows 3 and 4 until afghan is desired length. If no additional border is desired, finish off and weave in end.

Optional border – end with a row 3.

Border round 1: Ch 3 and turn. (1 dc, ch 2, 2 dc) in ch-1 sp, ** skip ch-2, skip sc, skip ch-2, Shell in the next V-stitch. Repeat from ** across the top of the throw to the ch-4 turning chain. Work the following in the ch-4 turning chain sp: shell, ch 2, shell. Mark the 2-ch between the shells as the corner. On the side of the throw, make a shell in each space formed by the ch-4 turning chain of the rows. At the bottom corner, in the ch-3/tr space at the corner work (shell, ch 2, shell). Mark the 2-ch between the shells as the corner. Working across the ch-3 spaces at the bottom of the blanket, (skip one space and make a Shell in the next space) across to the last two spaces. In the last space work (shell, ch 2, shell). Mark the 2-ch between the shells as the corner. On the side of the throw, make a shell in each space formed by the final dc of the rows. Ch 2, slip stitch to join in the third chain of the first shell of the round. Mark the 2-ch between the shells as the corner. Do not turn.

Border round 2: Slip stitch in the next dc, slip stitch in the ch-2 space, ch 4, dc in same ch-2 space [** ch 2, sc in space before next Shell, ch 2, V-stitch in ch-2 space of Shell. Repeat from ** across to the corner, ch 2, (sc, ch 2, V-stitch, ch 2, sc) in the corner ch-2 space, move the corner marker to this last V-stitch, ch 2, V-stitch in the ch-2 space of the shell] four times, but on the last repeat, exclude the last V-stitch, join with a slip stitch in the third chain. Do not turn.

Border round 3: Slip stitch in the ch sp. Ch 3, (1 dc, ch 1, 2 dc) in same sp. Make a shell in the ch-1 space of each V-stitch around, except at each corner, make (shell, ch 2, shell) in the ch-1 space of the corner V-stitch. Move the corner marker to the ch-2. Join in the third chain of the first shell of the round. Do not turn.

Rounds 2 and 3 can be repeated to desired width. Finish off and weave in end.

The blanket can be made in a solid color or can be made with any number of color changes. The best way to make a color change is to finish all but the very last pull through of the two loops of the last stitch of a row. Cut yarn with a few inches of tail and join with new color next to stitch. Pull new color through last two loops. Weave in ends.

Edits:
11/8/14 – corrected typos in Border round 2
3/19/17 – added photos for all rows

Interview on Stitch and Unwind

21 July 2014

 
Kara Huen of AllFreeCrochet interviewed me and posted the interview on Stitch and Unwind. You can see it here:

http://stitchandunwind.com/crochet-exclusive-lets-talk-to-heather-tucker/

Little Checks Wrap

3 April 2014

pinkwrap3

pinkwrap2

This is a quick to crochet wrap that is good for someone wheelchair bound. The little check pattern adds character without making the wrap too lacy.

The example is made in worsted weight acrylic yarn

Size: The sample is 18-½” from neck to edge. The bottom of each of the four panels is 26-½” wide.

Materials:

14.7 oz/937 yds worsted weight yarn

Size H (5mm) crochet hook

Abbreviations:

ch = chain

ch sp = chain space

dc = double crochet

shell = 2 dc, 1 ch, 2 dc in chain space indicated

Instructions:

There is also a tutorial video for this pattern.

Make all stitches in both loops.

Chain 131 and finish off. This will form the foundation and ties.

Row 1: Form a new slip knot. Skip 40 chains. Dc in each of the next 4 ch, 2 dc in next ch, dc in each of next 8 ch, (2 dc in next ch, dc in next ch, 2 dc in next ch, dc in each of next 8 ch) three times, 2 dc in next ch, dc in each of next 4 ch. (leave the remaining 40 ch)

Row 2: Ch 3, turn. Shell in 4th dc, ** (skip 2 dc, 2 dc in space between dc) five times, skip 2 dc, shell in next dc. Repeat from ** three more times, skip 2 dc, dc in last dc.

Row 3: Ch 3, turn. Shell in next shell, ** 2 dc between shell and 2 dc set, 2 dc between each 2 dc set across the panel, 2 dc between the last 2 dc set of the panel and the shell, shell in the shell. Repeat from ** for the other three panels, dc in the top of the turning chain.

Repeat row 3 until wrap is desired size, then finish off with the last row given below. The sample has 37 rows, including the last row.

Last Row: Ch 3, turn. Dc in 2nd and 3rd dc, 3 dc in ch-1 sp, (dc in each dc across to next ch-1 sp, 3 dc in ch-1 sp) four times, dc in each of last two dc, dc in turning chain. Finish off and weave in end.

The wrap can be made in a solid color or can be made with any number of color changes. The best way to make a color change is to finish all but the very last pull through of the two loops of the last stitch of a row. Cut yarn with a few inches of tail and join with new color next to stitch. Pull new color through last two loops. Weave in ends.

Optional larger neck opening:

Chain 147 and finish off. This will form the foundation and ties.

Row 1: Form a new slip knot. Skip 40 chains. Dc in each of the next 4 ch, 2 dc in next ch, dc in each of next 12 ch, (2 dc in next ch, dc in next ch, 2 dc in next ch, dc in each of next 12 ch) three times, 2 dc in next ch, dc in each of next 4 ch. (leave the remaining 40 ch)

Row 2: Ch 3, turn. Shell in 4th dc, ** (skip 2 dc, 2 dc in space between dc) seven times, skip 2 dc, shell in next dc. Repeat from ** three more times, skip 2 dc, dc in last dc.

Continue standard pattern.

Updates:
6/11/2017 – Added optional larger neck opening instructions.

Permissions for Using My Patterns

4 March 2014

 
Some of you have asked for written guidelines on how the patterns found here may be used. These permissions have been provided, and, fortunately, there are very few limitations. I love seeing how many items are created for charity, sale and just personal use, and I certainly encourage you to keep making and using your beautiful things any way you see fit!

Please see the Using My Patterns page linked in the menubar above and at the end of each of my patterns for more details.

« Previous PageNext Page »