Monthly Archives: September 2013

Quick Crazy Block Scarf

29 September 2013

crazyblockscarf

Make good use of those single skeins of homespun or bouclé or other knobby style yarns that have been just sitting in your stash. This scarf does not require finding chain stitches, even for the first row. Every side has a fun and pretty zig-zag shape.

This pattern was designed to be easy for homespun or bouclé style yarns, but it can be made with just about any yarn. Make it in a solid color or with as many color changes as you like.

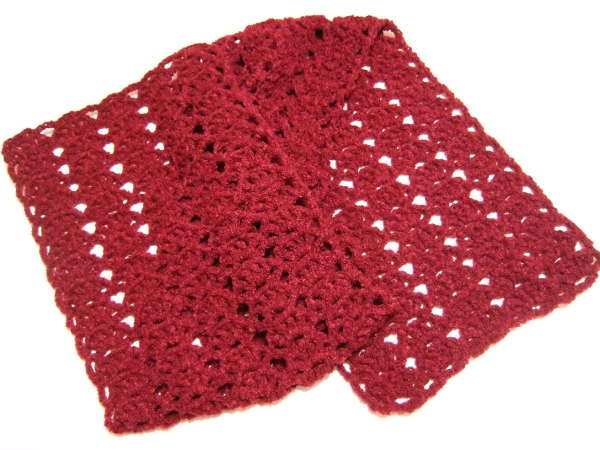
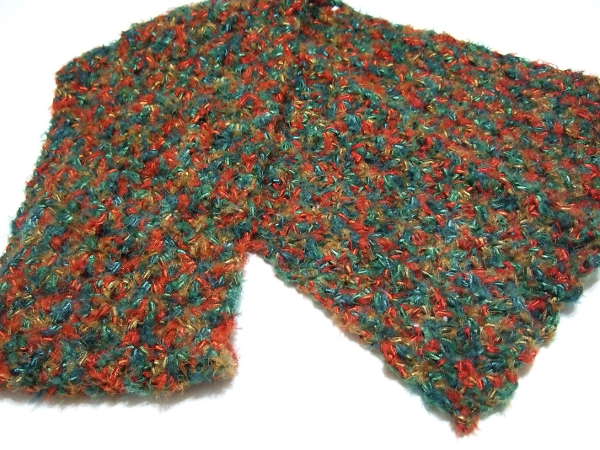
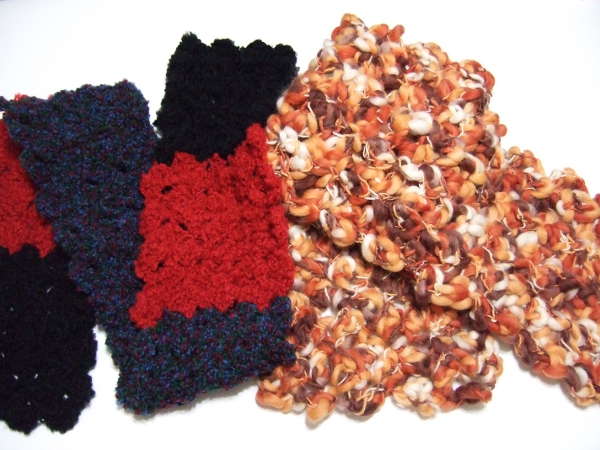
The scarf on the left is made from Bernat Soft Bouclé, a bulky weight acrylic yarn. The scarf on the right is made from Jo-Ann Sensations Marvel, a super bulky wool yarn.

Size: The scarf on the left is 6″ by 45″. The scarf on the right is 8″ by 48″.

Materials:
Yarn – The scarf on the left was made with 148 yards/80 grams of Bernat Soft Bouclé. The scarf on the right was made with 196 yards/200 grams of Jo-Ann Sensations Marvel.
The scarf on the left was made with Size I (5.5mm) crochet hook. The scarf on the right was made with Size N (10mm) crochet hook. Use the appropriate sized hook for the yarn you choose to use.

Abbreviations:
ch = chain
ch sp = chain space
dc = double crochet
sc = single crochet
sl st = slip stitch

Instructions:

Instead of a beginning chain, the scarf is begun with a first row of blocks.

The scarf on the left was begun with 4 blocks. The scarf on the right was begun with 5 blocks. Start with the number of blocks to make the scarf whatever width you desire.

There is a photo tutorial, chart and a video demonstrating the technique of this pattern.

Row 1 Block: Chain 6. Join with a sl st in first chain. Chain 3. 2 dc in ch 6 sp.
Make these blocks until desired width.

Do not turn.

Row 2: Ch3. Without turning the work, rotate so that the following is worked across the chain loops created in the first row. In each of the chain spaces, (sc, ch3, 3dc) in ch sp.

Row 3: Ch 3 and turn. In each of the chain spaces, (sc, ch3, 3dc) in ch sp.

Repeat row 3 until afghan is desired length. Finish off and weave in end.

The scarf can be made in a solid color or can be made with any number of color changes. The best way to make a color change is to finish all but the very last pull through of the two loops of the last stitch of a row. Cut yarn with a few inches of tail and join with new color next to stitch. Pull new color through last two loops. Weave in ends.

Quick Lacy Shell Scarf

29 September 2013

lacyshellscarf

This is a great use of those single skeins of homespun or bouclé or other knobby style yarn you have in your stash. This scarf does not require finding chain stitches, even for the first row. The lacy shells keep the scarf light even with a heavier yarn.

This pattern was designed to be easy for homespun or bouclé style yarns, but it can be made with just about any yarn. Make it in a solid color or with as many color changes as you like.

The example is made in Red Heart Plush, an Aran weight plush textured yarn.

Size: The example is 10.5″ by 49″, but can be easily adjusted to make any size.

Materials:
The example was made with 230.7 yards/141 grams of Red Heart Plush.
Size I (5.5mm) crochet hook, but use hook size appropriate to yarn if other yarn is used.

Abbreviations:
ch = chain
ch sp = chain space
dc = double crochet
sc = single crochet
tr = triple crochet

Special stitch:
Shell – work the following in the ch sp or over stitch indicated: (1 dc, ch 1) three times, 1 dc

Instructions:

Instead of a beginning chain, the scarf is begun with a first row of chain and tr spaces.

The example was made with 9 tr/ch spaces. You can make the scarf narrower or wider by decreasing or increasing the number of tr/ch spaces.

Row 1: Ch 5, sc in first ch, (ch 3, tr in last ch sp) odd number of times, ch 3, dc in last ch sp.

Do not turn.

Row 2: Ch 1. Without turning the work, sc over dc just made. Working across the tr stitches, ch 1, shell over first tr, ch 1, ** sc over next tr, ch 1, shell over next tr, ch 1. Repeat from ** across all the tr stitches. Sc in ch 5 sp at end of row.

Row 3: Ch 4 and turn. Sc in first ch-1 sp of first shell, ch 3, sc in third ch-1 sp of same shell, ** ch 3, sc in first ch-1 sp of next shell, ch 3, sc in third ch-1 sp of same shell. Repeat from ** across all the shells. Ch 2, dc in ch space from row before shell row.

Row 4: Ch 1 and turn. Sc in ch-2 sp. Ch 1, shell in first ch-3 sp, ch 1, ** sc in next ch-3 sp, ch 1, shell in next ch-3 sp, ch 1. Repeat from ** across all the ch-3 spaces. Sc in ch 4 sp at end of row.

Repeat row 3 and 4 until scarf is desired length.

For straight sides – End with a row 3. Finish off and weave in end.

For scalloped sides – You will need to have an odd number of shell rows. End with a row 4. In same ch sp, ch 1, shell, ch 1, sc. Working across the ch-4 spaces on the side, (ch 1, shell in next ch-4 sp, ch 1, sc in next ch-4 sp). At the last ch-4, after the sc, also work, ch 1, shell, ch 1, sc. Working across bottom of afghan in the ch-3 spaces, (ch 1, shell in next ch-3 sp, ch 1, sc in next ch-3 sp). After the last sc, in same sp also work, ch 1, shell, ch 1, sc. Working across last side of dc stitches,  (ch 1, over next dc, ch 1, sc over next dc). At last corner also work, ch 1, shell, ch 1. Join with sc from the beginning of the last row 4. Finish off and weave in end.

The scarf can be made in a solid color or can be made with any number of color changes. The best way to make a color change is to finish all but the very last pull through of the two loops of the last stitch of a row. Cut yarn with a few inches of tail and join with new color next to stitch. Pull new color through last two loops. Weave in ends.

Edits:
1/23/2017 – changed “over” to “in” on row 4.

Quick Shell Scarf

29 September 2013

quickshellscarf

Do you have some single skeins of homespun, bouclé or ribbon yarn and you haven’t found a purpose for it? Crocheting with textured and specialty yarns can be frustrating because sometimes it is hard to find stitches. This scarf does not require finding chain stitches, even for the first row.

This pattern was designed to be easy for homespun or bouclé style yarns, but it can be made with just about any yarn. Make it in a solid color or with as many color changes as you like.

The example is made with Yarn Bee Topkapi, a fuzzy ribbon yarn (DK weight).

Size: The example is 6″ wide and 60″ long but can be adjusted to any size you like.

Materials:
Yarn – example was made using 262 yards/200 grams of Yarn Bee Topkapi.
Size I (5.5mm) crochet hook or size appropriate to yarn used.

Abbreviations:
ch = chain
ch sp = chain space
dc = double crochet
sc = single crochet
tr = treble/triple crochet

Instructions:

There is a tutorial video available for the similar blanket.

Instead of a beginning chain, the scarf is begun with a first row of chain and tr spaces.

The example was made using 7 beginning chain and tr spaces. Make the scarf wider by adding more beginning chain and tr spaces. You need to begin with an odd number.

Row 1: Ch 3, tr in first ch, (ch 3, tr in last ch sp) even number of times.

Do not turn.

Row 2: Ch 4. Without turning the work, 2 dc over tr just made. Working across the tr stitches, (sc, ch 3, sc) over next tr, ** (2 dc, ch 2, 2 dc) over next tr, (sc, ch 3, sc) over next tr. Repeat from ** across all but last tr stitch. Over last tr, 2 dc, 1 tr.

Row 3: Ch 3 and turn. Sc in space between tr and dc. ** (2 Dc, ch 2, 2 dc) in ch-3 sp, (sc, ch3, sc) in ch-2 sp. Repeat from ** across to last 2 dc and turning chain. (Sc, ch 1, dc) in space between 2nd dc and turning chain.

Row 4: Ch 4 and turn. 2 dc in ch-1 sp. (Sc, ch 3, sc) in ch-2 sp, ** (2 dc, ch 2, 2 dc) in ch-3 sp, (sc, ch 3, sc) in ch-2 sp. Repeat from ** across to last ch-3 sp. (2 Dc, 1 tr) in last ch-3 sp.

Repeat row 3 and 4 until scarf is desired length. Finish off and weave in end.

The scarf can be made in a solid color or can be made with any number of color changes. The best way to make a color change is to finish all but the very last pull through of the two loops of the last stitch of a row. Cut yarn with a few inches of tail and join with new color next to stitch. Pull new color through last two loops. Weave in ends.

Embossed Leaves Hat

2 September 2013

EmbossedLeaves

The knit stitch leaves stand out against a purl background, which makes this hat very stretchy. The poles the leaves climb meet very neatly at the crown. The bottom edge has a very slight scallop.

This is the in-the-round version of the pattern. There is a straight needle version here.

Sizes: The circumference measurements given are unstretched. This is a very stretchy hat.

SizeCircumference (Inches)Height (Inches)Ounces of yarnYards of yarn
Baby10.755.50.6241.13
Toddler13.256.50.9361.44
Child167.51.385.77
Medium Adult18.758.751.73114.11
Large Adult21.259.752.22146.46
Extra-Large Adult2410.752.78182.83

Gauge: 17 stitches and 23 rows = 4 inches in stockinette

Materials:
worsted weight yarn (see chart above for amount)
Size 8 (5 mm) 47″ circular needle (for magic loop) or set of size 8 (5 mm) double pointed needles
Yarn needle

Abbreviations:
k = knit
p = purl
m1 = make one: With left needle pick up thread between last and next stitch inserting front to back. With right needle knit back loop.
k2tog = knit two together
ssk = slip one knitwise, slip one knitwise, insert left needle into front of both slipped stitches and knit.
s1k-k2tog-psso = slip1 knitwise, k2tog, pass slipped stitch over
s2kp2 = slip2 (together, knitwise), k1, pass 2 slipped stitches over

Pattern:

Amount to cast on for the different sizes:

Baby = 56
Toddler = 70
Child = 84
Medium Adult = 98
Large Adult = 112
Extra-Large Adult = 126

Join to knit in the round. Divide stitches between double pointed needles or needles for a magic loop. Divide with multiples of 14 on each needle.

Repeat instructions across the round:

Rnds 1-4: p1, k1
Rnd 5: p1, m1, k1, m1, p3, k1, p1, s1k-k2tog-psso, p1, k1, p2
Rnd 6: p1, k3, p3, k1, p1, k1, p1, k1, p2
Rnd 7: p1, k1, m1, k1, m1, k1, p3, ssk, k1, k2tog, p2
Rnd 8: p1, k5, p3, k3, p2
Rnd 9: p1, k2, m1, k1, m1, k2, p3, s2kp2, p2
Rnd 10: p1, k7, p3, k1, p2
Rnd 11: p1, k7, p3, k1, p2
Rnd 12: p1, k7, p3, k1, p2
Rnd 13: p1, ssk , k3, k2tog, p3, m1, k1, m1, p2
Rnd 14: p1, k5, p3, k3, p2
Rnd 15: p1, ssk, k1, k2tog, p3, k1, m1, k1, m1, k1, p2
Rnd 16: p1, k3, p3, k5, p2
Rnd 17: p1, s2kp2, p3, k2, m1, k1, m1, k2, p2
Rnd 18: p1, k1, p3, k7, p2
Rnd 19: p1, k1, p3, k7, p2
Rnd 20: p1, k1, p3, k7, p2
Rnd 21: p1, m1, k1, m1, p3, ssk, k3, k2tog, p2
Rnd 22: p1, k3, p3, k5, p2
Rnd 23: p1, k1, m1, k1, m1, k1, p3, ssk, k1, k2tog, p2
Rnd 24: p1, k5, p3, k3, p2
Rnd 25: p1, k2, m1, k1, m1, k2, p3, s2kp2, p2

Repeat rounds 10 – 25 until the hat measures 1.75 inches less than desired finished length. Begin crown after a rnd 12 or a rnd 20.

Measurements from edge before beginning crown:

Baby – 3.75″ high
Toddler – 4.75″ high
Child – 5.75″ high
Medium Adult – 7″ high
Large Adult – 8″ high
Extra-Large Adult – 9″ high

Crown after a rnd 12 (repeat across the round):

Rnd 1: p1, ssk, k3, k2tog, p3, k1, p2
Rnd 2: p1, k5, p3, k1, p2
Rnd 3: p1, ssk, k1, k2tog, p3, k1, p2
Rnd 4: p1, k3, p3, k1, p2
Rnd 5: p1, s2kp2, p3, k1, p2
Rnd 6: p1, k1, p3, k1, p2
Rnd 7: s2kp2, p2, k1, p2
Rnd 8: k1, p2, k1, p2
Rnd 9: k1, p1, s2kp2, p1
Rnd 10: k1, p1
Rnd 11: k1, s2kp2

Crown after a rnd 20 (repeat across the round):

Rnd 1: p1, k1, p3, ssk, k3, k2tog, p2
Rnd 2: p1, k1, p3, k5, p2
Rnd 3: p1, k1, p3, ssk, k1, k2tog, p2
Rnd 4: p1, k1, p3, k3, p2
Rnd 5: p1, k1, p3, s2kp2, p2
Rnd 6: p1, k1, p3, k1, p2
Rnd 7: p1, k1, p2, s2kp2, p1
Rnd 8: p1, k1, p2, k1, p1
Rnd 9: p1, k1, p1, s2kp2
Rnd 10: p1, k1
Rnd 11: s2kp2, k1

Cut the yarn with several inches to work with. With a yarn needle, pull the yarn through all the remaining loops, secure and weave in end.