
Dripping Lines Blanket

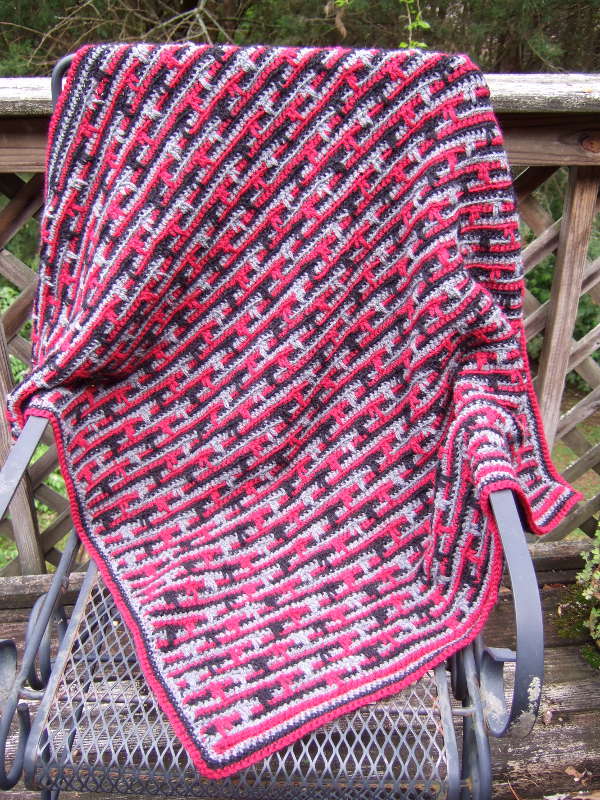
Little stripes of color look so fun, but weaving in ends from lots of color changes is far from fun. This blanket is designed to make it possible to change between three colors without cutting the yarn between stripes. The “drips” add interest to an otherwise just plain striped blanket.
Size: This blanket can be made any size. Five widths are given in the directions.
| Size | Width (Inches) | Length (Inches) | Ounces of yarn per color | Yards of yarn per color |
| Extra Small | 26.52 | 35.36 | 3.7 | 80.97 |
| Small | 39 | 52 | 8 | 175.11 |
| Medium | 51.48 | 68.64 | 13.94 | 305.11 |
| Large | 63.96 | 85.28 | 21.52 | 470.98 |
| Extra Large | 76.44 | 101.92 | 30.73 | 672.71 |
Materials:
Worsted weight yarn in three colors
Size I (5.5mm) crochet hook
Abbreviations:
ch = chain
sc = single crochet
Special stitches:
ldc – long double crochet – yo, insert hook in stitch a row below next sc, yo and pull up a loop even with last stitch made, (yo and draw through two loops on hook) twice.
eldc – extended long double crochet – yo, insert hook in stitch 2 rows below next sc, yo and pull up a loop even with last stitch made, (yo and draw through two loops on hook) twice.
You can see a demonstration of these stitches in this video – http://www.youtube.com/watch?v=eSuvSZPGiLM&feature=youtu.be
The beginning chain should be a multiple of 40 plus 5.
For these widths, start with this number of chains:
26.5″ = 85
39″ = 125
51.5″ = 165
64″ = 205
76.5″ = 245
How to change colors for this blanket:
For making this blanket, you will use 3 colors that will stay attached to the work. You will drop and take up colors at the ends of rows, but will not have to cut or restart a color except to start a new skein. At the end of each row, finish all but the last pull through the two loops to finish the sc. Use the other color waiting at the end of that row to pull up through that loop. Use it to continue the next row back across to the other side.
After the first row, make all stitches in front loop.
Make beginning chain (see above for number of chains) in color A.
Beginning Border Row 1: Sc in second ch from hook, sc in each ch to the end of the row. On the last sc, finish all the but the last pull through the two loops. Attach color B, drop color A and pull color B through those last two loops.
Beginning Border Row 2: Color B. Ch 1, turn. Sc in first sc, sc in each sc to end of the row. On the last sc, finish all the but the last pull through the two loops. Attach color C, drop color B and pull color C through those last two loops.
Beginning Border Row 3: Color C. Ch 1, turn. Sc in first sc, sc in each sc to end of the row. On the last sc, finish all the but the last pull through the two loops. Drop color C and pull color A through those last two loops.
Continue this way of changing colors each row for the rest of the blanket. You will always know what color to change to because it will be the yarn waiting for you at the end of the row.
Repeat these 10 rows for the length of the blanket, continuing to change color each row in the same manner as above. There are not colors given on these rows because they rotate throughout the length of the blanket.
Row 1: Ch 1, turn. Sc in first sc, sc in next sc, working across the prior row stitches * eldc, ldc, 16 sc, ldc, eldc, 20 sc. Repeat from * across to the last two stitches. Sc in each of the last two stitches.
Row 2: Ch 1, turn. Sc in first sc, sc in next sc, working across the prior row stitches * 16 sc, eldc, ldc, 16 sc, ldc, eldc, 4 sc. Repeat from * across to the last two stitches. Sc in each of the last two stitches.
Row 3: Ch 1, turn. Sc in first sc, sc in next sc, working across the prior row stitches * 8 sc, eldc, ldc, 16 sc, ldc, eldc, 12 sc. Repeat from * across to the last two stitches. Sc in each of the last two stitches.
Row 4: Ch 1, turn. Sc in first sc, sc in next sc, working across the prior row stitches * 8 sc, eldc, ldc, 16 sc, ldc, eldc, 12 sc. Repeat from * across to the last two stitches. Sc in each of the last two stitches.
Row 5: Ch 1, turn. Sc in first sc, sc in next sc, working across the prior row stitches * 16 sc, eldc, ldc, 16 sc, ldc, eldc, 4 sc. Repeat from * across to the last two stitches. Sc in each of the last two stitches.
Row 6: Ch 1, turn. Sc in first sc, sc in next sc, working across the prior row stitches * eldc, ldc, 16 sc, ldc, eldc, 20 sc. Repeat from * across to the last two stitches. Sc in each of the last two stitches.
Row 7: Ch 1, turn. Sc in first sc, sc in next sc, working across the prior row stitches * 2 sc, ldc, eldc, 20 sc, eldc, ldc, 14 sc. Repeat from * across to the last two stitches. Sc in each of the last two stitches.
Row 8: Ch 1, turn. Sc in first sc, sc in next sc, working across the prior row stitches * 10 sc, ldc, eldc, 20 sc, eldc, ldc, 6 sc. Repeat from * across to the last two stitches. Sc in each of the last two stitches.
Row 9: Ch 1, turn. Sc in first sc, sc in next sc, working across the prior row stitches * 10 sc, ldc, eldc, 20 sc, eldc, ldc, 6 sc. Repeat from * across to the last two stitches. Sc in each of the last two stitches.
Row 10: Ch 1, turn. Sc in first sc, sc in next sc, working across the prior row stitches * 2 sc, ldc, eldc, 20 sc, eldc, ldc, 14 sc. Repeat from * across to the last two stitches. Sc in each of the last two stitches.
Finishing and border:
End with a color C row. Finish off. Cut the color A yarn and tie to the color C tail to finish off color A.
Round 1: At the beginning of the last row, insert hook into back loop of first sc and pull up a loop of color B. Ch 1, sc in first sc and sc across the top in each stitch to the last sc. Make 2 sc in the last sc of the top row. Sc in the side of each stitch going down the side of the blanket, working over the loops where the colors were changed at the sides to hide them. On the bottom, work across the bottom loops of each stitch, making 2 sc in the first and last stitches of the bottom, and 1 sc in each stitch between. Sc in the side of each stitch going down the side of the blanket, working over the loops where the colors were changed at the sides to hide them. Make another sc in the first stitch of the top row. Switch to color C. Sl st in the first stitch of the round to join.
Round 2: Ch 1, sc in same sc, sc in each sc around, with 3 sc in each corner sc. Once reaching the beginning, switch to color A. Sl st in the first stitch of the round to join.
Round 3: Ch 1, sc in same sc, sc in each sc around, with 3 sc in each corner sc. Once reaching the beginning, sl st in the first stitch of the round to join.


This blanket is so beautiful and I love the colors. Thank you for sharing this pattern with us. I haven’t crocheted for quite some time but am getting ready to go again ~ this will be my first fun thing to do.
God bless
Carol
I love all your patterns. Thank you for sharing your skills. I so
appreciate your wonderful work.
Thank you for this beautiful blanket pattern. I will enjoy making it.
This is very pretty. I like the idea of not having to tie in ends so often. I have wanted to try this type of changing colors and this would be great.
Thanks
It is so gorgeous. Thank you. I LOVE that you give the different sizes. Wish everyone did or at least give the multiples to increase.
God bless you.
V
This technique is also known as Apache Tears..nice to see a version that does not cut a thousand threads.
Such a great idea I hate the weaving ends in, that’s why normally I don’t make a blanket with different colors if I want different colors i’ll use verigated yarn. This afghan I would actually make Thank You!
Thank you for the lovely pattern. I have never seen this type of stitch before. What a wonderful way to integrate different colors without having to weave ends in. I hate weaving ends in and have always chosen to use variegated yarn instead. Thank you also for the info on different sizes! This is a keeper.
I made this blanket for my son in tan, light blue, and navy blue. He is nine years old and asked for a blanket that he could keep until he, “gets old.” We were looking for something that wasn’t too childish or girly. I knew when I saw this one that it would be perfect. He is also projected by the doctor to be at least 6’4″ when he is done growing so I needed one that would be a very large blanket as well. With the size chart you created I was able to make an extra large for him. He loves it!!!! Now my daughter (10) wants one done in different colors. Looks like I’m not finished yet. 🙂
Love you patterns. I’ve done one afghans and your pot holder all ready. I’ve just started on the dripping line blanket now. I’m working on the one that chains 205 stitches. When I get to the end of the 4th row that starts the long doubles I have been ending up with only 3 stitches at the end I can’t get that figured out can you help me. Thank you
those 3 stitches would count for the two doubles with only 1 stitch for the last two single stitches Sorry I didn’t make that clear. I do have 205 stitches across.Thanks
Starting with a chain of 205, making the first sc of the first foundation row in the second chain would result in 204 sc. So each of the foundation rows should have 204 stitches. There are two stitches at the beginning of the 4th row, 40 stitches between the *’s which are repeated 5 times and then two more stitches at the end. It sounds like you have an extra stitch in your foundation rows and that you didn’t make the two sc at the beginning of the row that are not in the repeated section.
thank you very much. I have been working on it and finally figured out what I was doing wrong. Your reply Makes me feel better because I’m getting ready to start the 1st. row of the pattern.
Have a good one
Holly
So pretty–can’t wait to start! Can you please tell me what the reverse side of this blanket looks like? Thanks!!
It looks the same on both sides.
Finished the blanket, for a baby, with pale pastels. Came out gorgeous–new mom and grandmom were thrilled. Thanks so much!
Are your stitches for your directions in American or european ? As some stitches are different between the 2
American.
Clever!! I hate weaving in lots of little ends, but I never would have thought of making them a design feature! Your patterns are beautiful, and so many of them–and so many that will be great for charity stitching, too. HOW will I ever choose which one to do first?? 🙂 Thanks for sharing!
Hi
I love this blanket and want to make it for my god daughter. However. we are in Australia and use UK terms so would have to convert. I dont mind doig that but cannot cut and past from the PDf. I find it too confusing converting as i go. is there some way i can obtain this pattern in UK/Aus terms?
Would it work if I made a PDF of it for you in UK/Aus terms?
Would love to try this Looks a wee bit too difficult for me It’s gorgeous. Thank you
Your instructions say to make all stitches in the front loop after the first row. Is that the first row in the repeating patter or after Border Row 1? Thanks in advance. I am making this with grey, teal, and white and can’t wait to get this finished!
The row after the row made in the initial chain.
With the pattern says you start with the border first, then start row 1.
Correct. Make the 3 border rows then begin row 1.
I am not sure I understand how you are changing color. At the end of the row when you have two loops left on your hook, you pick up a new color and drop the beginning color and finish the stitch. You then do the same for the next color. Wouldn’t you be left with extra loops of previous colors that aren’t worked? Or are they somehow worked into the pattern?
When you get to the end of the row using color A and have the last two loops of the last sc, before YO and pulling through those last two loops, drop yarn color A and use yarn color B to YO and pull through the two loops to complete the sc. You don’t drop any loops, just switch the yarn you are using. You will use color B to turn and continue back to the other side. The color A yarn will be extending off that side, but will be used again when you come back using color C and will switch to color A. All loops are worked but there are always two extra sources of yarn that will be extending from the opposite sides.
Thank you. I did a swatch using 45 chains to see what you are saying and I see how it works. I am trying to decide between doing the ribbed ripple reversible afghan or this one. I know it really is subjective, but about how long does it take to make the small size for this one? Also, even making my small swatch, the colors seem to be getting tangled with each other. Do you have a suggestion and how to minimize that?
The ribbed ripple reversible will go at least twice as fast because it’s in dc versus sc and doesn’t have the extra yarn to deal with. My only tip on keeping the yarns from tangling is to untwist them every few rows so that they don’t get knotted.
[…] 39. Dripping Lines Blanket by Heather Tucker […]